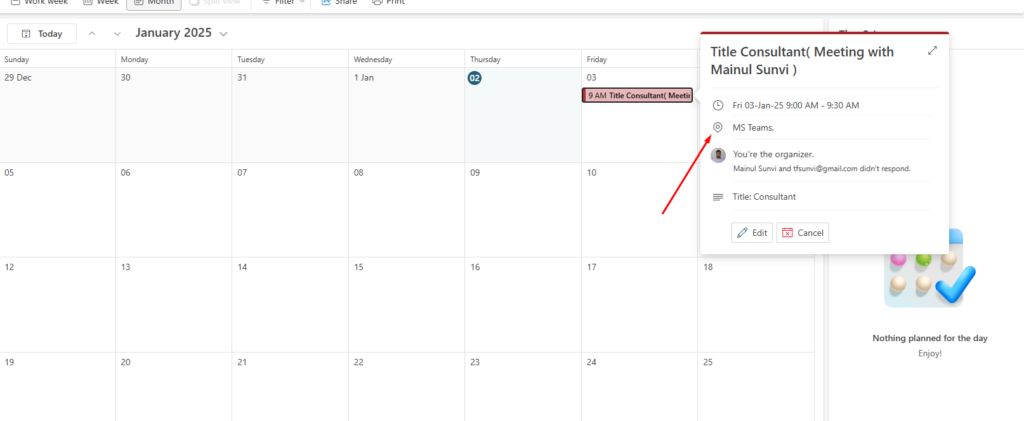
Hydra Booking now offers seamless integration with Outlook Calendar, taking your booking and appointment management to the next level. Starting from Hydra Booking version 1.0.14 and Hydra Booking Pro version 1.0.7, you can effortlessly connect your Microsoft Outlook Calendar with the system.
In this article, we’ll discuss and guide you through the setup process for integrating Outlook Calendar with the Hydra Booking system.
Without further ado, let’s dive in!
How to Integrate Outlook Calendar with Hydra Booking? – The Step by Step Guide #
Prerequisites #
Before we dive into the guide and share the steps to connect Hydra Booking with Outlook Calendar, there are some prerequisites you need to have in place to start the process.
- Ensure you have the Pro version of Hydra Booking and a valid license on your website. If you don’t have one, get one from here.
- You’ll need a Microsoft account. If you don’t have one, you can create one from here.
- To connect your Outlook Calendar with Hydra Booking, you’ll need a Microsoft 365 Developer Account. Follow this official guide to create one.
- Ensure you’ve updated the Hydra Booking Plugin to version 1.0.14 or higher and the Hydra Booking Pro Plugin to version 1.0.7 or higher.
Once you’ve fulfilled all the prerequisites, let’s begin the connection process.
Step 1: Retrieving Keys from Outlook Calendar #
To connect the Outlook Calendar with Hydra Booking, you’ll need a Client ID and Secret Key. First, we will retrieve these credentials from your Outlook account.
First, go to this link and log in to your Microsoft account. After logging in, you’ll see an interface like this.
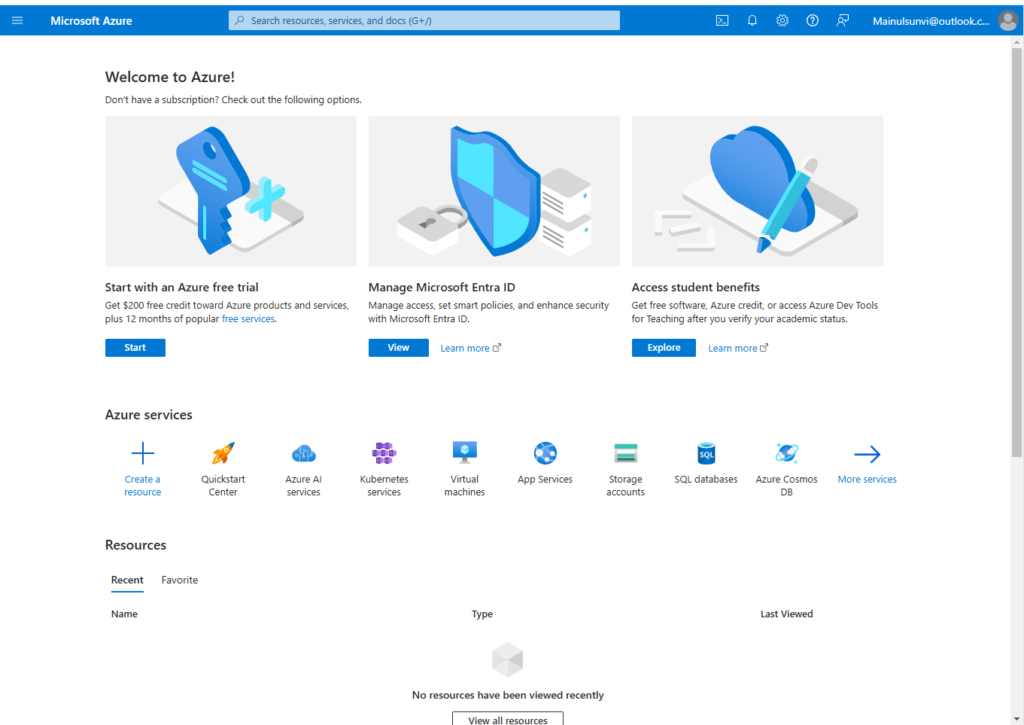
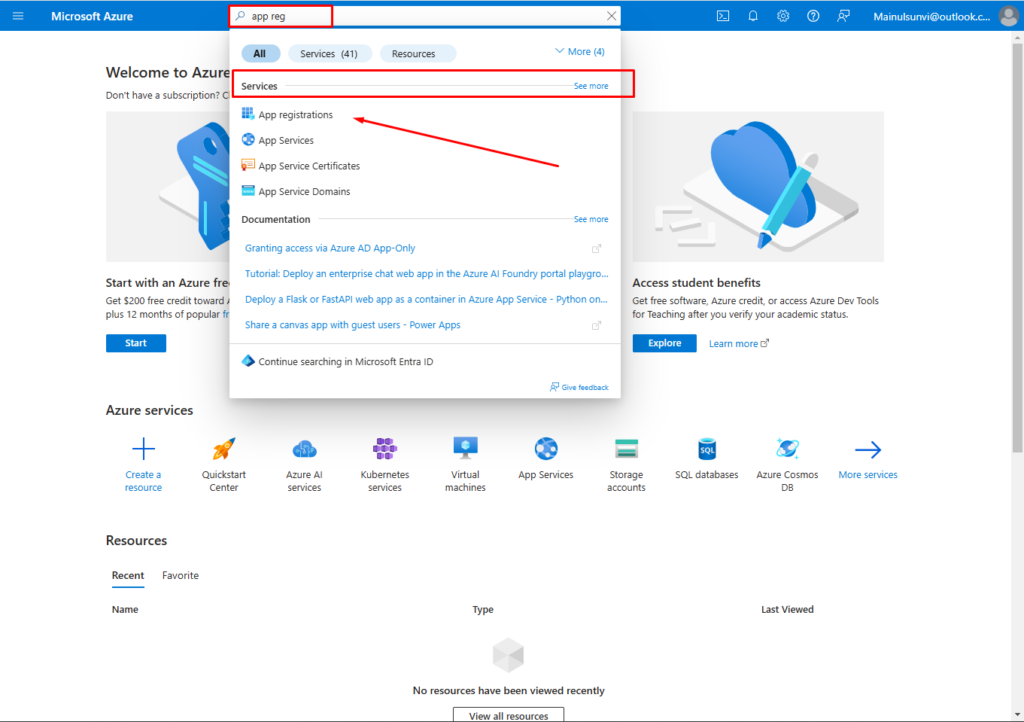
Now, go to the search bar and type “App Registrations”. Once you start typing, you’ll see an option under the Services category. Click on it to proceed.
Now from the menu, click on the “New registration” button.
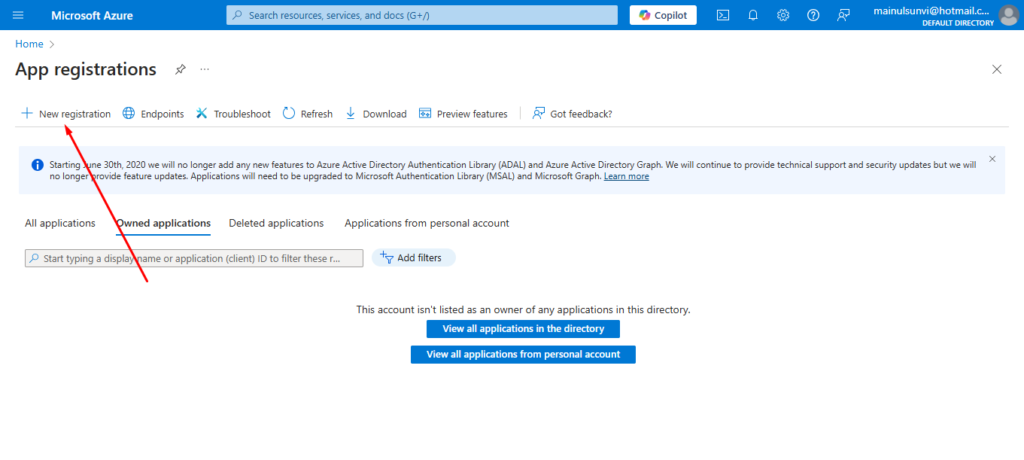
After loading the New Registration page, you’ll see several fields. Let’s go over them:
Name: Enter a desired app name here. For this demonstration, I’m using “Hydra Outlook”.
Supported Account Types: To allow access to all types of users, select the option: “Accounts in any organizational directory (Any Microsoft Entra ID tenant – Multitenant) and personal Microsoft accounts (e.g., Skype, Xbox)”.
Redirection URI: First, select “Web” from the dropdown menu. Then, enter the redirection URI provided by Hydra Booking. You can find this by navigating to Hydra Booking > Settings > Integrations > Outlook Calendar and copying the Redirect URL.
Here is my information.
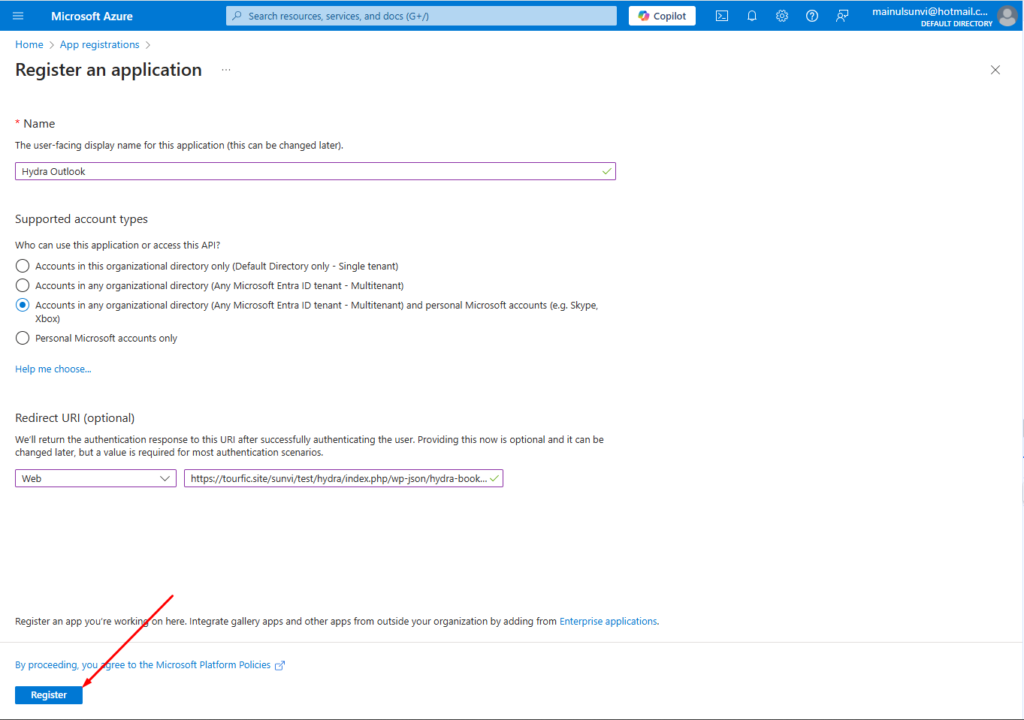
After filling in all the information correctly, click on the Register button to register the app.
Once registered, a new page will open. In the Essentials section, copy the Application (Client) ID as it will be needed to configure the Hydra Booking settings.
Next, in the same section, click on Add a Certificate or Secret to create a secret key.
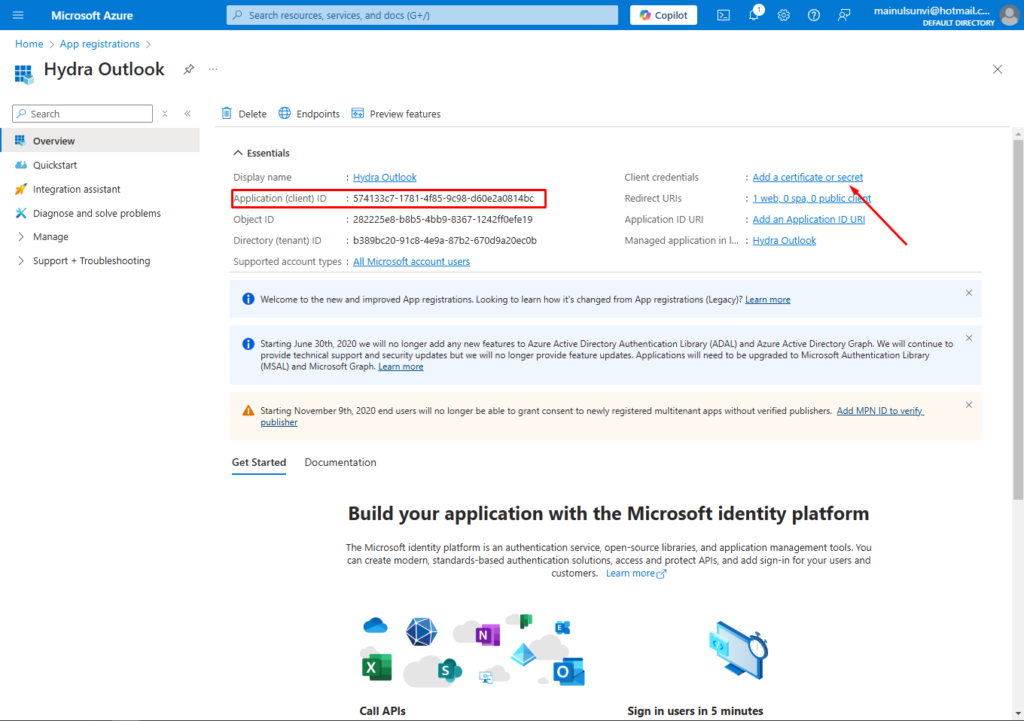
After clicking the link, a new page will open. Click on New Client Secret, provide a Description, and set the expiration date to the maximum of 730 days. and click on the add button.
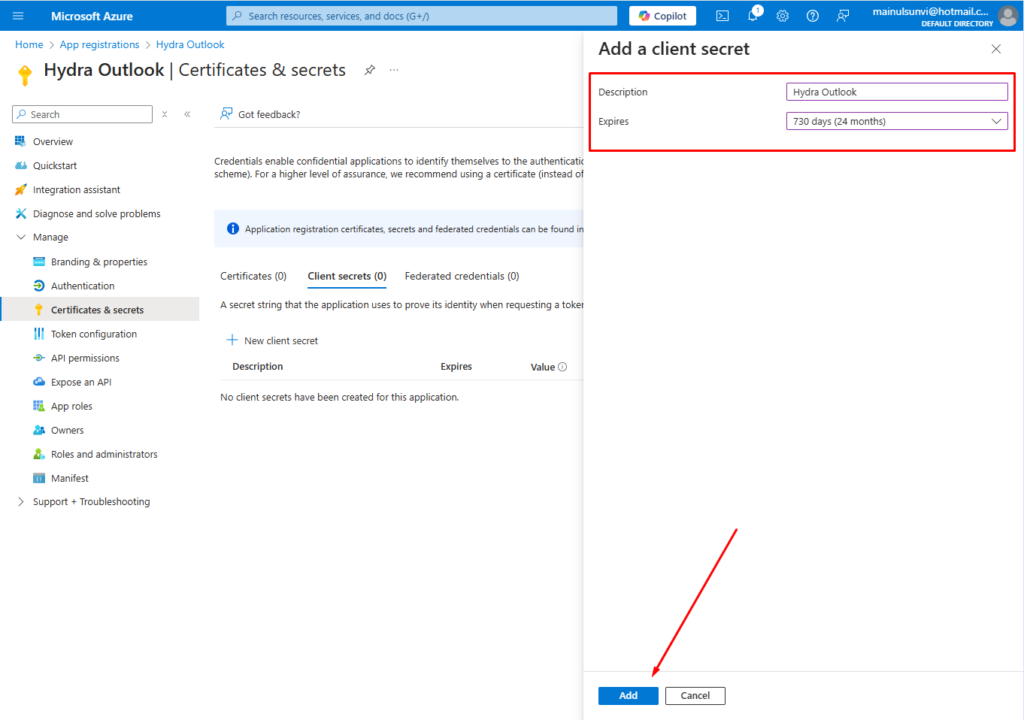
Once the new secret key is added, copy the Value immediately. It will only appear once, so make sure to save it in a secure location.
Congratulations! You have successfully created the API and now have the Client ID and Secret Key. It’s time to configure the Hydra Booking settings.
Step 2: Configuring the Hydra Booking Settings. #
Once you have the Client ID and Secret Key, it’s time to configure the Hydra Booking settings and connect the API.
First, navigate to Hydra Booking > Settings > Integration > Calendars > Outlook Calendar and click the Connect button to start the connection process with Outlook Calendar.
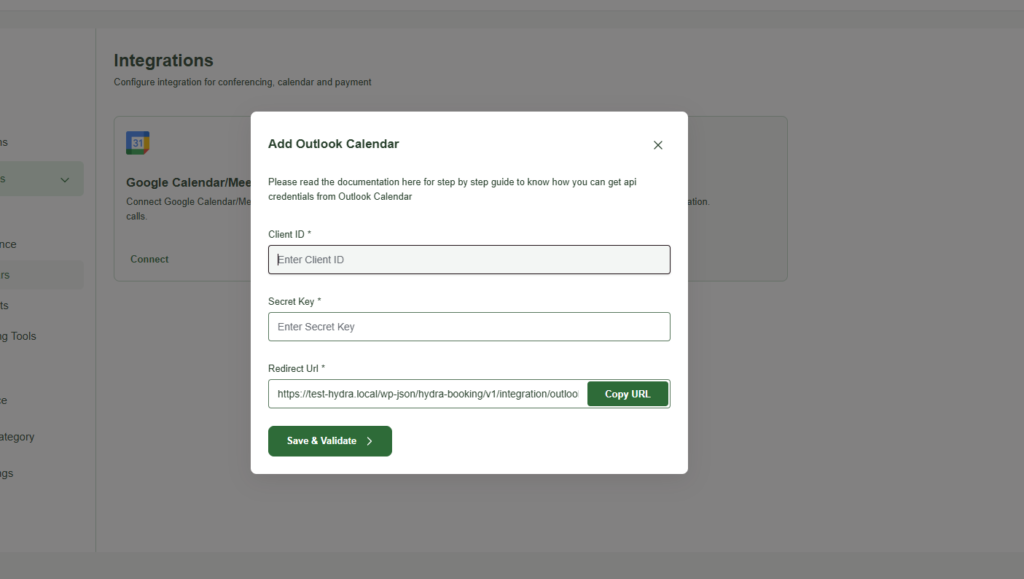
A popup will appear. Paste the Client ID and Secret Key that you obtained in Step 1, then click the Save and Validate button. After saving and validating the credentials, turn the toggle button on. Without enabling this button, the feature will remain disabled and cannot be used within your system.
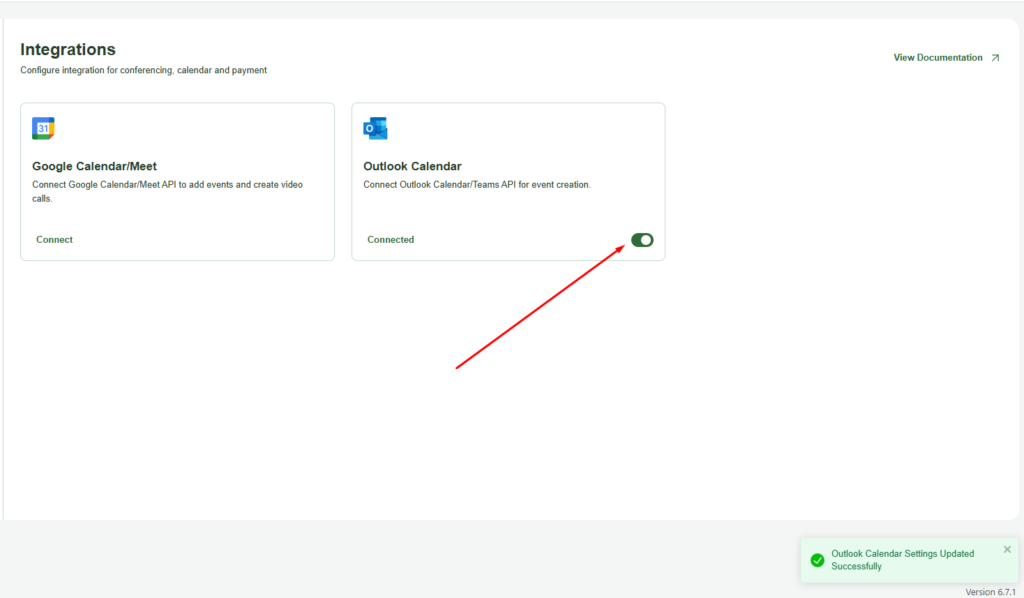
Your Hydra Booking settings have been successfully configured. The next step is to configure the Hosts.
Step 3: Configure the Host to get Access Token #
After successfully configuring the Hydra Booking settings, it’s time to configure the host profile and obtain the access token.
To do this, navigate to Hydra Booking > Hosts and edit your desired host profile. From the menu, go to the Calendars section. Beside the Outlook Calendar option, you’ll find a button labeled Get Access Token.

Click on the “Get Access Token” Button.
A new tab will open with the login form for your Microsoft account. Enter your credentials and sign in to proceed. If you’re already logged in, the form will not show, instead of the login form it will show your Outlook mail. Click on the “Next” button to proceed to the next step.
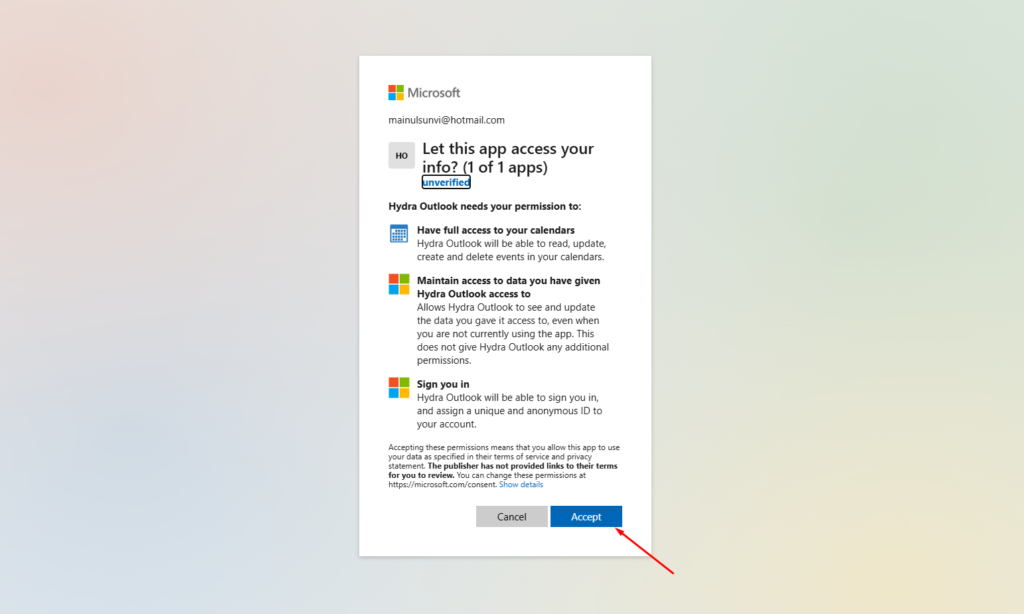
In the next step, the app’s scopes will be displayed. Simply click the Accept button to proceed further.
Now click on the advance section and click on “Go to [Your website address]”.
Note: If you see a message about the connection being “unsafe,” don’t worry—this is a standard warning for apps in development. Since you’re connecting your own Microsoft account and API, it’s safe to proceed.
Now, wait for the page to load. If prompted, you may need to re-login to your WordPress admin account.
Once the Hydra Booking settings page loads, click on the Settings button next to the Outlook Calendar option. Select the calendar you want to use for managing bookings. After making your selection, click Update Host Settings to save your changes.
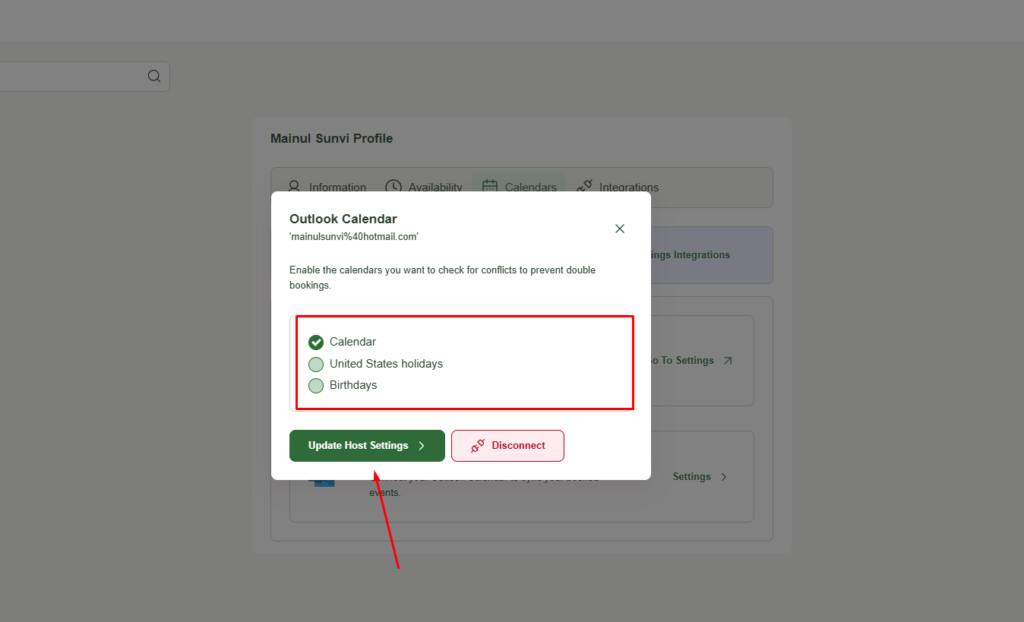
You’ve successfully generated the Outlook access token! Your host can now create meetings using Microsoft Team and sync them with the Outlook Calendar. Now we need to configure the Meetings.
If you don’t intend to use Microsoft Teams as the location for your meetings, you can skip Step 3, as it focuses entirely on connecting meetings with Microsoft Teams.
Step 3: Configure the Meeting for Microsoft Teams (Optional) #
After generating the Access Token for hosts, it’s time to add Microsoft Teams as the location for your meeting.
To do this, navigate to Hydra Booking > Meetings, select your desired meeting, and click Edit. Once the edit page loads, go to the Location section on the Details page. From the dropdown menu, select MS Teams / Outlook, and save the changes.
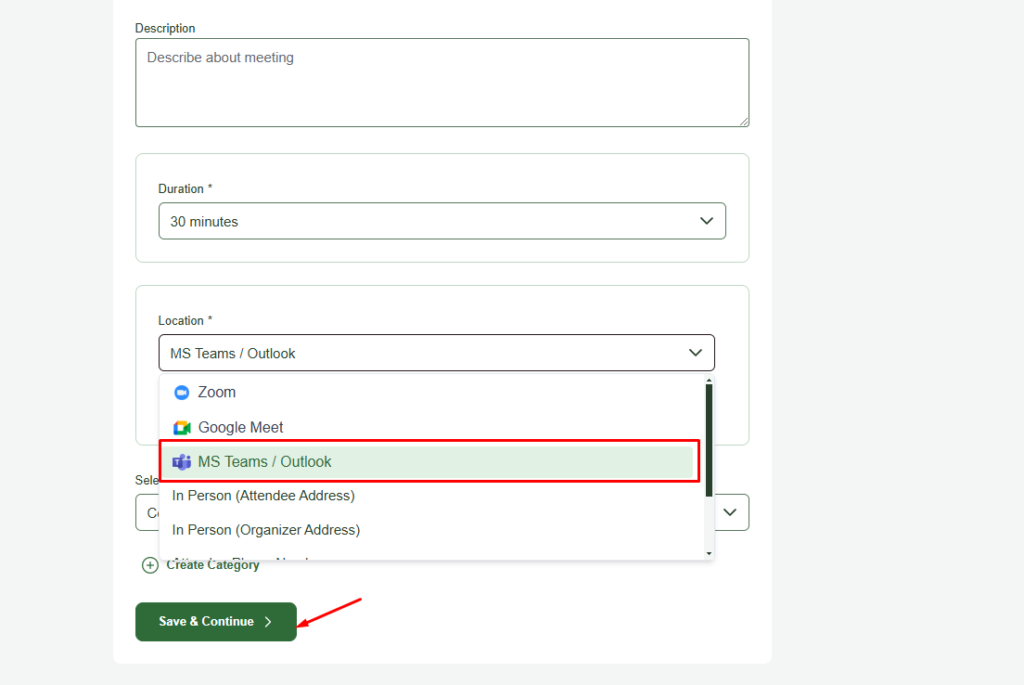
Congratulations! Your Microsoft Teams is now successfully connected with Hydra Booking.
Testing the Outlook Calendar Integration #
Once every step is set up correctly, whenever an attendee tries to book your meeting. They’ll receive a Microsoft Teams link to join at the scheduled time. You’ll also be able to find the meeting link in your Outlook Calendar.
