In this article, we will try to explain how to create a Conditional Form using Contact Form 7 with the help of our Free Addon “Contact Form 7 Conditional fields”.
Watch Complete Video #
If you need further clarification, watch our video tutorial. It provides a detailed walkthrough of the entire process of setting up Conditional Fields for Contact Form 7:
What’s needed #
- Ensure that both Contact Form 7 and Ultra Addons for Contact Form 7 are installed on your WordPress site.
- Navigate to the Ultra Addons section in your WordPress Dashboard, and enable the “Conditional Field” checkbox/toggle.

What is Contact Form 7 Conditional Fields? #
Contact Form 7 Conditional Fields is a feature for Contact Form 7 that allows you to show or hide specific fields within your contact forms based on user input. This means you can create dynamic forms that adapt to the user’s selections, enhancing the overall user experience. For example, you can set up a form where if a user selects “Yes” to a specific question, an additional set of fields appears for further details. This feature enables you to create more interactive and tailored forms by applying logical conditions, making your forms more relevant and engaging for your users.
Live Example of a Conditional Form #
In this tutorial, we’ll create a conditional form similar to the example below. Follow these steps to create your own form with conditional logic.
Visit our main demo to see all the supported fields for CF7 Conditional Fields.
Creating a Conditional Form #
Go to Contact -> Add New in your WordPress Dashboard to create a new form. You will see a contact form editor with a “Conditional Wrapper” button.
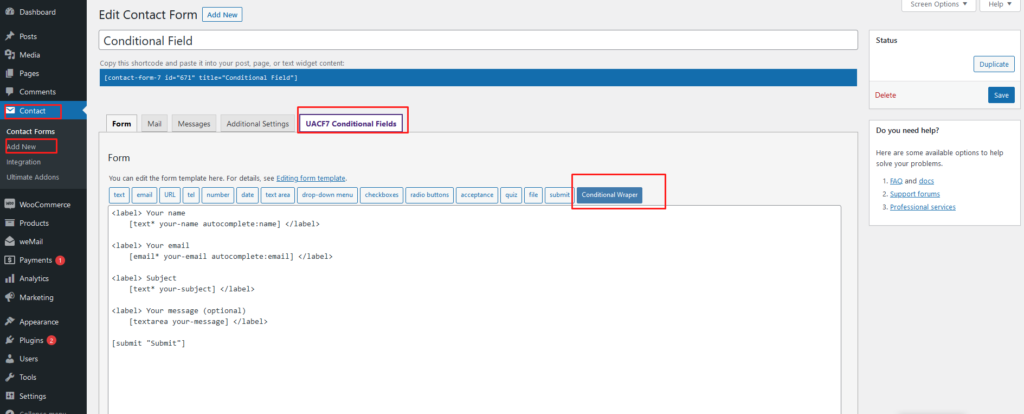
Insert Conditional Wrapper #
Click on “Conditional Wrapper.” You will find a name field that you can edit. Make sure each Conditional Wrapper name is unique for easy identification. After setting the name, click the “Insert Tag” button.

Formatting the Wrapper #
After inserting the tag, it will appear in the editor, looking like this: [conditional conditional-928][/conditional]. You can rename these wrappers for clarity, for example, [conditional address][/conditional].
Rearrange Your Code: Suppose you want to add a condition like this:
- If the user selects “Yes,” show an address field.
- If the user selects “No,” show an email field.
Create two separate fields (Address & Email) and wrap each one with a unique conditional wrapper. If you want to add more conditions, wrap each hidden field in a separate “conditional wrapper.”

Save the form once you’re done.
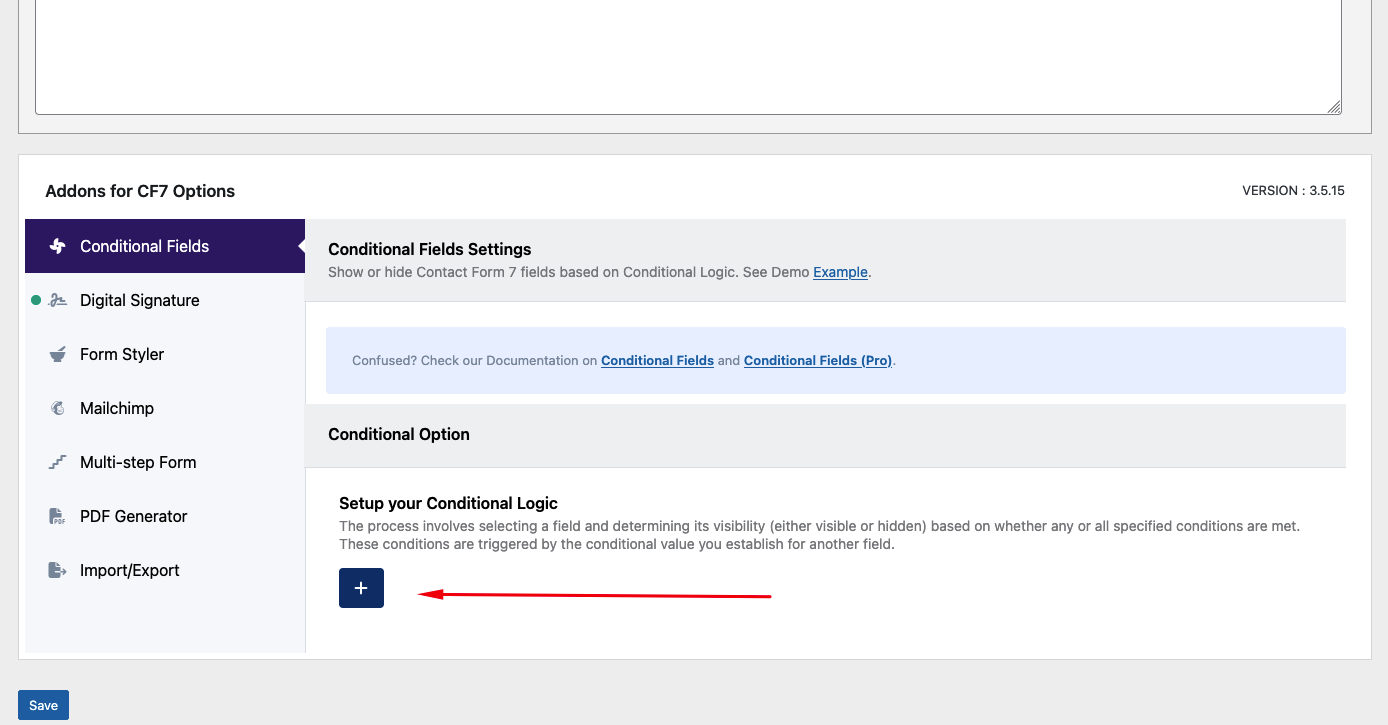
Setting Up Conditions #
After saving the form, scroll down to the Conditional Fields tab under “Ultra Addons for CF7 Options.” Click the “+” icon under “Setup your Conditional Logic” to create your conditional logic.
Now follow these steps to set up the logic:
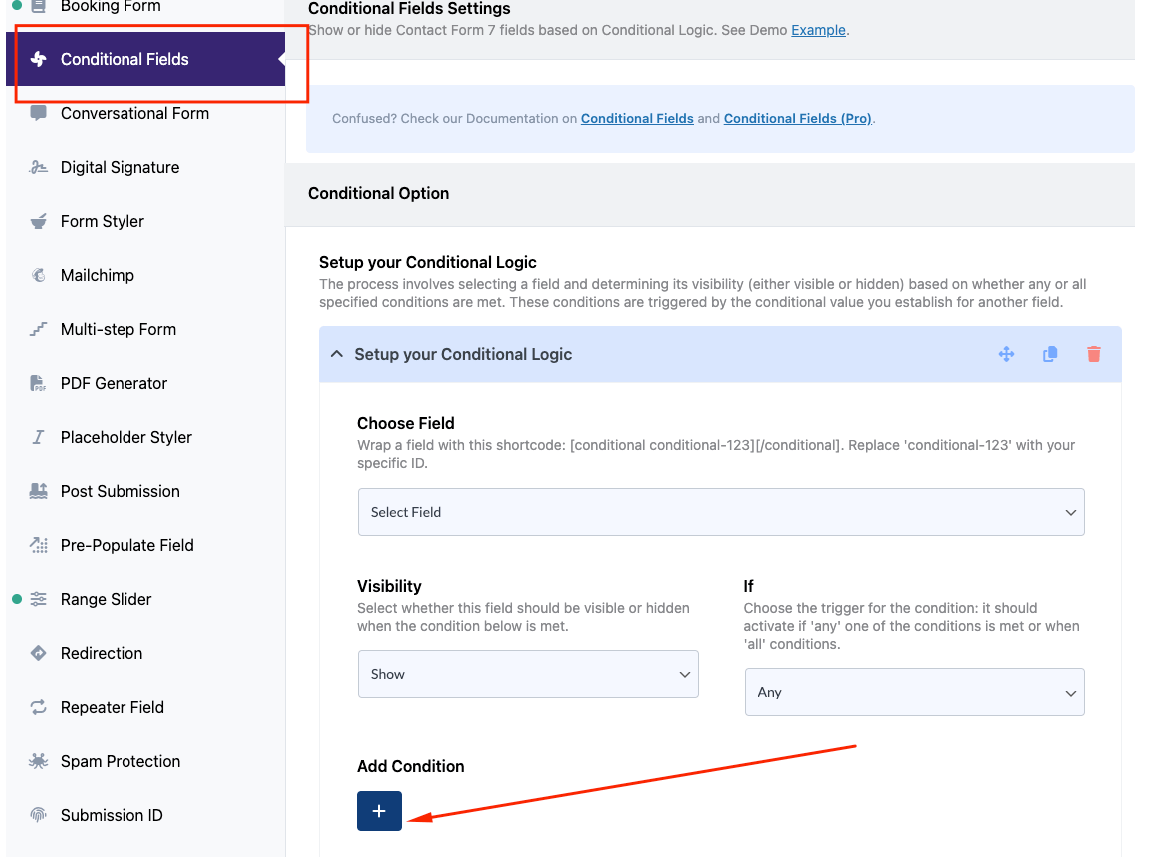
- Step one – Choose your conditional field: This dropdown will only show those fields which you added within the wrapper which we did on our “Formatting the Wrapper” stage. You can select which conditional field you want to add to this logic. For example, in our case, “the address” field and “alternate email” field.
- Step Two – Visiblity of Conditional Field: There are two options here: “Show” or “hide”. If you select “show”, your conditional field will show when the logic is true. If you select “hide”, your conditional field will be hidden when the logic is applicable.
- Step Three – If else Condition: Next is, if “any” or “all”. If you select “Any”, that means if any of the below logic is true your condition will be working. On the other hand, if you select “All”, all the logic set below needs to be true for showing your conditional field.
- Step Four: For Step 3 to work, you need to set condition. For that, click the “Add Condition” button.
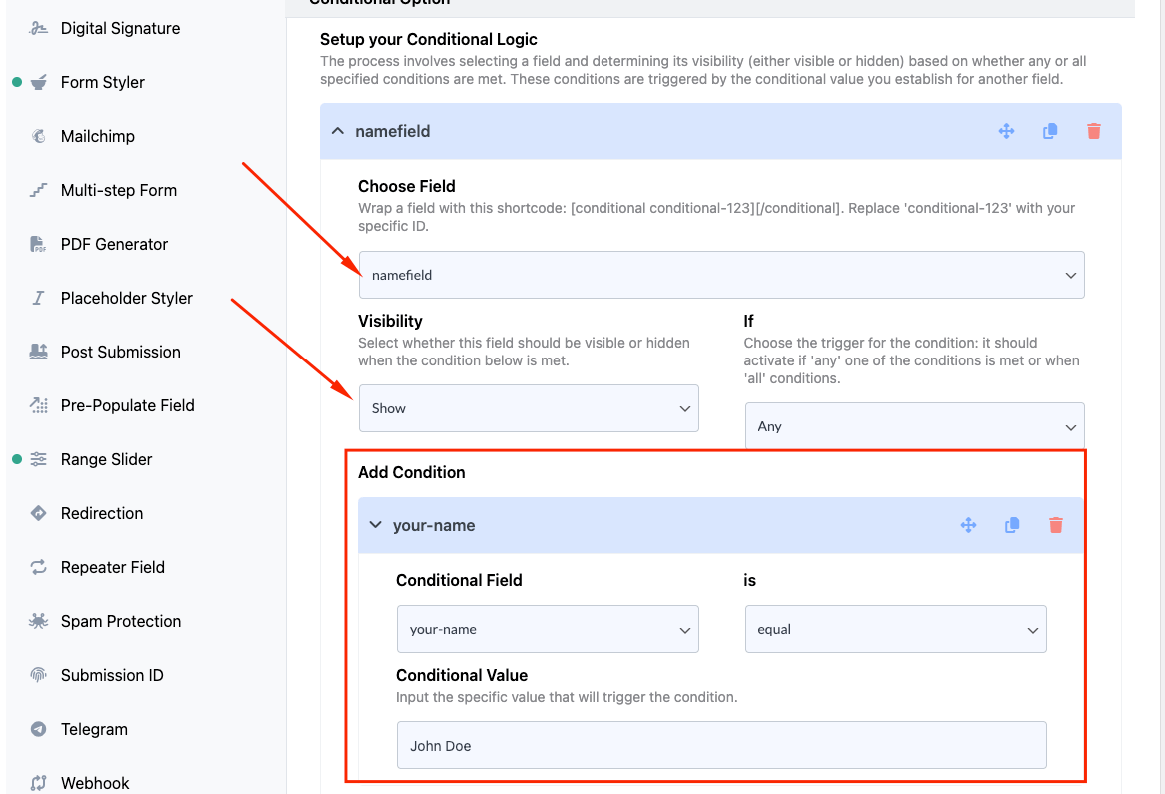
After clicking the “Add Condition” button, you will get three fields for making conditions:
- Select a form tag from the first field. Your conditional field will only show or hide based on the activity set on this field.
- Then set the logic variant. The default is “Equal”.
- Equal -> If your selected field value is “Equal” to the provided value. Example: If the user selects “Yes”, then your conditional field will show.
- Not Equal -> If the user value is “Not Equal” with your condition value, then your conditional field will show.
- Greater than -> If the value is “Greater than” your condition value, then your conditional field will show.
- Less than -> If the value is “Less than” your condition value, then your conditional field will show.
- Greater than or equal to -> This logic can take two logic simultaneously. If the value is Greater than or equal to your condition, then your conditional field will show.
- Less than or equal to -> This logic can take two logic simultaneously. If the value is Less than or equal to your condition value, then your conditional field will show.
- Next is the condition value. Set your exact value to meet the condition. Note: The spelling of the value field is important. The value field is case-sensitive. So entering John doe or John-Doe (instead of the exact phrase John Doe) may not work! The value needs to correspond exactly.
Refer to the screenshot below for a visual guide on how the conditions were set up.
After you are done setting up all your conditions, save the contact form.
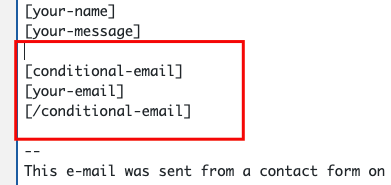
Setting Conditional Fields to Send Email #
Wrap the body of the message in a conditional wrapper to ensure that when the condition is not met, the field is not included in the email. Conversely, when the condition is satisfied, the field details will be sent via email.
Time to Publish #
Copy the form’s shortcode and paste it wherever you want to display the form (Pages, Posts, Custom Post Types, Sidebars). The result should look similar to the example form.
Full-Form Code #
Here is a sample code of our above form:
<label> Your name
[text your-name] </label>

<label> Your email
[email your-email] </label>

<label> Do you have any Physical Address? (Select <strong>"Yes"</strong> or <strong>"No"</strong> to test the conditional feature)
[select menu-654 include_blank "Yes" "No"] </label>

[conditional address]
<label> Insert Your Address
[text text-612] </label><div class="clear"></div>
[/conditional]

[conditional email]
<label> Insert Your Alternate E-mail
[email your-email] </label><div class="clear"></div>
[/conditional]

[submit "Submit"]
Still Not Clear? Please contact us. If you are a free User, you can open a ticket from here. If you are a pro user, you can open a ticket from here.