AWeber is a fast-growing email marketing platform that offers a wide range of powerful features to help you manage and grow your audience.
At Hydra Booking, we focus on providing useful integrations that improve your workflow. That’s why we’ve included AWeber in our integration options. You can easily connect your booking system with your email marketing campaigns and keep your audience engaged.
In this documentation, we will take a deep dive into how to integrate AWeber with Hydra Booking, step by step.
What is AWeber? #
If you’re looking to grow your audience, build relationships, and increase sales online, email marketing is one of the most powerful tools you can use. That’s where AWeber comes in.
AWeber is an email marketing and automation platform that helps businesses, creators, and marketers connect with their audience through emails, newsletters, and automated campaigns.
Why AWeber Matters #
In today’s digital world, social media algorithms change constantly—but your email list is something you truly own. AWeber helps you:
- Stay connected with your audience
- Send targeted messages
- Automate your marketing
- Build long-term customer relationships
Key Features of AWeber #
Here are some of the core features that make AWeber a popular choice:
Email Campaigns #
- Create and send professional emails
- Use drag-and-drop email builders
- Customize templates to match your brand
Automation #
- Set up automated email sequences
- Send emails based on user actions
- Welcome new subscribers automatically
Subscriber Management #
- Collect and organize your contacts
- Segment your audience based on behavior.
- Manage lists easily
Analytics & Reporting #
- Track open rates and click rates
- Measure campaign performance
- Improve your strategy with data
Integrations #
- Connect with tools like WordPress, Shopify, and more.
- Sync your data across platforms
- Enhance your workflow
How to Integrate AWeber with Hydra Booking? #
Prerequisites #
- Since Twilio integration is a pro feature, make sure you have a valid pro license for Hydra Booking. If you don’t have one yet, check pricing here.
- Ensure you have an active AWeber account. If you don’t have one yet, sign up here.
- Ensure you’ve updated the Hydra Booking Plugin to version 1.1.40 or higher and the Hydra Booking Pro Plugin to version 1.1.6 or higher.
Step 1: Getting the API Key from AWeber #
To integrate AWeber with Hydra Booking, you first need to obtain your API key from your AWeber account.
Follow these steps:
- Log in to your AWeber dashboard.
- From the navigation bar, go to My Apps.
- Click on Create a New App.
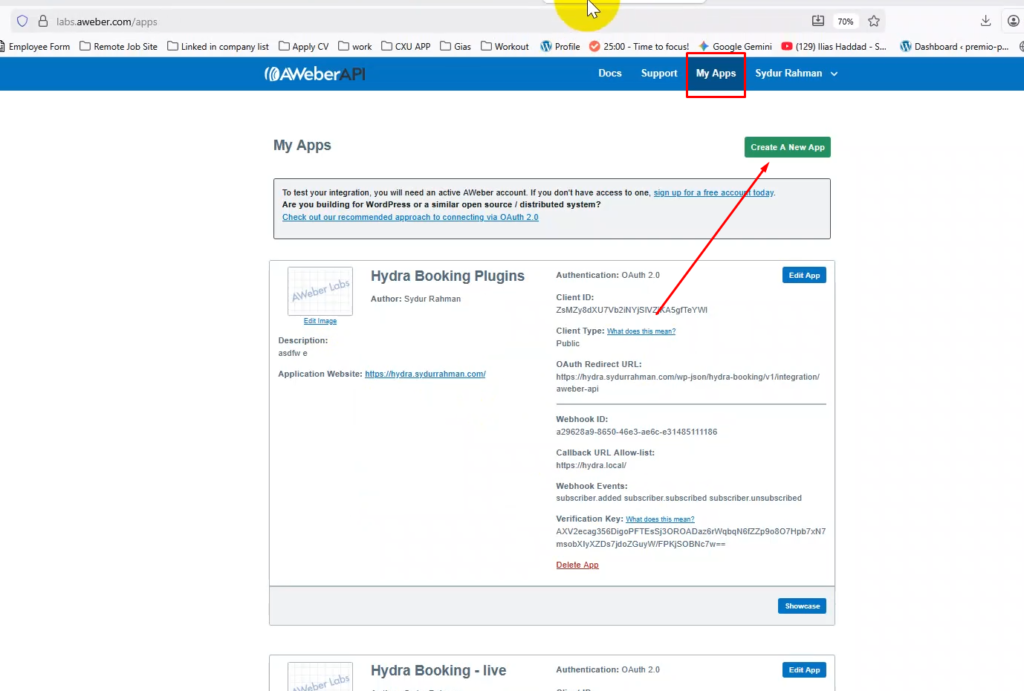
Then a pop-up will open with a Form. Just fill out the form with your desired information.
Here are two pieces of information you need to fill out correctly.
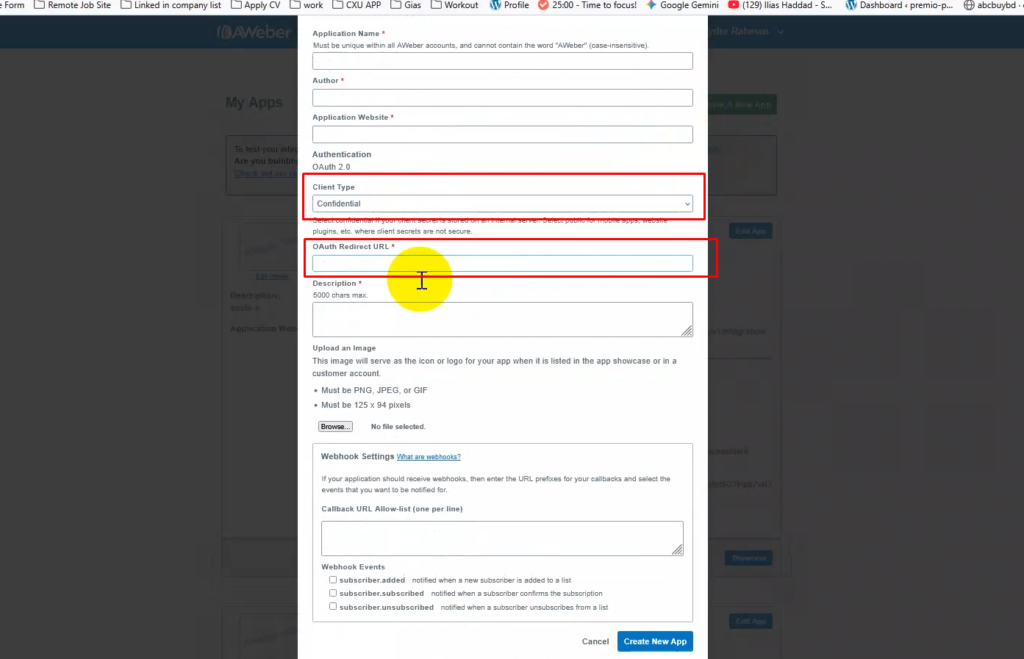
- Client Type: When configuring your AWeber app, make sure to set the Client Type to Public. This setting is required for the integration to function properly. If a different client type is selected, the connection between AWeber and Hydra Booking may not work as expected.
- Oauth Redirect URL: To complete the AWeber integration, you need to provide the correct OAuth Redirect URL. First, go to Hydra Booking → Settings, then navigate to Host Settings → Integration and locate the AWeber option. Click on Connect, and a pop-up will appear displaying the Redirect URL. Copy this URL and paste it into the OAuth Redirect URL field in your AWeber app settings to finalize the connection.
After everything fills up successfully, now click on “Create New App.” After the app is created successfully, you will find a box like this.
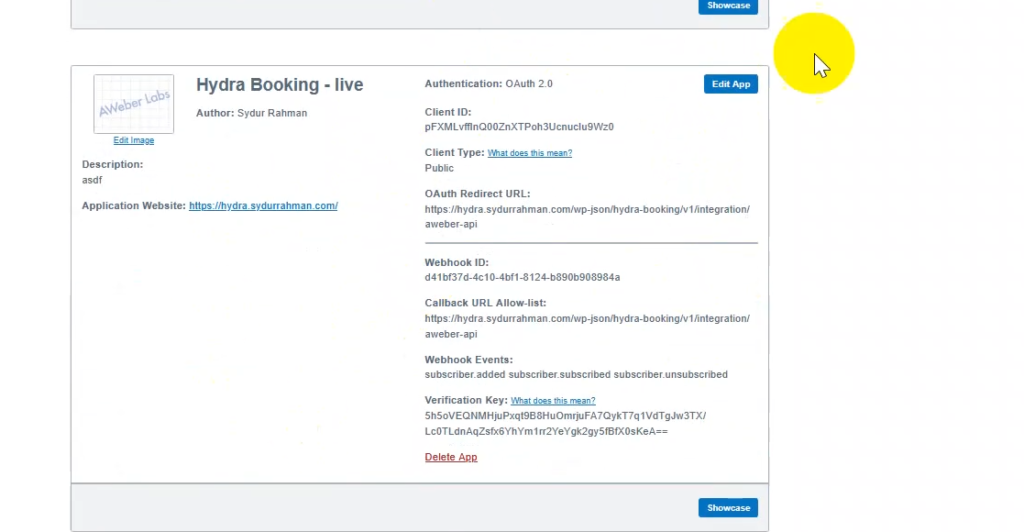
Copy the client ID from the box. Your AWeber configuration is done for Hydra Booking.
Step 2: Configure the Hydra Booking Settings #
After getting the Client ID from AWeber.
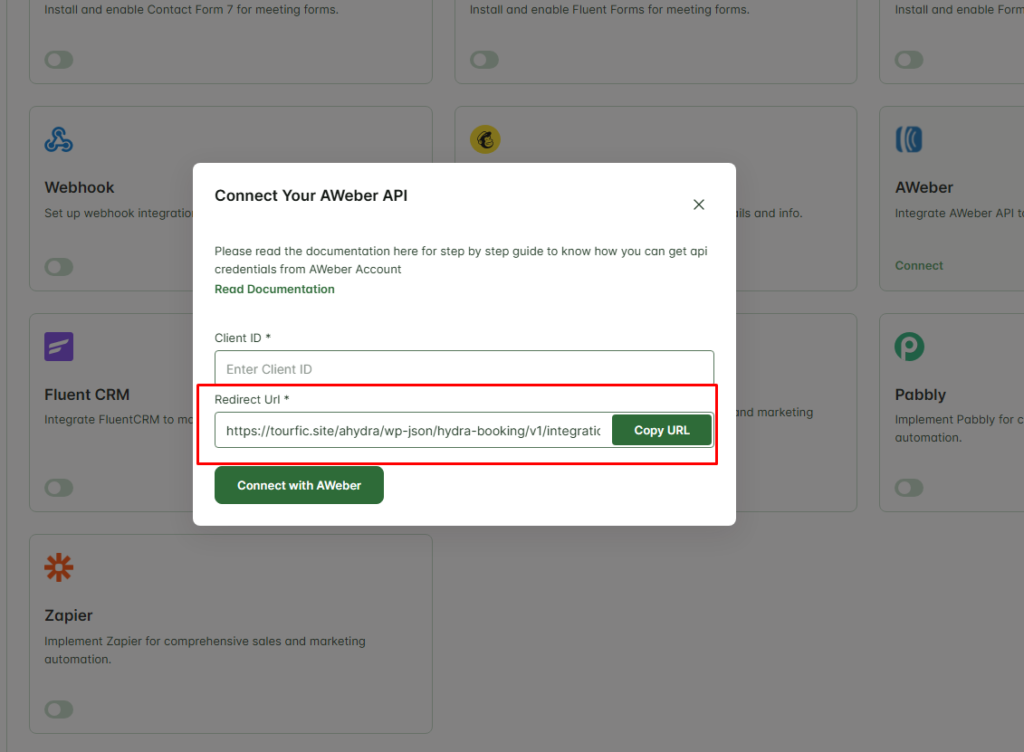
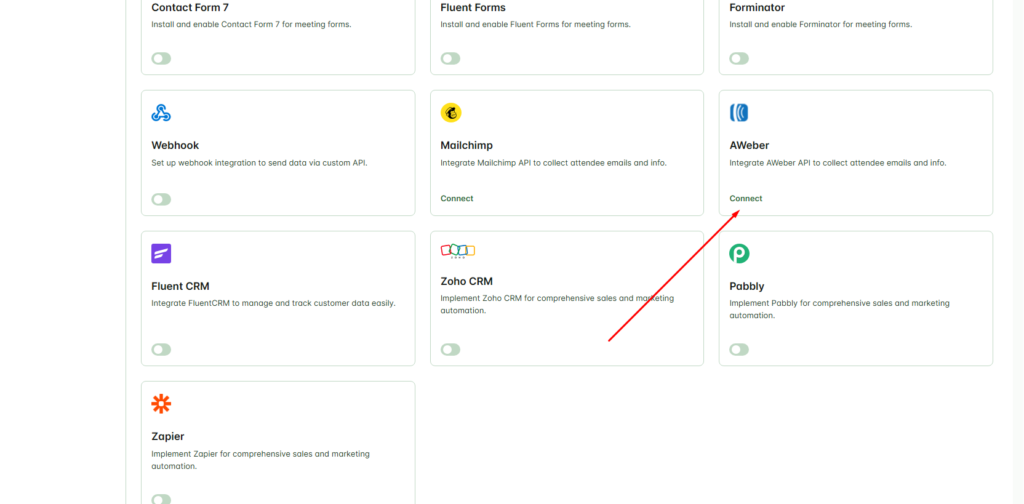
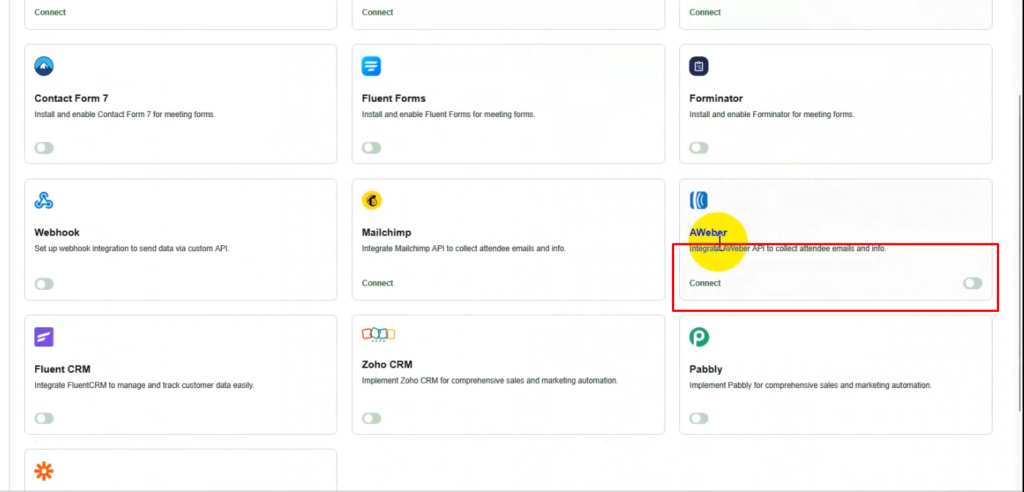
To connect AWeber with Hydra Booking, navigate to Hydra Booking → Settings → Host Settings → Integrations, then locate the AWeber Integration option and click on the Connect button to start the authorization process.
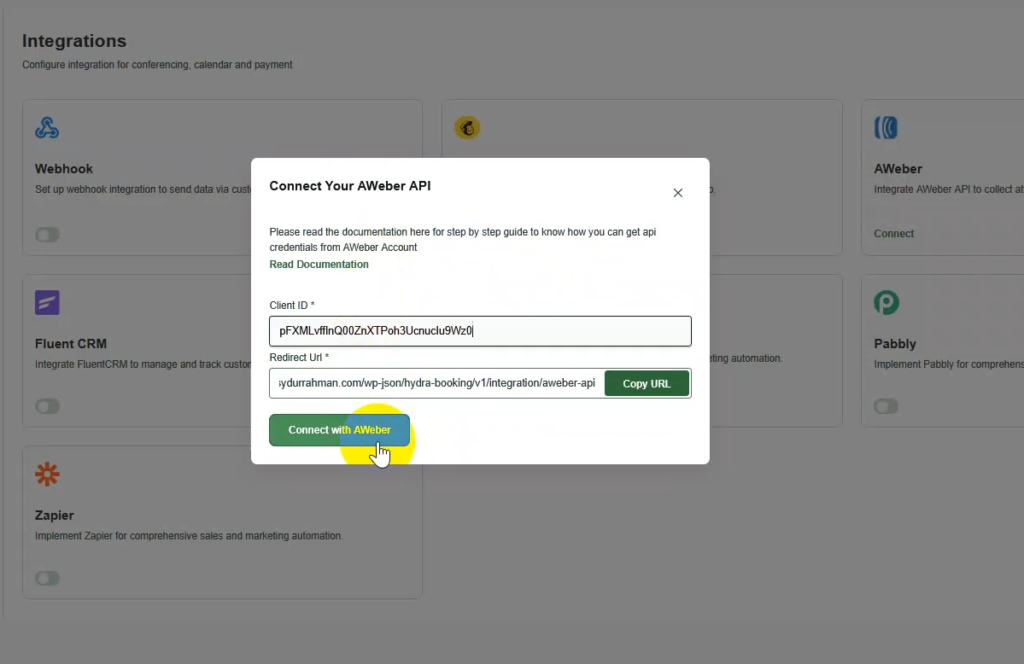
Once you click the connect option, a popup will appear. Paste the Client ID you obtained in Step 1 into the required field, then click on Connect with AWeber to proceed with the authorization process.
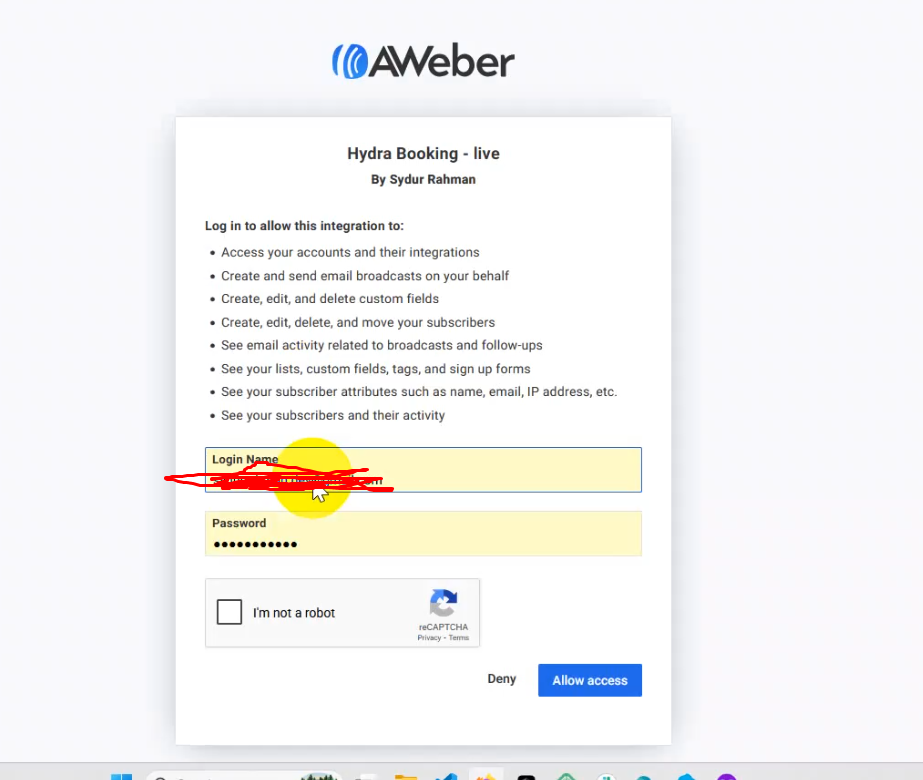
After clicking Connect with AWeber, a new page will load. Simply enter your AWeber account credentials and click on Allow Access to complete the authorization process.
Now it will redirect you to Hydra booking settings, Now all you need is to enable the connection from.
After enabling the Hydra Booking Settings, the configuration is done.
Step 3: Configure the Hydra Booking Meeting #
After enabling the “AWeber Integration” all you need to do is go to Hydra Booking > Meetings and navigate to the edit page of your desired meeting.
Click on “Integrations Tab”, you will find AWeber from the dropdown.
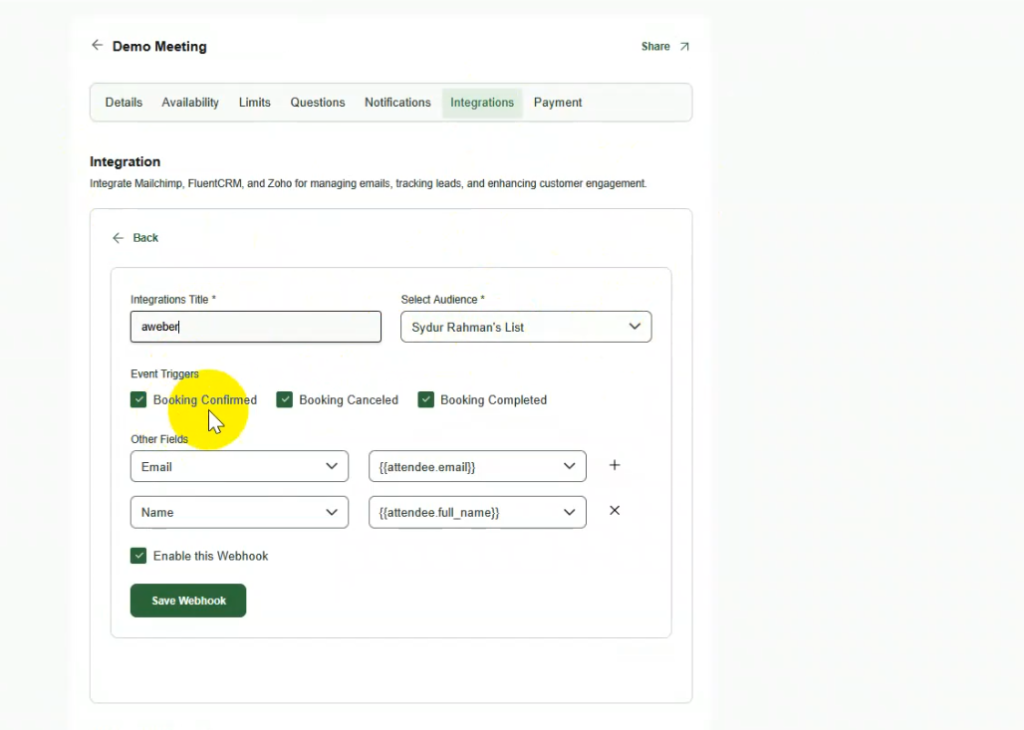
Fill in the settings with your desired options. And click on the “Save Webhook” button.
Testing the AWeber Integration #
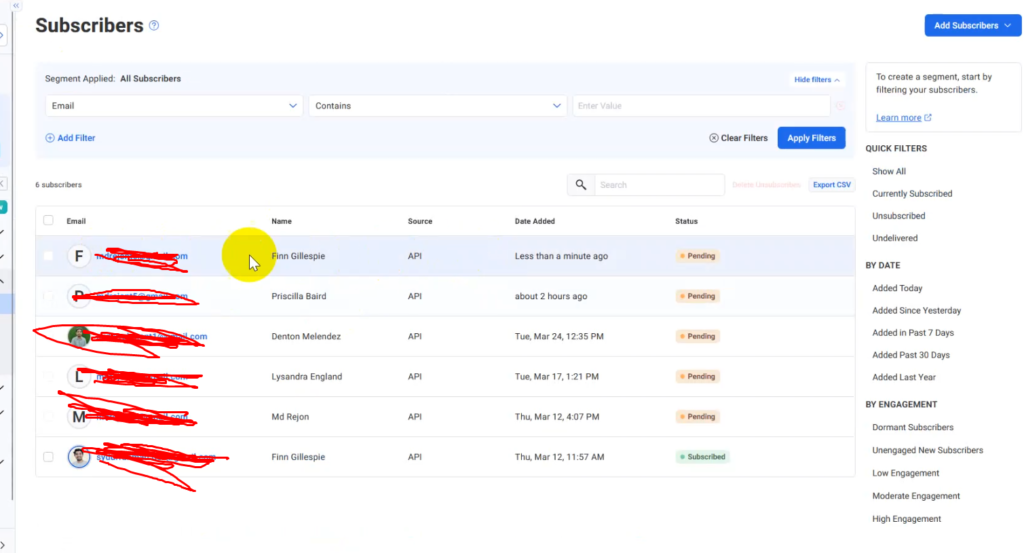
Now, whenever an attendee books a meeting from the front end, their data will automatically be added to the selected AWeber audience contact list. You can view this information by navigating to AWeber Dashboard > Subscribers> Subscribers in your AWeber account.