Tourfic Settings > Email Settings
Tourfic allows you to create and use versatile email templates to utilize — for the admin, vendors, and customers. The Email Settings tab controls the template for all three.
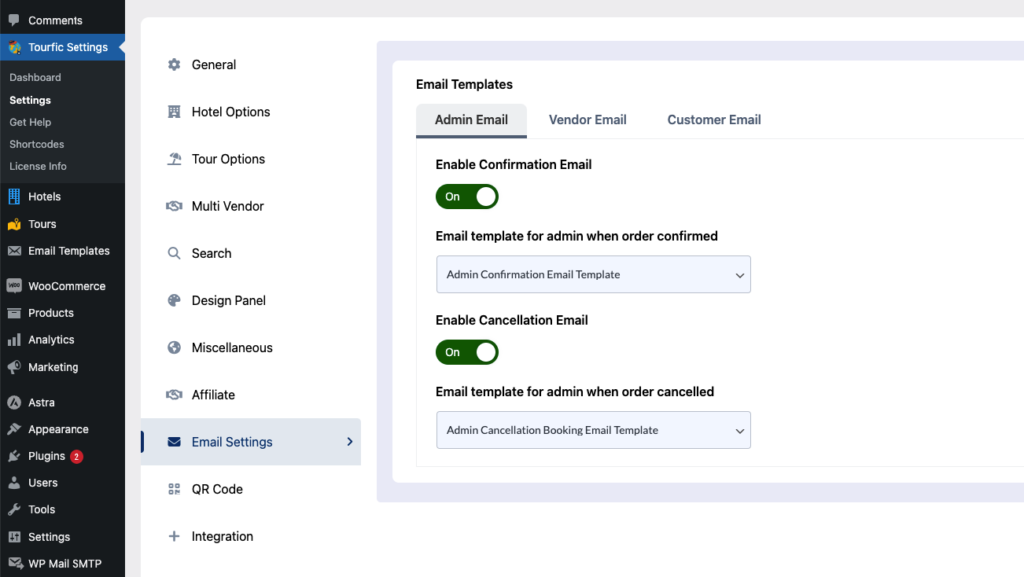
Admin Email #
This section determines the email templates that the admin receives upon certain actions.
Enable Order Confirmation Email #
If you, as the admin, want to receive an email whenever there’s an order confirmed, turn this toggle on. Next, you’ll have to select the email template from the dropdown menu.
Enable Order Cancellation Email #
Turn this toggle on to receive an email when a booking or order has been canceled. You’ll have to select the template here as well.
Vendor Email #
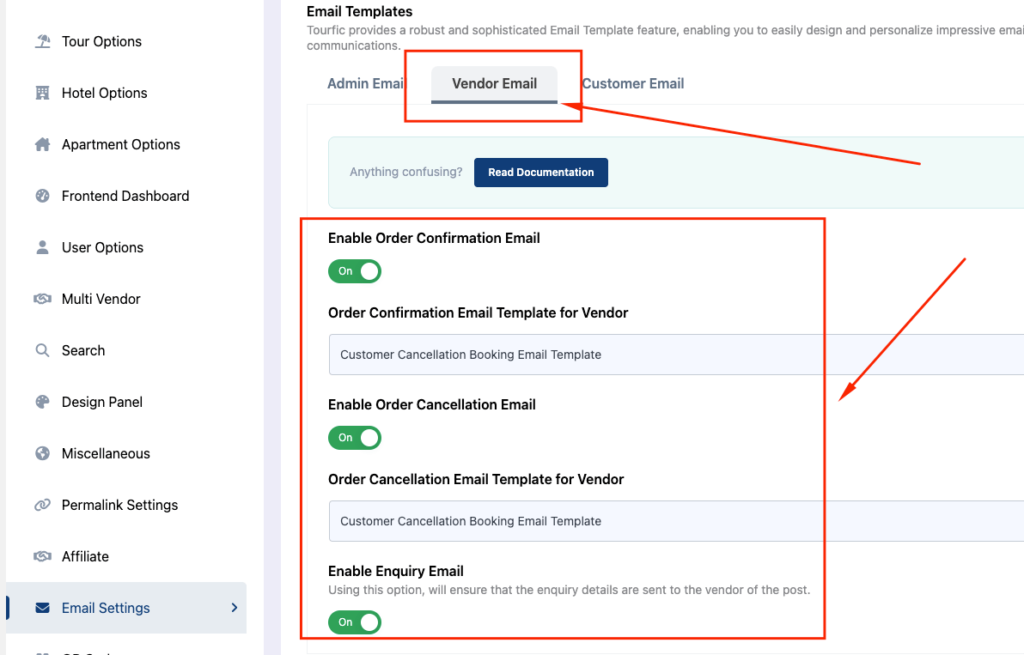
This tab determines which emails vendors will receive.
Enable Order Confirmation Email #
Turn this toggle on to let vendors receive emails upon order confirmation. Next, choose the desired template.
Enable Order Cancellation Email #
Likewise, this will send emails to vendors when orders have been canceled according to the selected template.
Enable Enquiry Email #
This section is specific to the vendors of your website. When you turn this toggle on, vendors will receive an email with the enquiry details. Of course, this refers to the vendor of the post/listing who posted it.
Customer Email #
This section determines which emails customers receive when they confirm or cancel bookings.
Enable Order Confirmation Email #
Customers will receive booking confirmation when you turn this toggle on. Again, you can choose a template from the dropdown.
Enable Order Cancellation Email #
When this toggle is turned on, a customer will receive a confirmation email when they cancel a particular order.
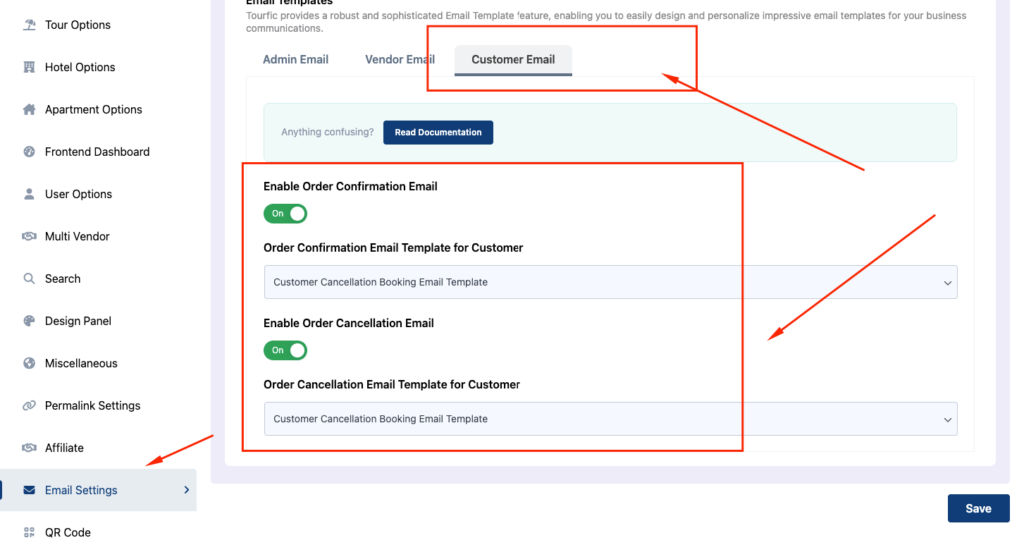
Note: If you want to create a custom email template for admin, vendor, or custom then you will have to create an email template and select that template from the drop-down
Tourfic Email Piping #
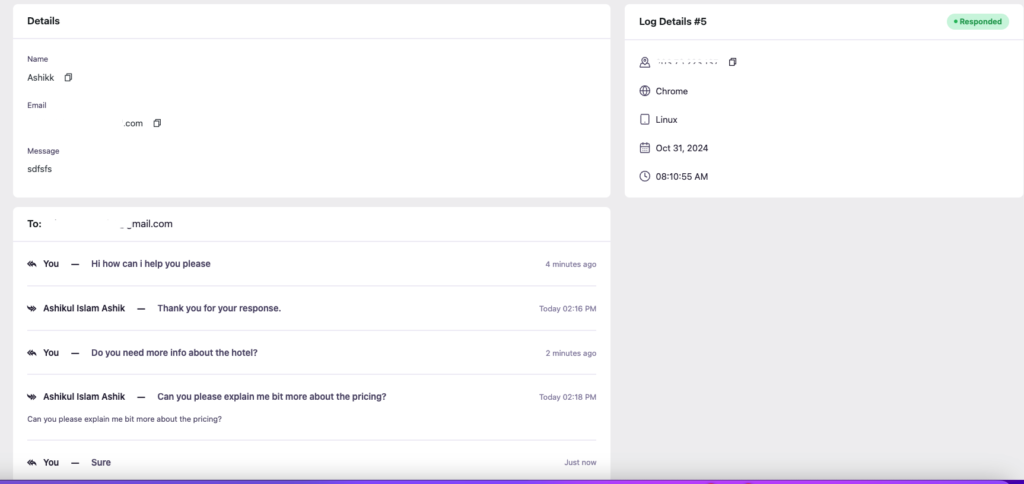
Tourfic is a leading plugin for Tour, Hotel, and Apartment bookings, designed to streamline your booking management experience. We are excited to introduce a new feature: email piping. This feature enhances your communication flexibility by allowing you to respond to customer inquiries directly from your WordPress dashboard. No more switching between your email account and the dashboard—simply reply to emails and receive customer responses all in one place.
Curious to learn more? Let’s explore how it works.
What is Email piping in Tourfic? #
The Email Piping feature is an addon available exclusively with [Tourfic Pro]. To fully utilize this feature, you will need to install the Email Piping Addon, which can be downloaded from the [Download] page.
Email piping is a process that allows you to manage customer communications seamlessly within your WordPress dashboard, enabling you to reply to and receive emails without switching between platforms.
Now, let’s explore the settings for configuring Tourfic Email Piping in detail.
Settings #
To configure the email piping feature, start by navigating to Tourfic Settings > Email Settings > Email Piping. Once you land on the page, you will find several options to configure. These options are straightforward, but here’s a brief explanation of each to help you get started.
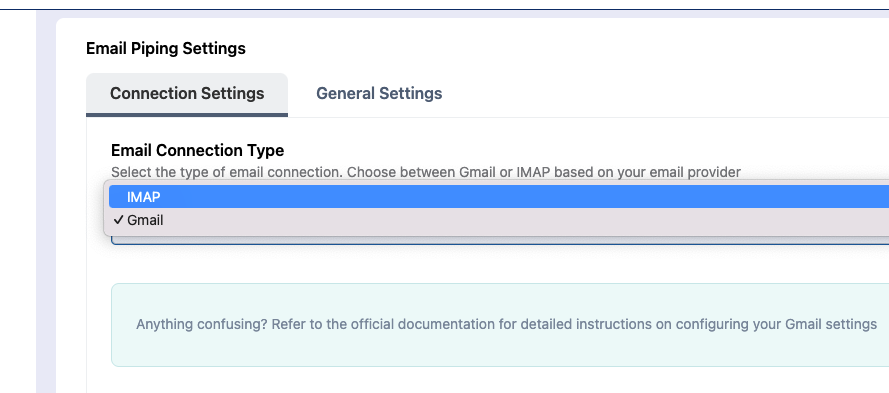
Email Connection Type: #
This setting allows you to select the email provider service you want to use for email piping. Tourfic provides two options: IMAP (Internet Messaging Access Protocol) and Gmail. You can choose the one that suits your needs.
The Options for IMAP #
- Email Address: This is the email address you wish to connect to the system for email piping.
- Password: This refers to the email password you set when creating the email account on your server.
- Incoming Mail Server: The address of the incoming mail server that will connect with the system.
- Connection Type: Specifies the connection type used by your server, such as SSL, TLS, or None. The default option is SSL.
- Connection Port: This is the port number your server uses to connect the email service. For SSL, the default port is 993.
Additionally, there is a “Test Connection” feature, which is used to verify that the provided configuration connects successfully with the IMAP server.
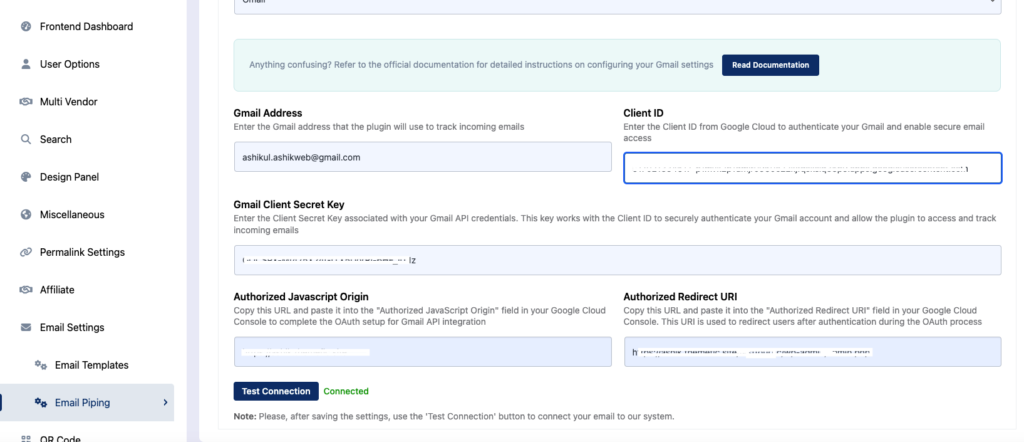
The Options for Gmail #
- Gmail Address: The Gmail account you want to connect to the system.
- Client ID: The Gmail Api client ID for connecting Gmail to our system.
- Gmail Client Secret Key: The Client Secret Key for connecting with GMAIL API to our system. Authorized Javascript Origin, and Authorized Redirect URI options are for authorizing your website with Gmail API, we will talk about it a little bit later.
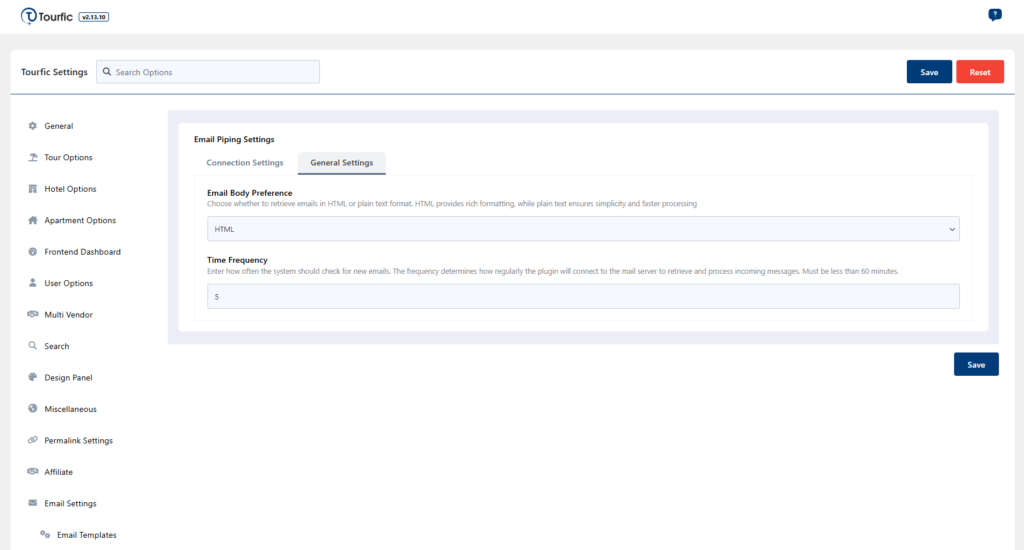
General Settings #
Email Body Preference: Type of email body you want. HTML or plain text.
Time Frequency: This option is for how often our system will check for the new email.
Now the fun part begins.
How to Connect your Email to Tourfic Email Piping? #
To connect your business email (e.g., someone@example.com) to the email piping system, you first need a domain-specific email account. If you don’t have one, please reach out to your server administrator or hosting provider for assistance in creating the account. Additionally, ask them to provide you with the necessary configuration details, such as the incoming mail server, connection type, and port.
Once the email account is created, follow these steps:
Step 1: Enter the required information into the relevant fields in the settings, such as the email address, password, mail server, and URL, according to the details provided by your server configuration.
Here is an example of my server configuration:

Here is how my settings look:
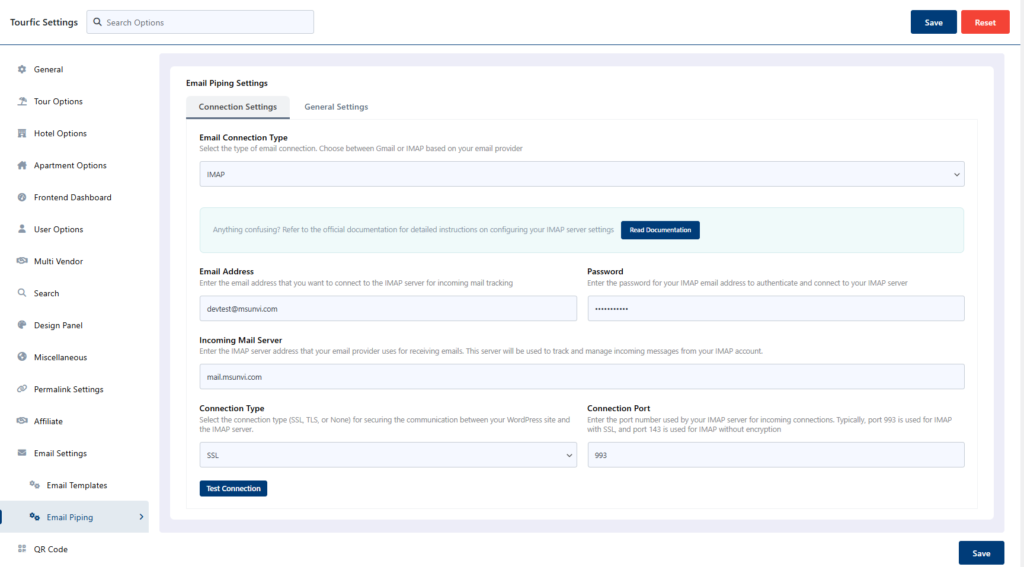
Step 2: Once all the information is entered, use the “Test Connection” button to verify the connection between your email and Tourfic.
If all the settings are correctly entered, you will see a confirmation message next to the “Test Connection” button that says “Connection Successful.”
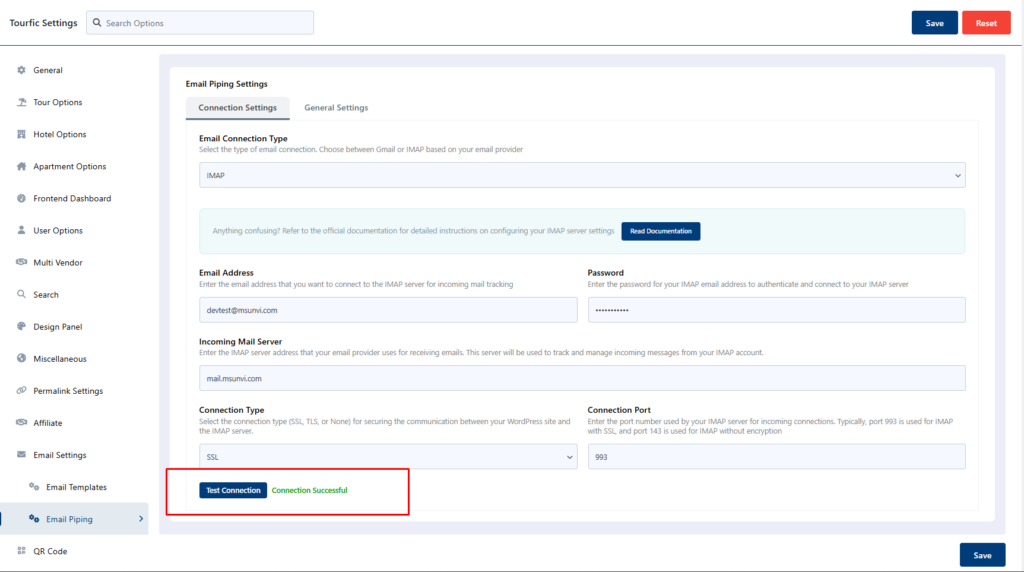
Once the connection is successful, save the settings by clicking the “Save” button.
Congratulations! Your IMAP settings are now successfully connected. From this point on, any user replying to your enquiry will appear directly on the enquiry details page.
For further information and a visual guide, please refer to the video.
How to Connect your Gmail to Tourfic Email Piping? #
Tourfic Email Piping also offers to connect email through Gmail API. For connecting your Gmail to our Tourfic Email Piping system follow the steps shown below.
Step 1: First of all you will require a Google Cloud Platform project Click here to create a Cloud platform project, We will name this project as DevTest.
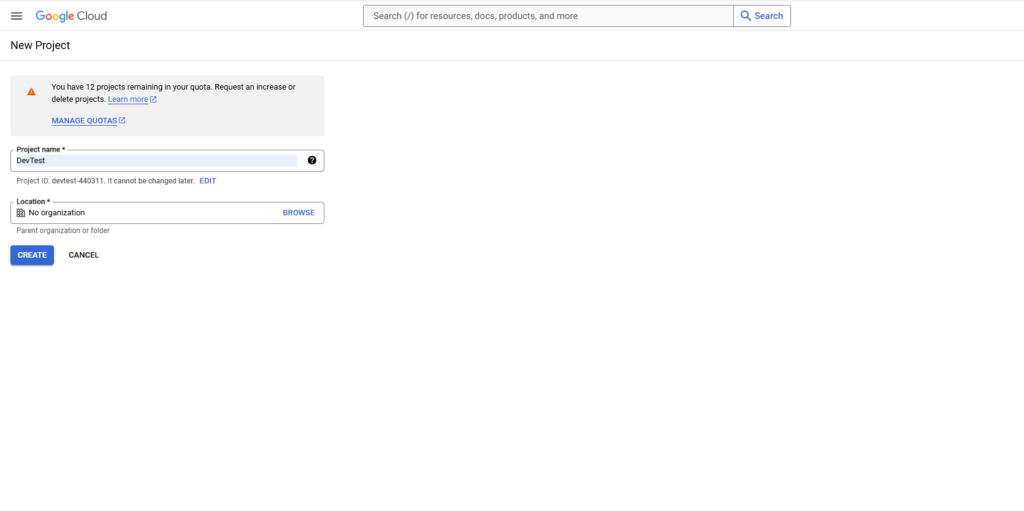
After filling in all the details click the “Create” button to create a new project.
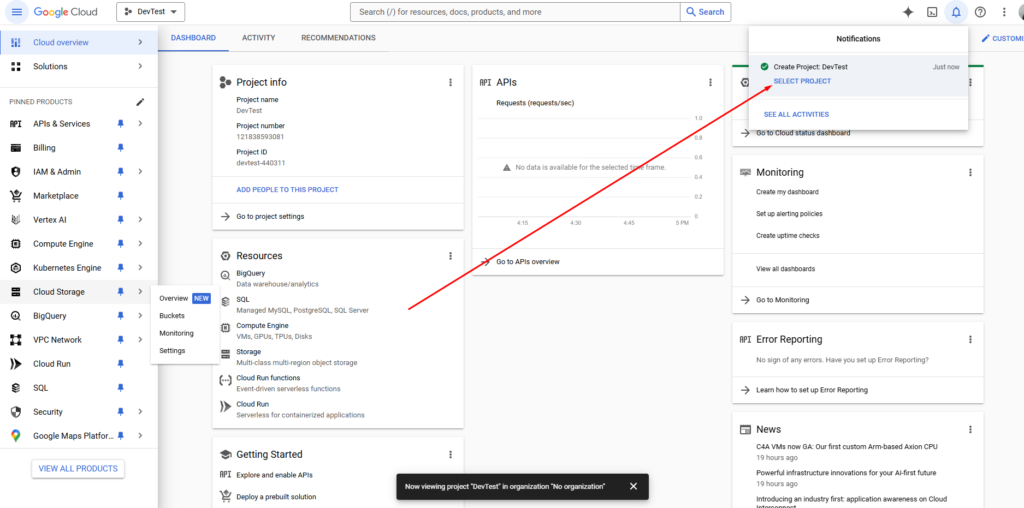
Step 2: You can select the project from the dropdown after the google cloud logo, or from the notification dropdown. I am selecting the project from the notification dropdown.
Step 3: Click the menu and go to APIs and services > Library, after loading the page, search for “Gmail API” and click the result shown in the screenshot below.
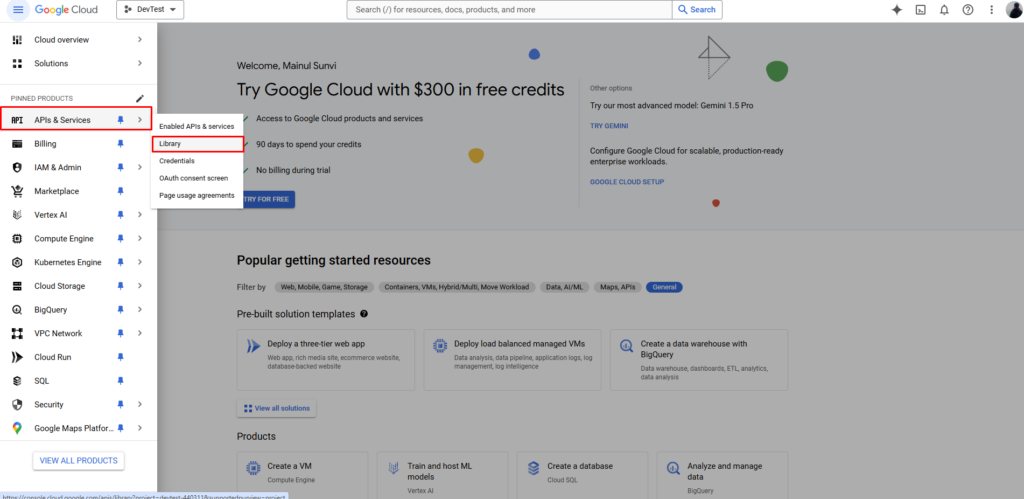
Now click the “Enable” button to enable the Gmail APIs, as shown in the below screenshot.
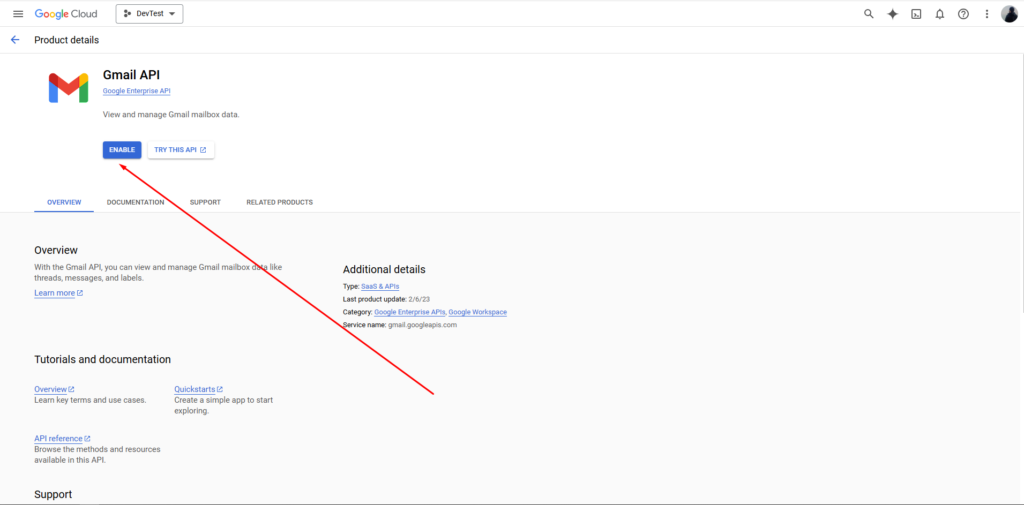
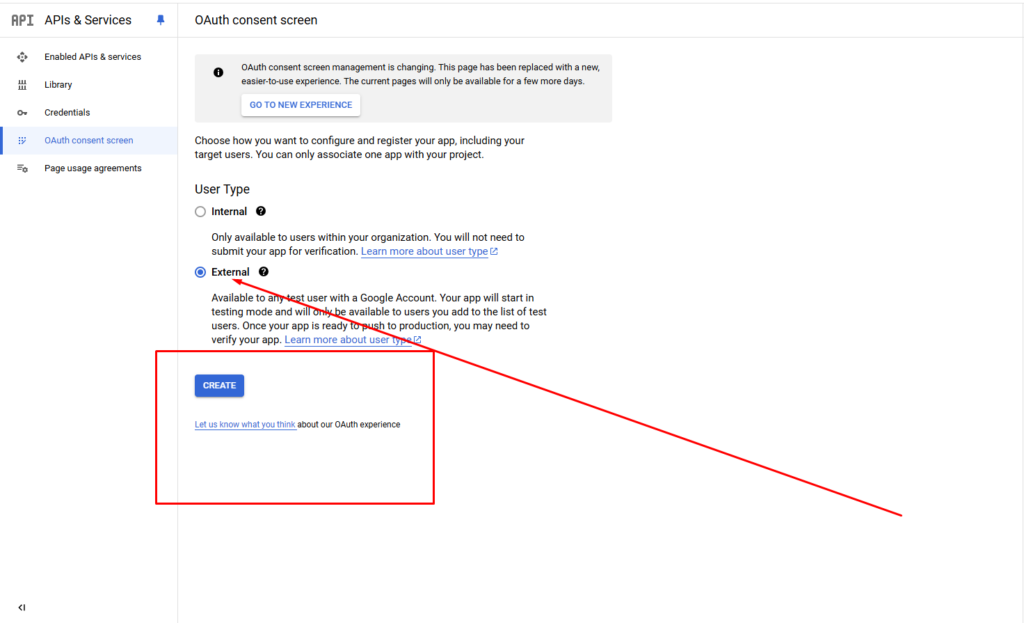
Step 4: After enabling the Gmail API now go to the APIs and services > OAuth Consent screen and Choose User Type as “External”, finally click the “Create” button to go to the next page.
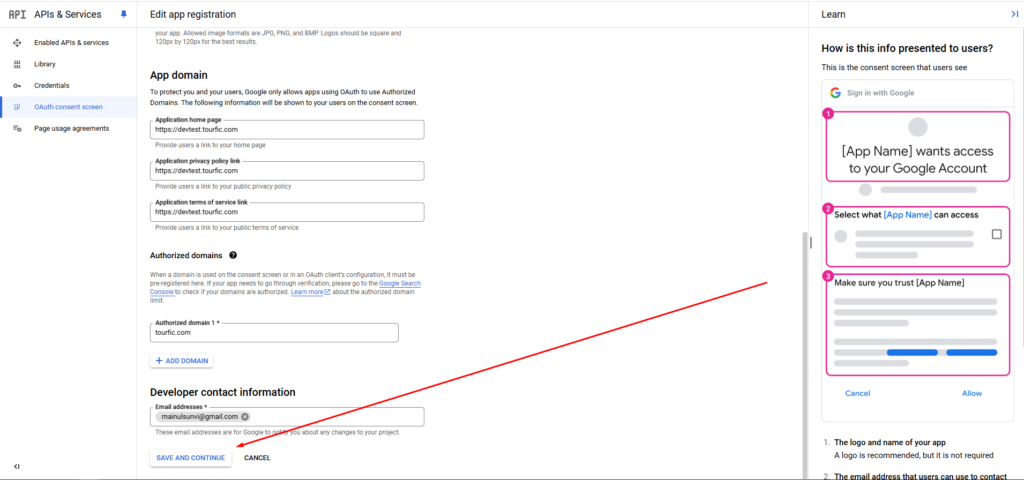
Step 5: Now fill in the app information properly, you can add any name and logo in the app, for sec of this tutorial I am filling in the name Tourfic EP and the tourfic logo. After filling in all the info, insert the email to the Developer Contact Information and click on “Save and Continue”.
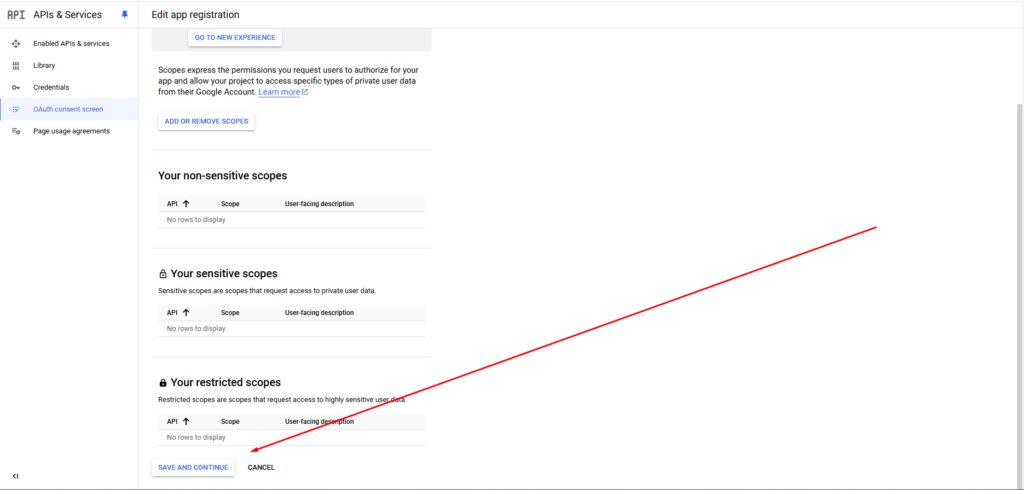
Step 6: For the “Scope page” you do not need to fill anything, just click the ‘Save and Continue Button once again”
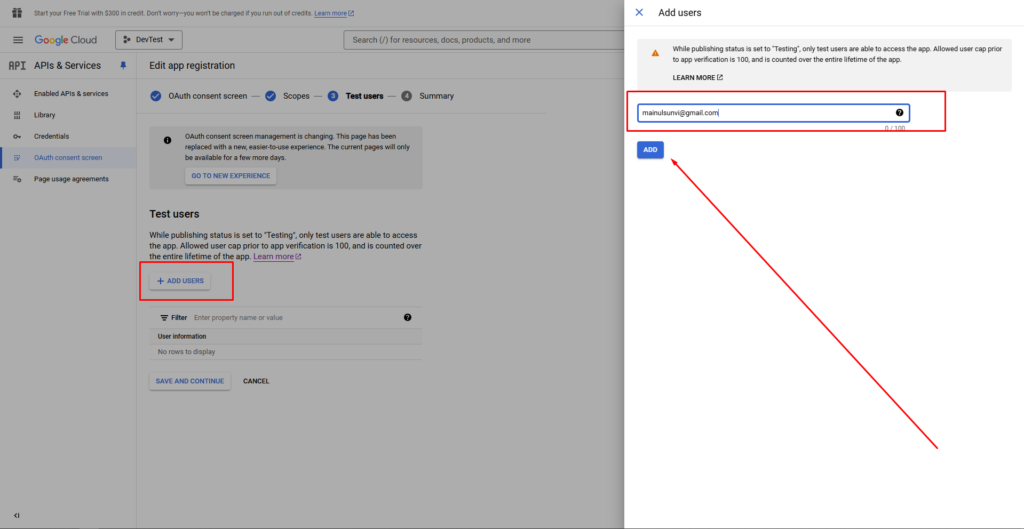
Spet 7: If everything is filled up correctly as explained above, you will land on the Test User page. From the “Test Users” section click the “Add Users” button.
After clicking the button a side menu will be open.
Just paste the email and click the “Add” button. The side menu will disappear and then click the “Save and Continue” button to go to the next step.
Now all you need to just click on the “Back to Dashboard” button and click on the “Publish App” icon.
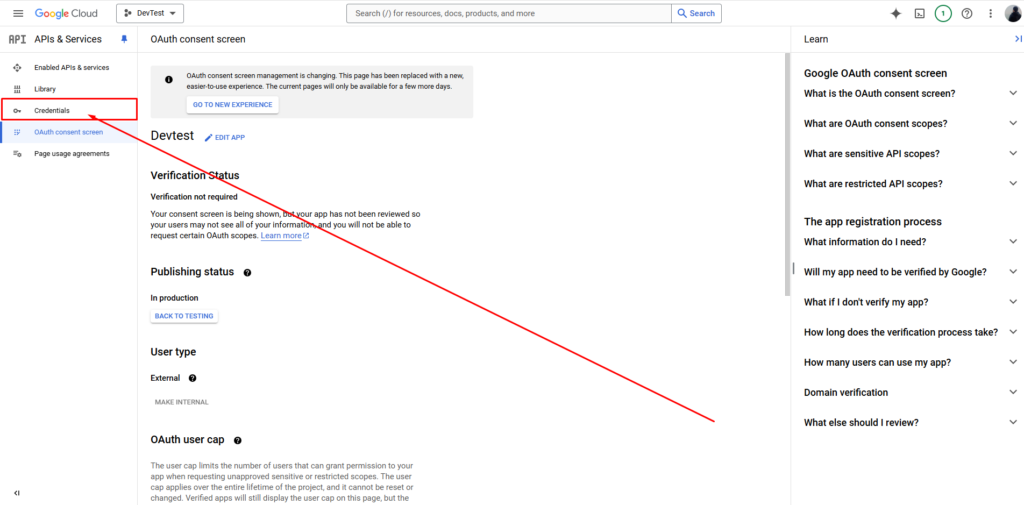
Step 8: After successfully publishing the app, now it’s time to create the credentials. To create the credentials click on the “Credentials” link below the “Library” on the left menu.
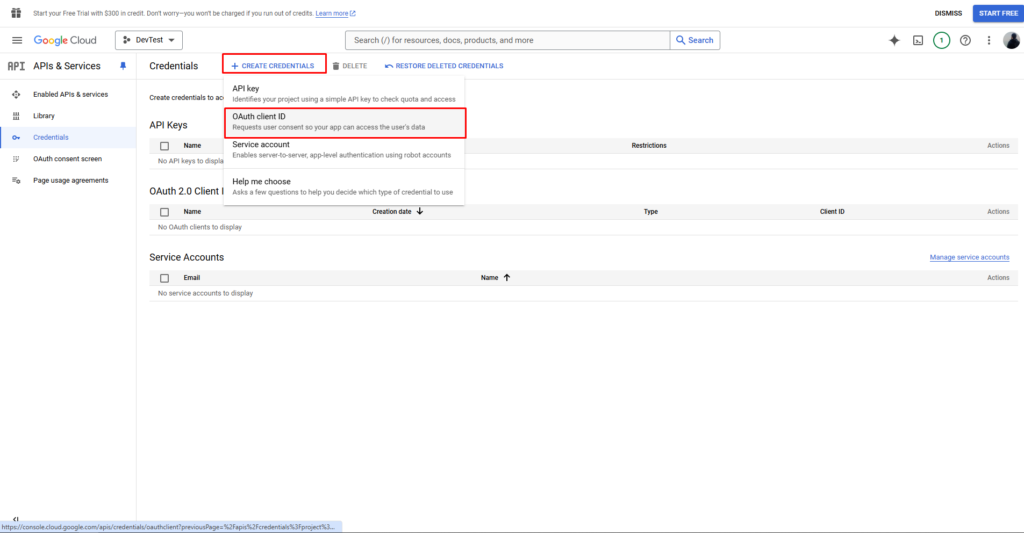
Step 9: Click on the “Create Credentials” button, then select the “OAuth Client ID” option from the dropdown.
[Screenshot]
Step 10: On the “Create OAuth Client ID” page, you’ll need to configure the Application Type. Select Web Application from the available options.
Step 11: Next, first select the “Application Type” as Web Application from dropdown and then, provide a name for the OAuth 2.0 client in the Name field. This can be any descriptive name you choose for your client, such as “Tourfic Email Piping.”
Step 12: In the Authorized JavaScript Origins section, enter the URL from the Tourfic Email Piping settings’ Authorized JavaScript Origins field. This ensures that the Gmail API is authorized to interact with your website’s email piping settings. Similarly, in the Authorized Redirect URIs section, add the URL from the Tourfic Email Piping settings’ Authorized Redirect URIs field to complete the authorization process.
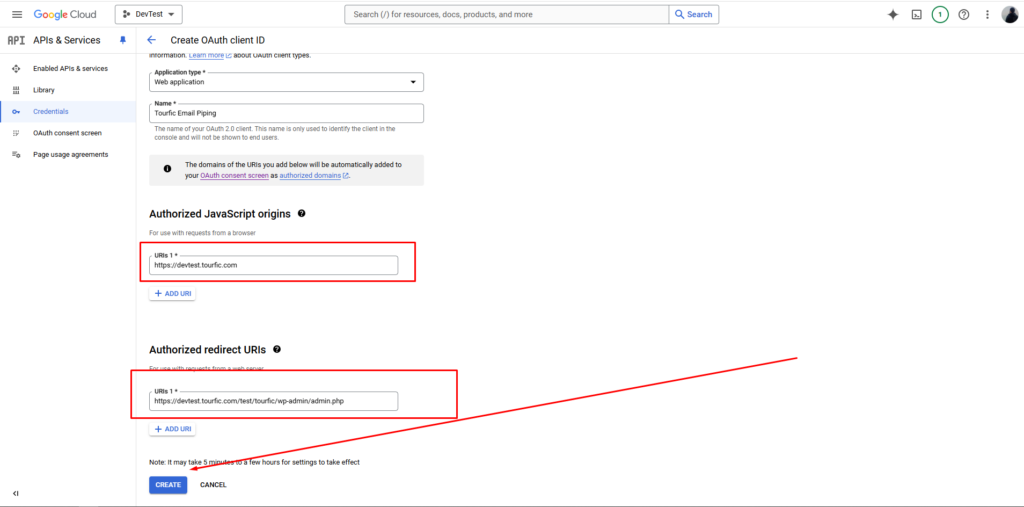
After filling in these details, click the “Create” button.
Once the credentials are successfully created, you will receive the Client ID and Client Secret Key. Save these values, as you will need them to configure Tourfic Email Piping.
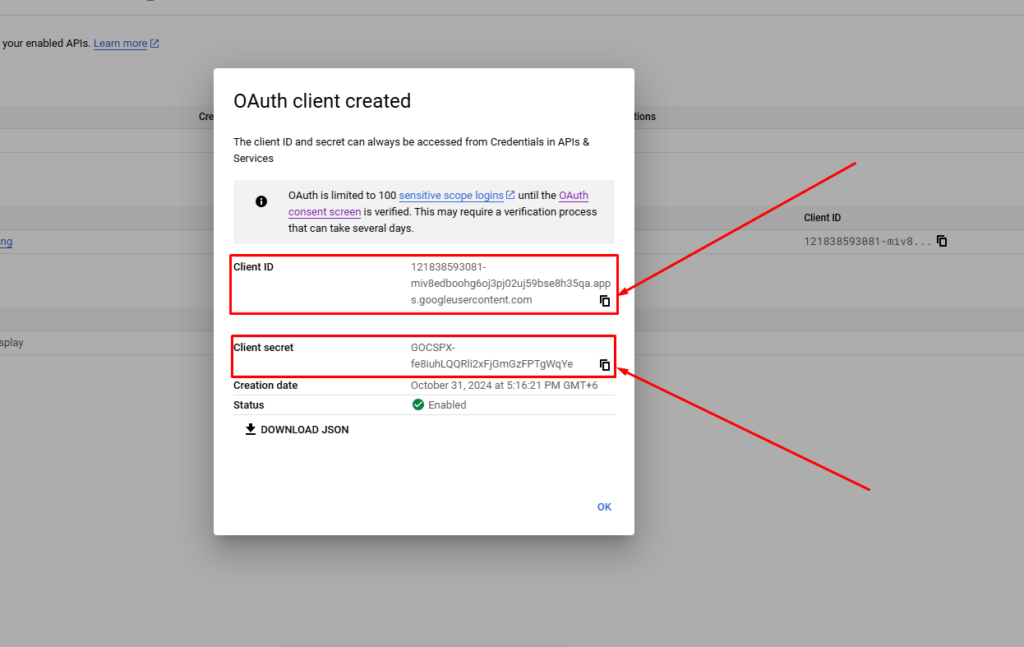
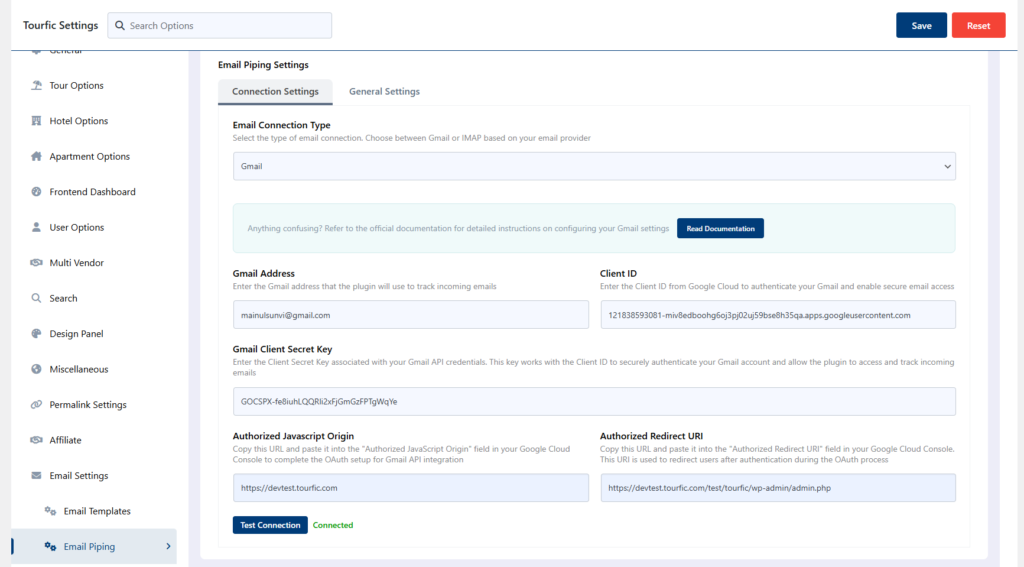
Next, copy the Client ID and Client Secret Key into the appropriate fields on the Tourfic Settings page.
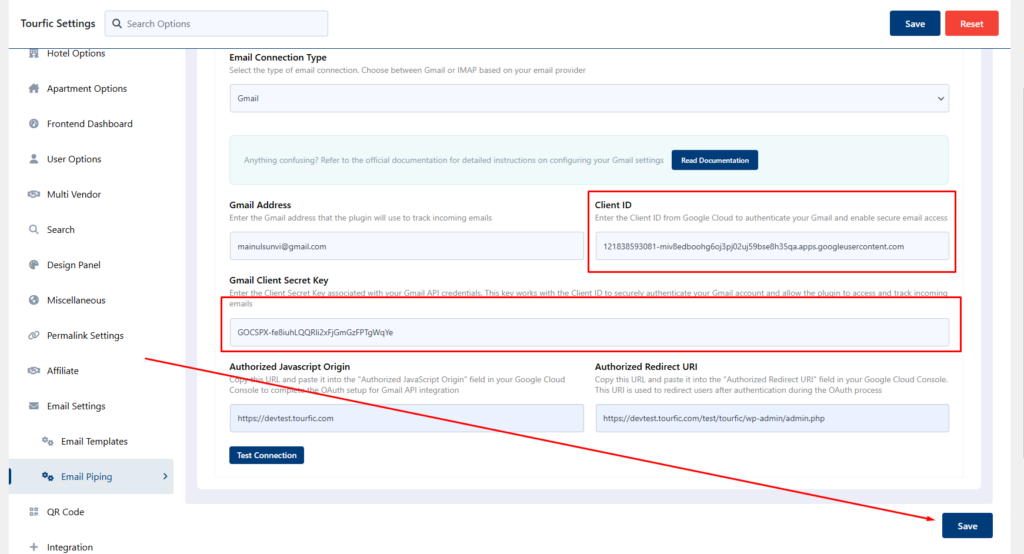
Once everything is filled in correctly, click the Save button. Then, click the “Test Connection” button.
A popup will appear where you will select the same Gmail account you entered in the Tourfic settings.
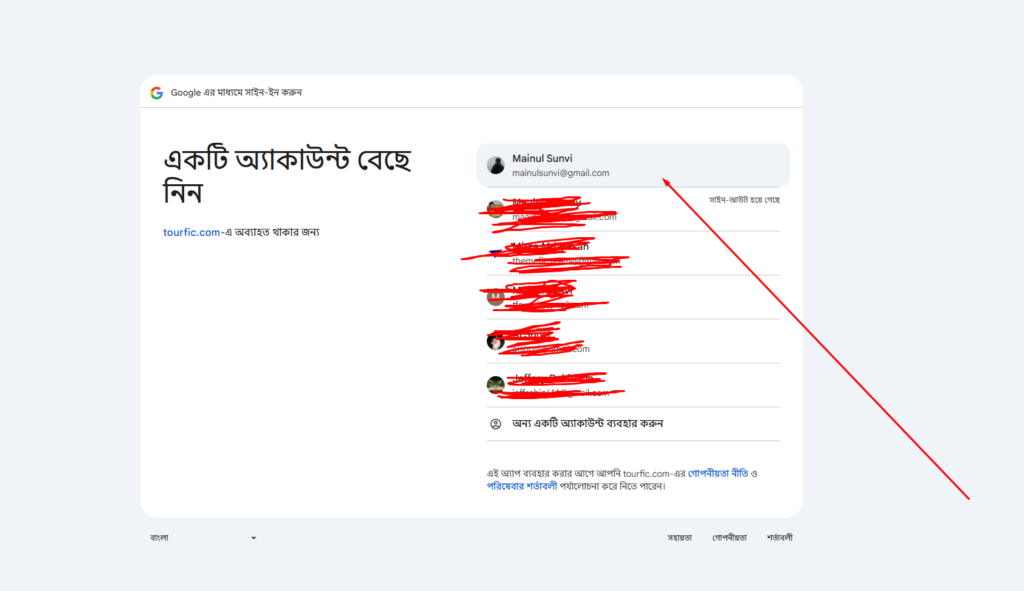
After selecting the account, click on the “Advance” button, followed by the “Go to [your project]” link.
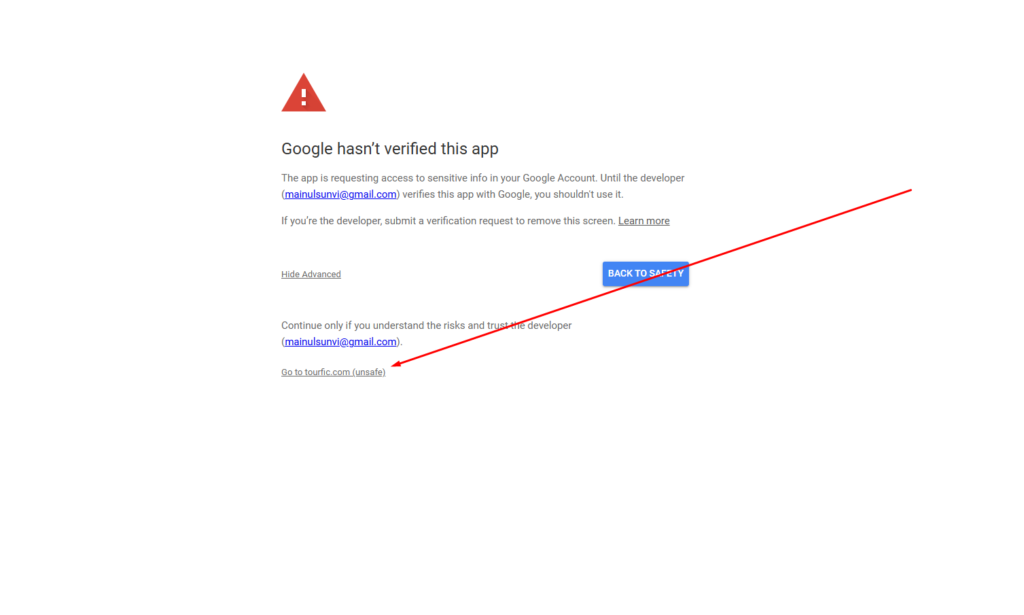
Now, click the “Continue” button. This is the final step, and after clicking “Continue,” wait for a few moments while the system redirects you back to the Email Piping settings page.
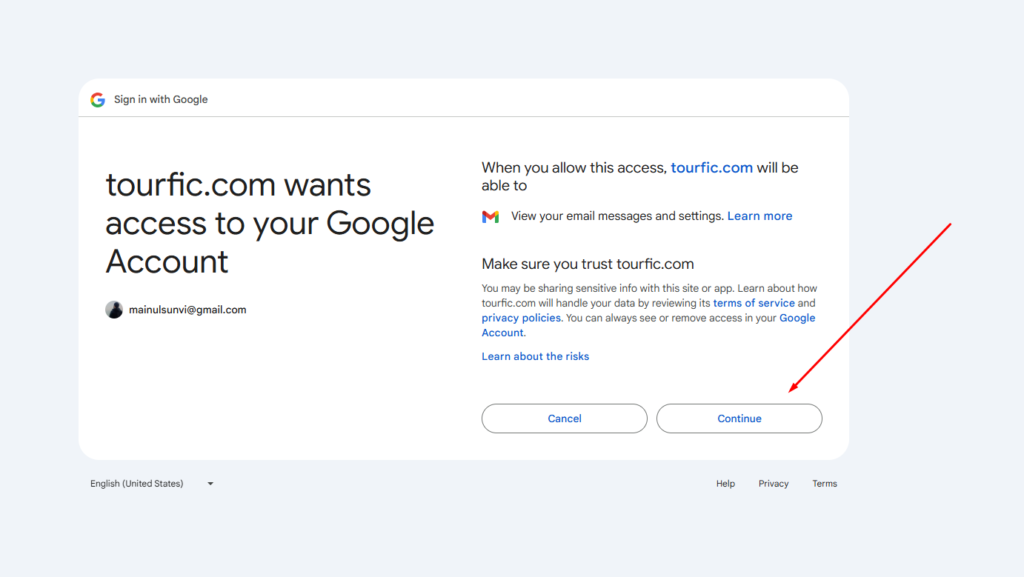
Once the above steps are completed, congratulations! Your Gmail account is now successfully connected to the Tourfic Email Piping system.
For further information and a visual guide, please refer to this video.
Final Words
Tourfic’s Email Piping feature offers a powerful solution for managing customer communication directly from your WordPress dashboard. Whether using Gmail API or IMAP, the system simplifies the process of replying to customer inquiries, eliminating the need to switch between email platforms. By following the outlined steps to configure settings, create credentials, and authorize the connection, you can seamlessly integrate your email with the Tourfic system. Once set up, this feature enhances communication efficiency and improves the overall booking management experience, allowing you to manage all interactions in one place.
