Ultimate Addons for Contact Form 7 takes your contact form 7 forms to the next level by adding powerful features and enhancements. As part of our ongoing commitment to developing new features, we’re excited to introduce Email Piping — a game-changing feature for seamless email management for database addon.
With Email Piping, you can receive emails directly from your inbox and reply to them right from your WordPress dashboard, eliminating the need to switch between platforms. This makes managing inquiries, customer support, and follow-ups more efficient and convenient than ever.
What is an Email Pipeline? #
An email pipeline is an automated system designed for efficient email management. It streamlines the entire email process, from sending to receiving, ensuring a smooth and organized workflow. By automating email handling, it helps reduce manual effort, improves response times, and enhances overall communication efficiency.
Key Components of an Email Pipeline #
Email Piping operates on two core concepts: Incoming Email Piping and Outgoing Email Piping. These two processes work together to automate and streamline email communication.
Incoming Email Piping #
incoming email piping allows emails sent to a specific inbox to be automatically retrieved, processed, and routed within a system. This is useful for handling support tickets, inquiries, and automated workflows.
- It captures emails from an inbox using IMAP/POP3 or email services like Gmail.
- Filters spam and categorizes emails based on rules.
- Extracts relevant data (e.g., ticket numbers, order IDs).
- Routes emails to the appropriate department or system (e.g., CRM, help desk).
- Automates responses or triggers actions based on email content.
Outgoing Email Pipeline #
Outgoing email piping automates the sending of emails, ensuring smooth delivery, tracking, and engagement monitoring. It is commonly used for marketing campaigns, automated replies, and transactional emails.
- Generates emails with dynamic content and personalized templates.
- Validates emails to avoid spam filters and formatting errors.
- Routes emails through SMTP servers or third-party APIs (e.g., SendGrid, Mailchimp).
- Tracks email delivery, open rates, and clicks.
- Stores sent emails for records in the database or any other platform.
The UACF7 Email Piping feature brings a powerful way to automate email handling within Ultimate Addons for Contact Form 7. It enables seamless email management by allowing you to receive and send emails directly in your WordPress dashboard and respond without switching between platforms.
Let’s get started!
Ultimate Addons For Contact Form 7 — Email Piping #
Prerequisites #
- The Email Piping is a pro feature of the Ultimate Addons for Contact Form 7 plugin. Ensure you have a valid license and the pro plugin activated. If you don’t have one yet, you can get one from here.
- Ensure you’ve updated the Ultimate Addons for Contact Form 7 Plugin to version 3.5.2 or higher and the Ultimate Addons for Contact Form 7 Pro Plugin to version 1.8.2 or higher.
- Ensure that the Database Addon is enabled from the addon list. The email piping is an enhanced feature of the Database Pro Addon, so you need to enable the Database Pro addon to use this feature. Check the database pro addon documentation here.
Settings of UAFC7 Email Piping #
To set up UACF7 Email Piping, navigate to your WordPress Dashboard and go to the Ultimate Addons > Settings > UACF7 Email Configuration > Email Piping (Receiving). Here, you’ll find several options to configure your email piping settings.
Now, let’s go through each setting one by one.
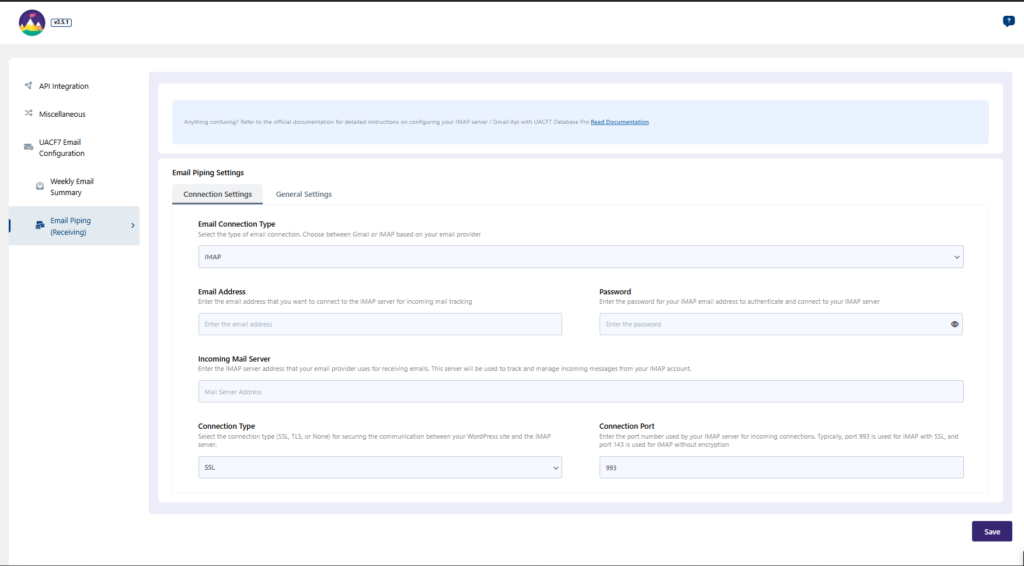
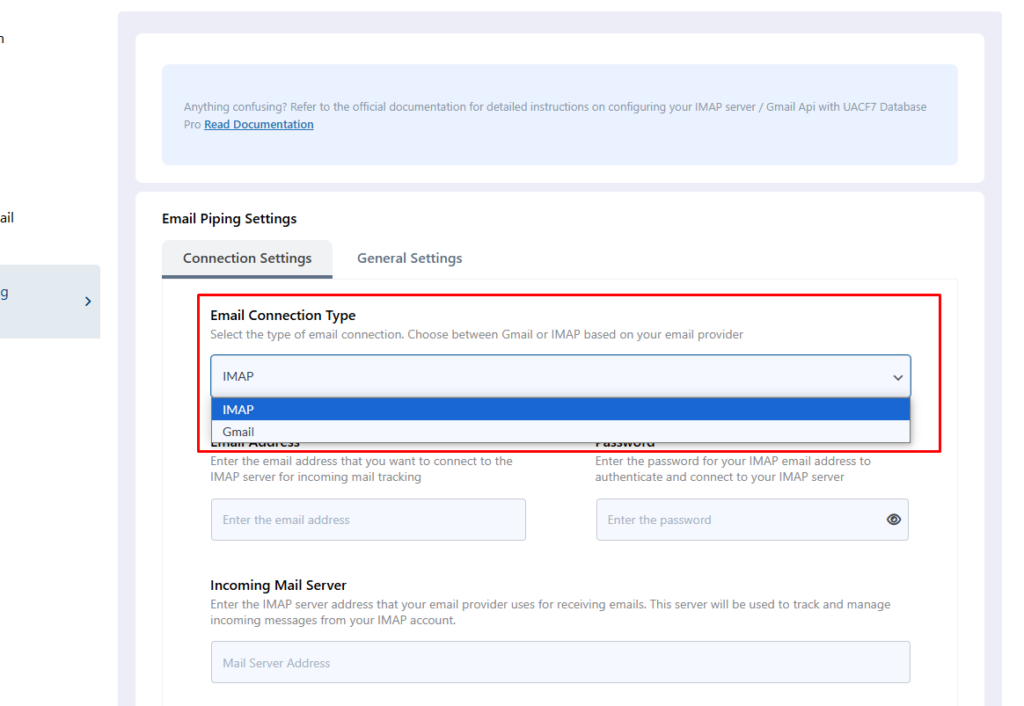
Email Connection Type #
This setting allows you to choose the email provider service you want to use for email piping. We provide two options:
- IMAP (Internet Messaging Access Protocol) – Ideal for connecting with various email services that support IMAP.
- Gmail – A dedicated option for integrating Gmail accounts for email piping.
Select the option that best suits your needs for seamless email retrieval and processing.
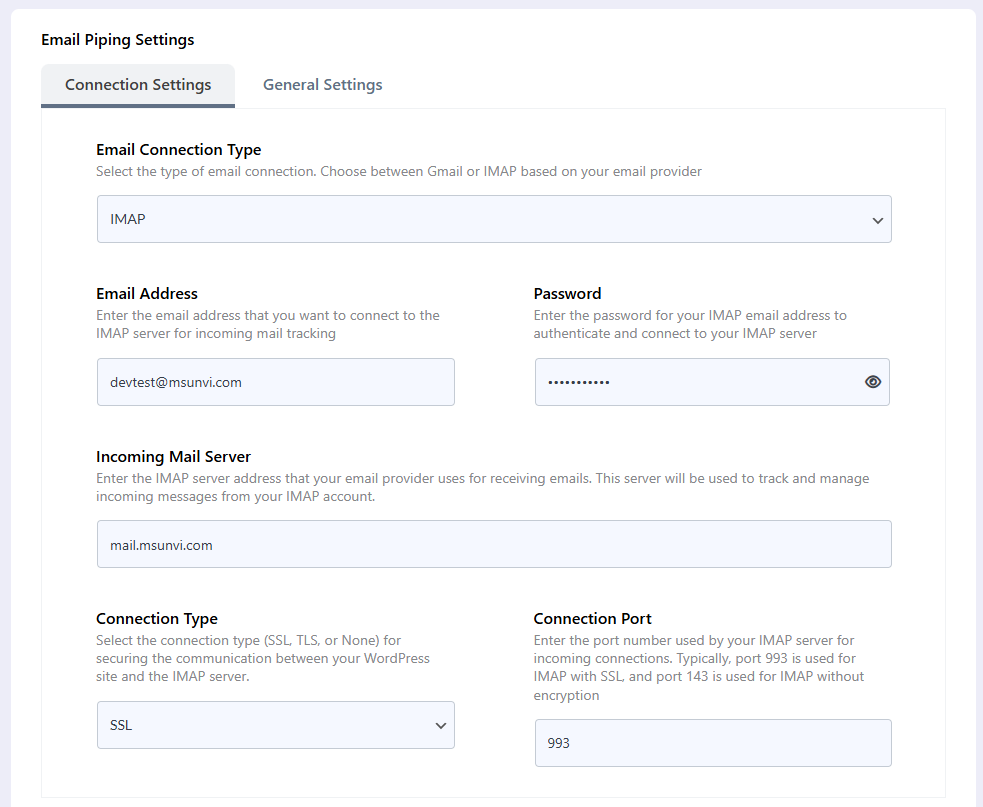
The Options for IMAP #
- Email Address: Enter the email address you want to connect to the system for email piping. This is the address where incoming emails will be retrieved.
- Password: Provide the email password set during the creation of the email account on your server. This is required for authentication.
- Incoming Mail Server: Specify the address of the incoming mail server that will be used to connect with the system.
- Connection Type: Choose the connection type supported by your email server. Available options include SSL, TLS, or None, with SSL being the default for secure connections.
- Connection Port: Enter the port number required for the email service connection. The default port for SSL is 993. Ensure this matches your email provider’s configuration.
Additionally, after saving the settings, there is a “Test Connection” option, which is used to verify that the provided configuration connects successfully with the IMAP server.
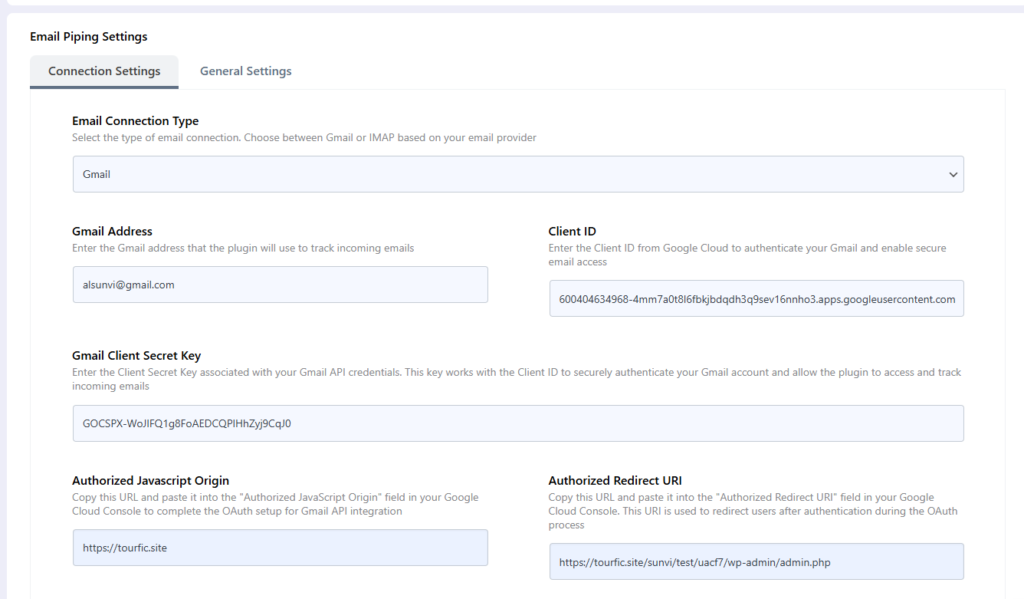
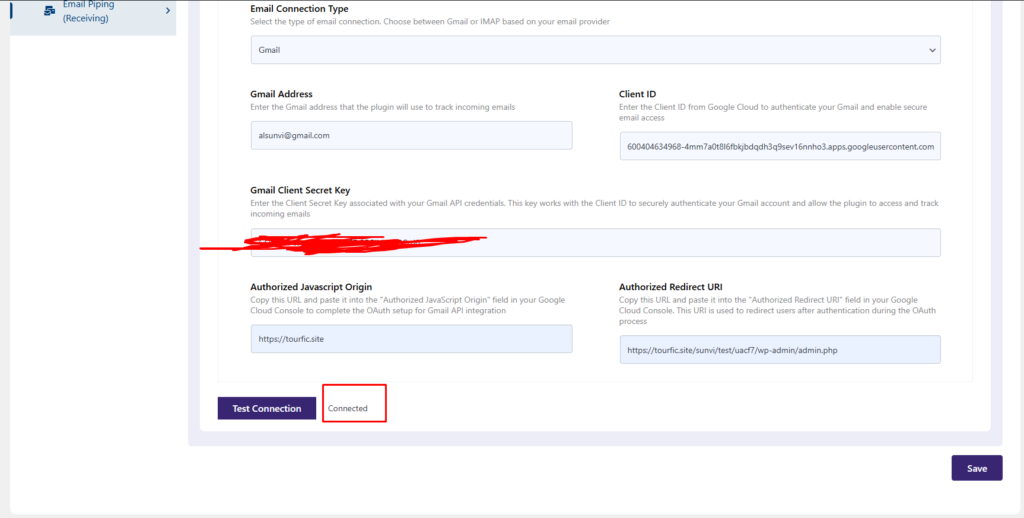
The Options for Gmail #
- Gmail Address: Enter the Gmail account you want to connect to the system for email piping.
- Client ID: Provide the Gmail API Client ID required for connecting your Gmail account to the system.
- Gmail Client Secret Key: Enter the Client Secret Key needed to authenticate and establish a secure connection with the Gmail API.
- Authorized JavaScript Origin & Authorized Redirect URI: These options are used to authorize your website with the Gmail API. We will discuss the setup process for these options in detail later.
Additionally, after saving the settings, there is a “Test Connection” option, which is used to verify that the provided configuration connects successfully with the Gmail API.
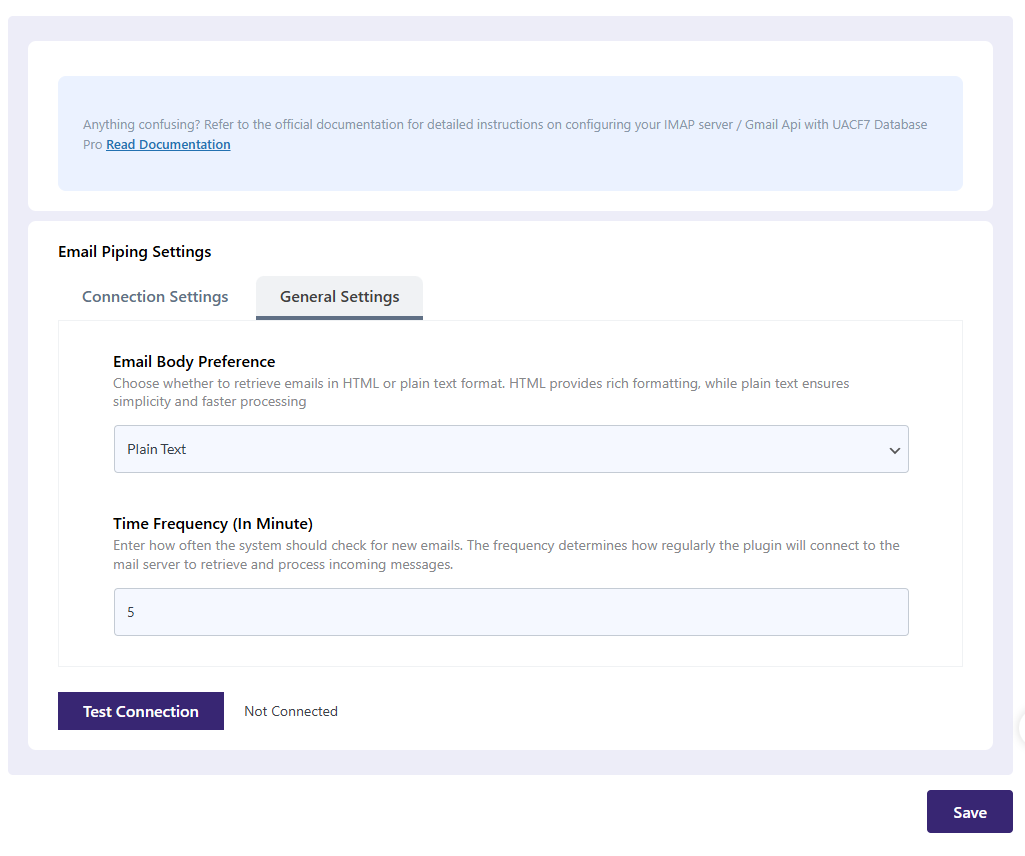
General Settings #
- Email Body Preference: Type of email body you want. HTML or plain text.
- Time Frequency: This option is for how often our system will check for the new email.
How to Connect Your Email to UACF7 Email Piping? #
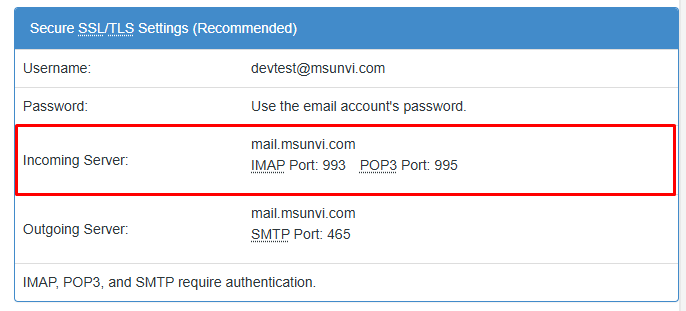
To connect your business email (e.g., someone@example.com) to the email piping system, you first need a domain-specific email account. If you don’t have one, please reach out to your server administrator or hosting provider for assistance in creating the account. Additionally, ask them to provide you with the necessary configuration details, such as the incoming mail server, connection type, and port.
Once the email account is created, follow these steps:
Step 1: Config the Settings #
Enter the required information into the relevant fields in the settings, such as the email address, password, mail server, and URL, according to the details provided by your server configuration.
Here is an example of my server configuration:
Here is how my settings look:
Step 2: Test the Connection #
Once all the information is entered, save the settings and reload the page, after reloading the page, you will a button will appaired called “Test Connection”, use the “Test Connection” button to verify the connection between your email and Tourfic.
If all the settings are correctly entered, you will see a confirmation message next to the “Test Connection” button that says “Connection Successful.
Congratulations! Your IMAP settings are now successfully connected. From this point on, any user replying to your enquiry will appear directly on the enquiry details page.
How to Connect Your Gmail to UACF7 Email Piping? #
UACF7 Email Piping also offers to connect email through Gmail API. For connecting your Gmail to our UACF7 Email Piping system follow the steps shown below.
Step 1: Create a New Project In GCP Console #
First of all you will require a Google Cloud Platform project Click here to create a Cloud platform project, We will name this project as Email Piping.
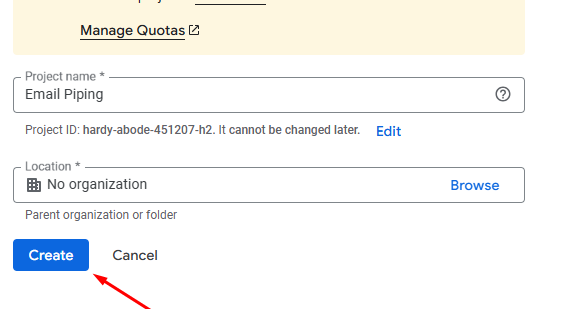
After filling in all the details click the “Create” button to create a new project.
Step 2: Enable the Library #
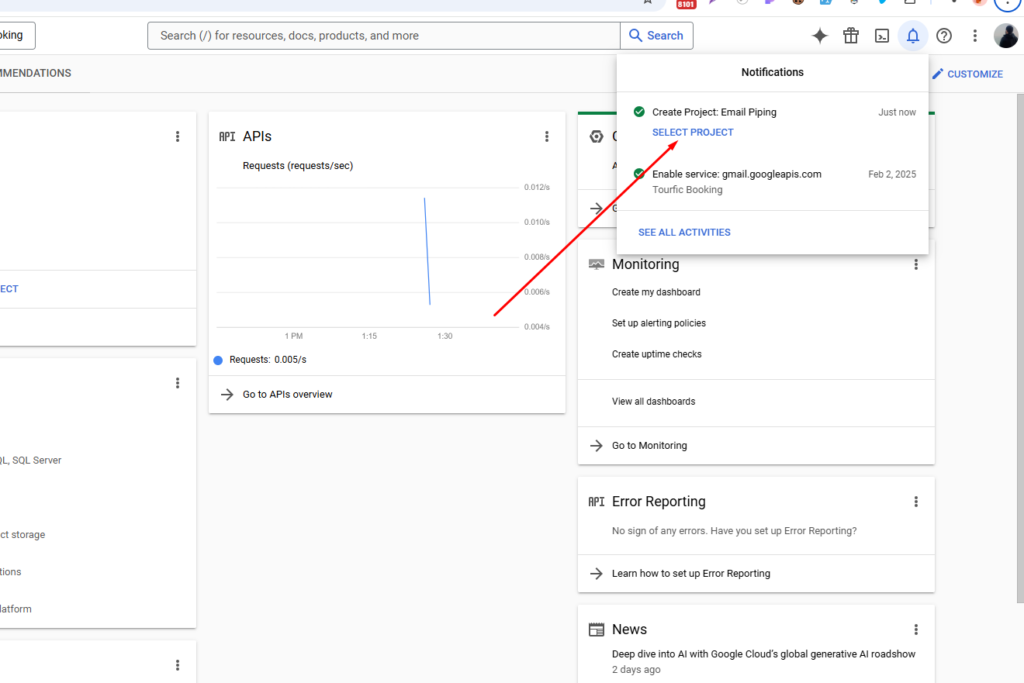
You can select the project from the dropdown after the google cloud logo, or from the notification dropdown. I am selecting the project from the notification dropdown.
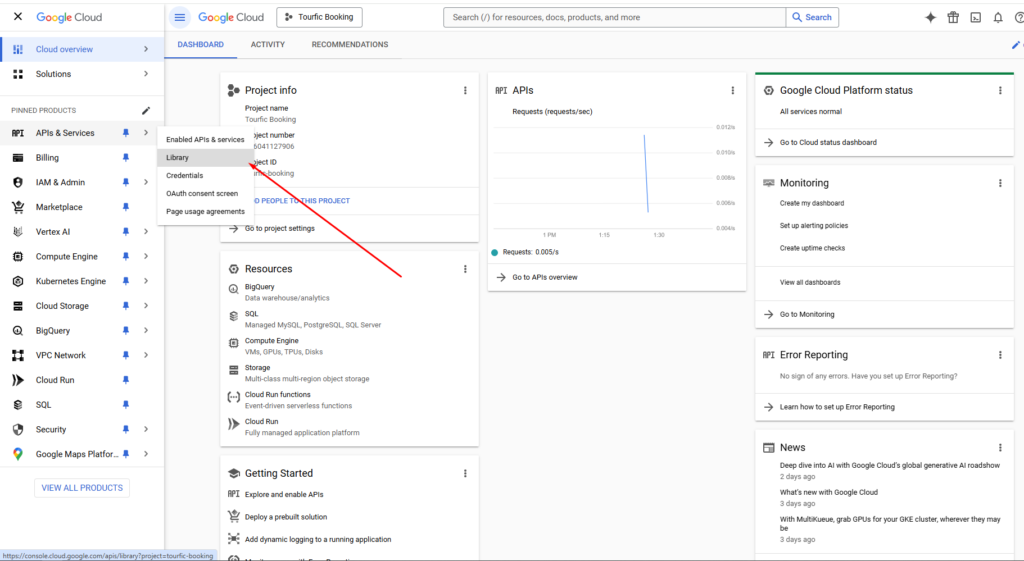
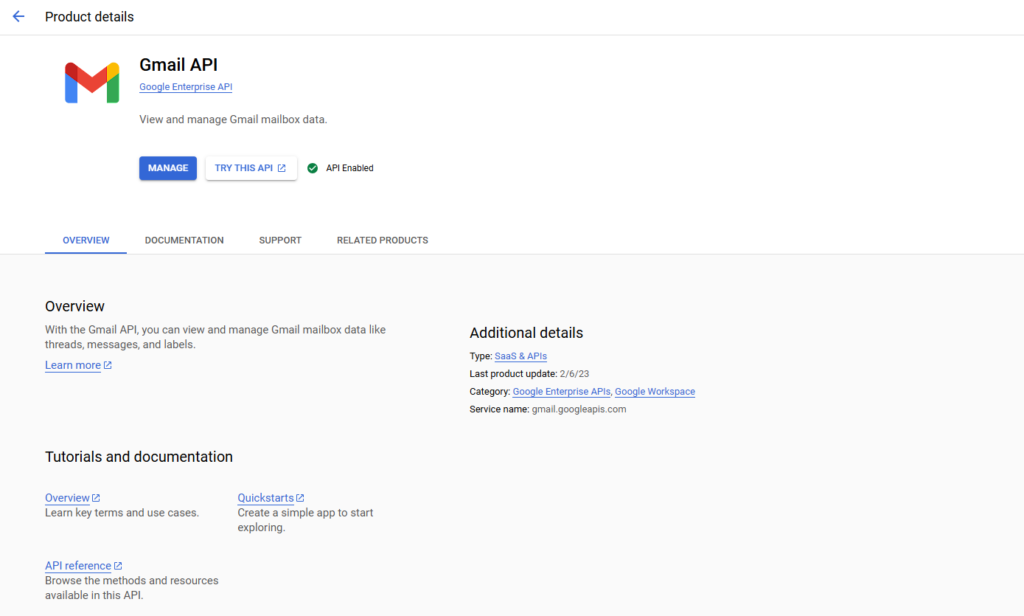
Click the menu and go to APIs and services > Library, after loading the page, search for “Gmail API” and click the result shown in the screenshot below.
Now click the “Enable” button to enable the Gmail APIs, as shown in the below screenshot.
Step 3: Creating an App for Authentication #
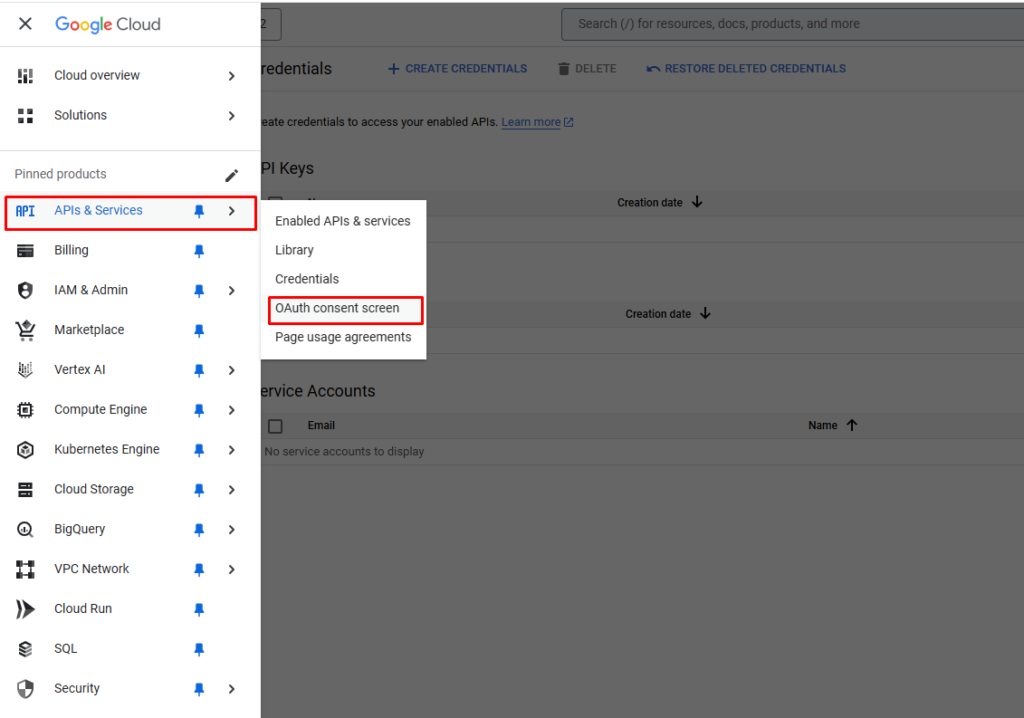
After enabling the Gmail API now go to the APIs and services > OAuth Consent screen and click on “Get Started” Button to go to the next step.
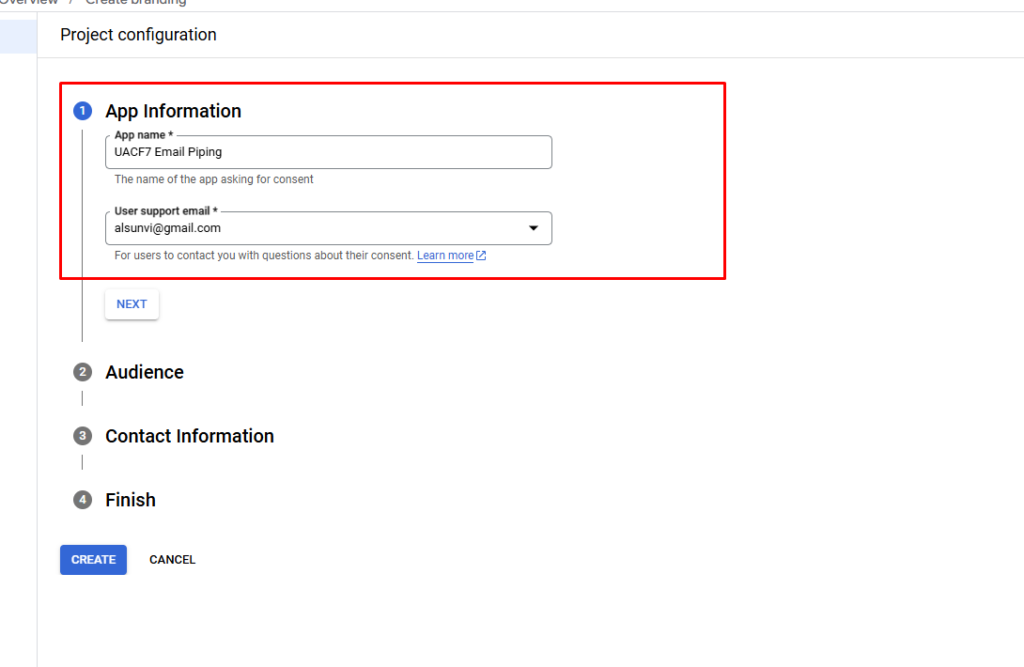
Fill in the app information according to your need, and click on the “NEXT” button to go to the next step.
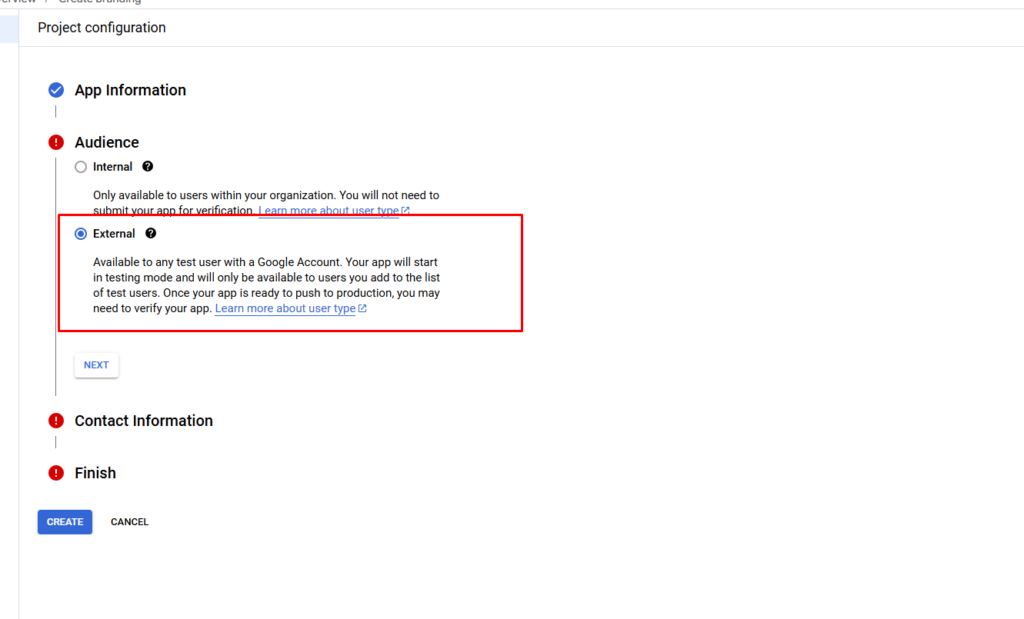
In the Audience step, choose the “External” option, and click on “NEXT” button to go to the further step.
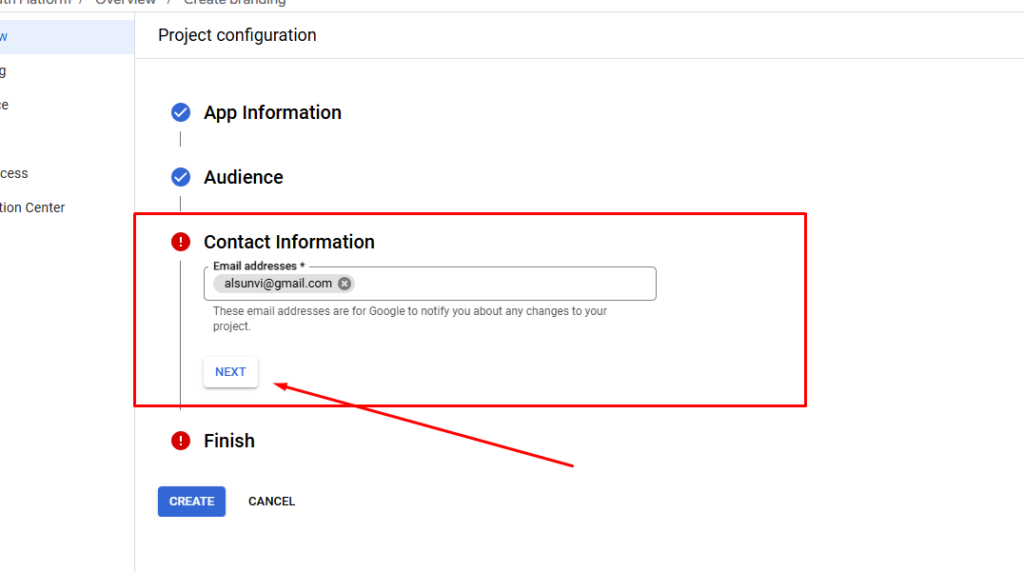
After configuring the audience step, now in contact information, fill in the email you’re using in the Email Address Section and click on the “Next” button.
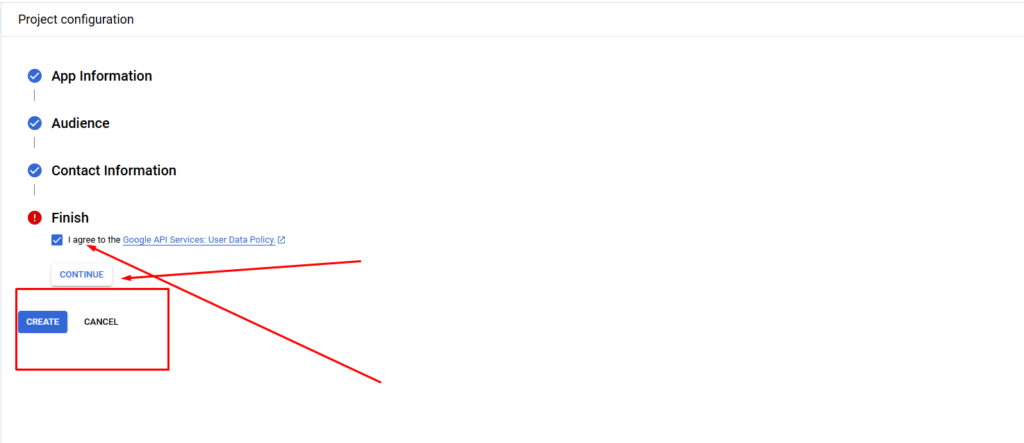
Now at the finish section, click on I agree … option and after that click on continue button.

After filling out the information correctly, now click on the Create Button.
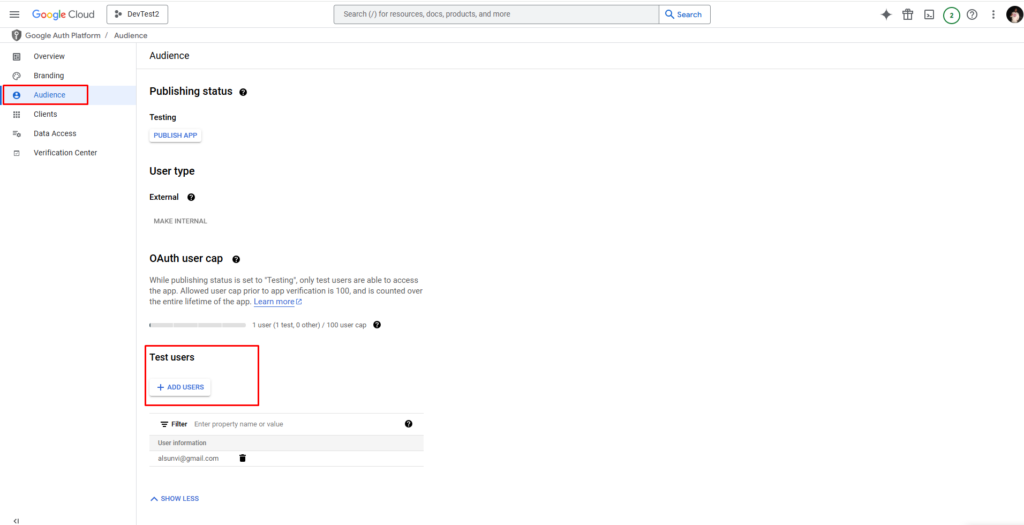
Now you need to add your email as a test user to the app. To do so, Go to the Audience section and then Click on the Add Users button from Test Users section, after then add your email and click on the “Add” Button.
Now you successfully created the App for authentication. It’s time to get the API and Secret Key.
Step 4: Get the API Credentials #
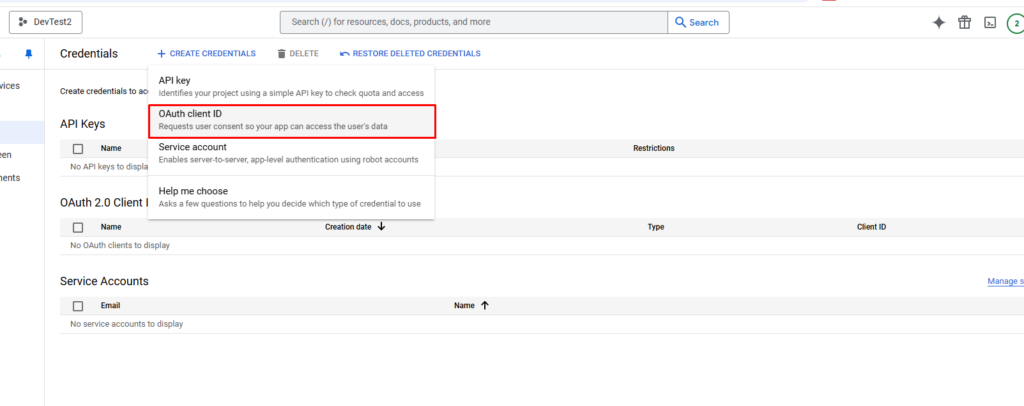
To create the credentials click on the “Credentials” link below the “Library” on the left menu.
Click on the “Create Credentials” button, then select the “OAuth Client ID” option from the dropdown.
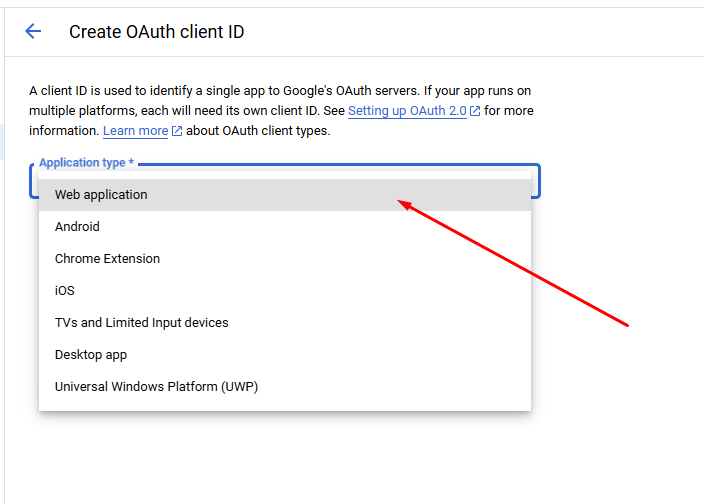
Next, first select the “Application Type” as Web Application from dropdown and then, provide a name for the OAuth 2.0 client in the Name field. This can be any descriptive name you choose for your client, such as “UACF7 Email Piping.”
In the Authorized JavaScript Origins section, enter the URL from the UACF7 Email Piping settings’ Authorized JavaScript Origins field. This ensures that the Gmail API is authorized to interact with your website’s email piping settings. Similarly, in the Authorized Redirect URIs section, add the URL from the UACF7 Email Piping settings’ Authorized Redirect URIs field to complete the authorization process.
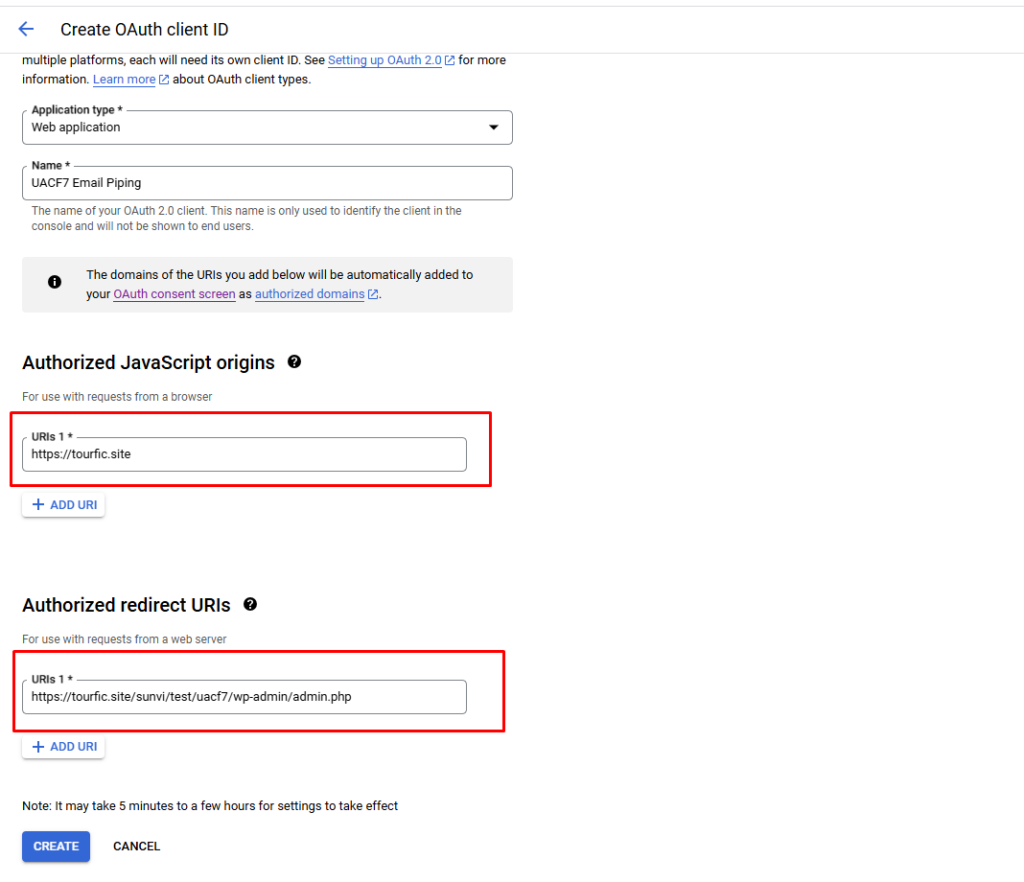
After filling in these details, click the “Create” button.
Once the credentials are successfully created, you will receive the Client ID and Client Secret Key. Save these values, as you will need them to configure UACF7 Email Piping.
Step 5: Configure the UACF7 Settings #
After creating the credentials now it’s time to configure the Ultimate Addons settings for connecting the piping.
Now navigate to the Email Piping Settings (Receiving), and Select the Connection type as Gmail and fill out the Settings field with the details.
After filling in all the information correctly, click on the save button, and after saving the settings. Reload the page.
After reloading the settings, you will find a button called “Test Connection”. Click on it and start the process of connecting the Gmail with the Email piping.
After clicking the test connection a window will appear, click on the email you use to create Gmail API.
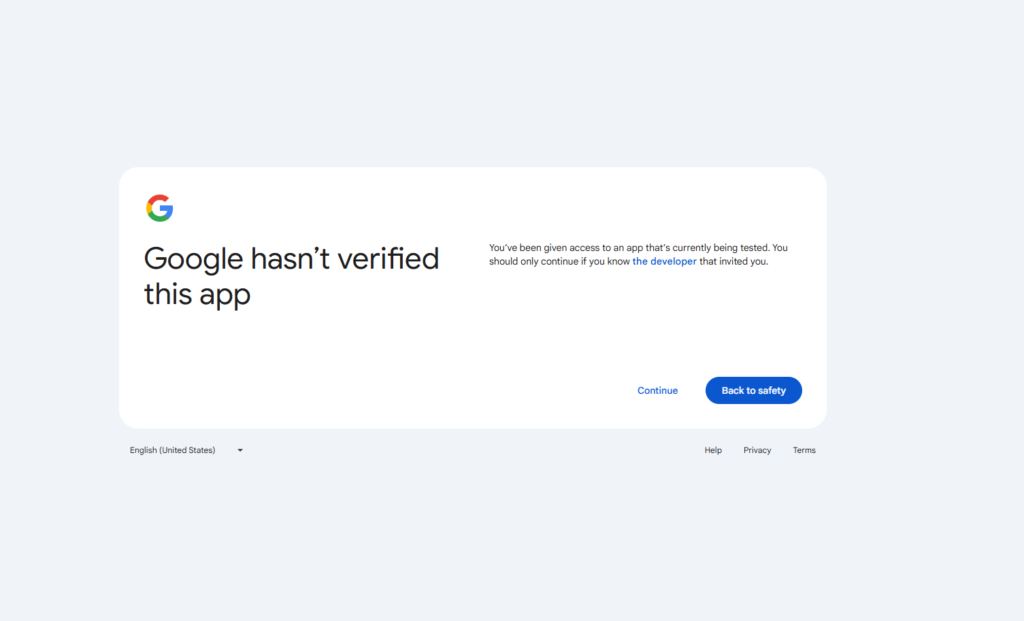
Now click on the “Continue” button to move forward.
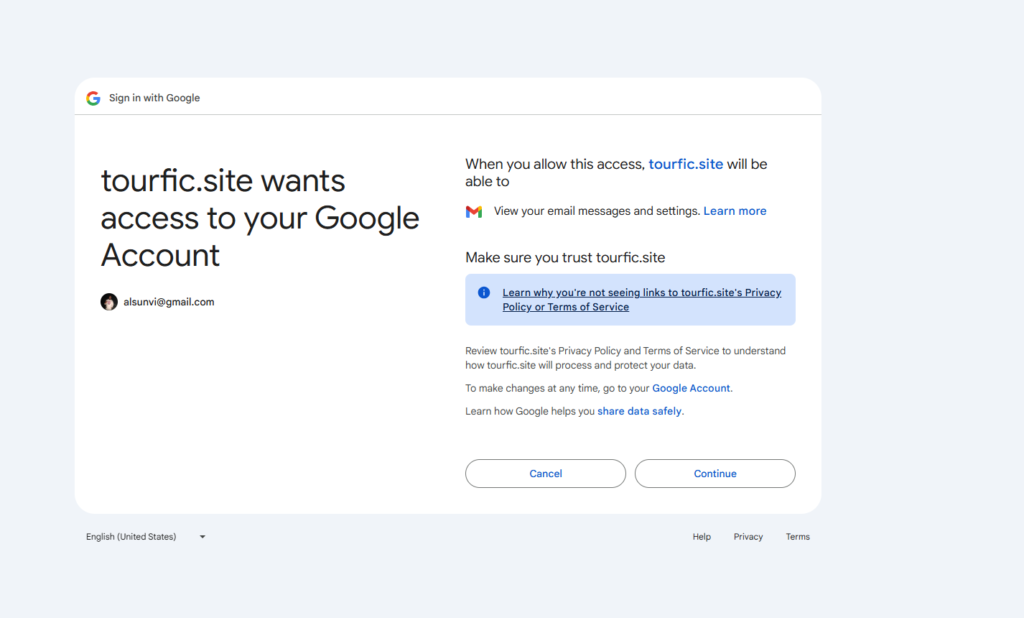
Now again click on the continue button to go further step.
Once the above steps are completed, congratulations! Your Gmail account is now successfully connected to the UACF7 Email Piping system.
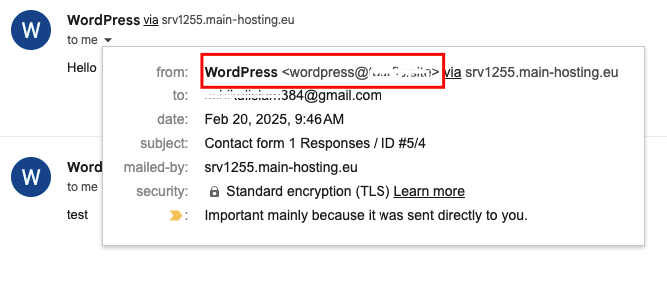
Important: Set Up “From Email” for Contact Form 7 Email Piping #
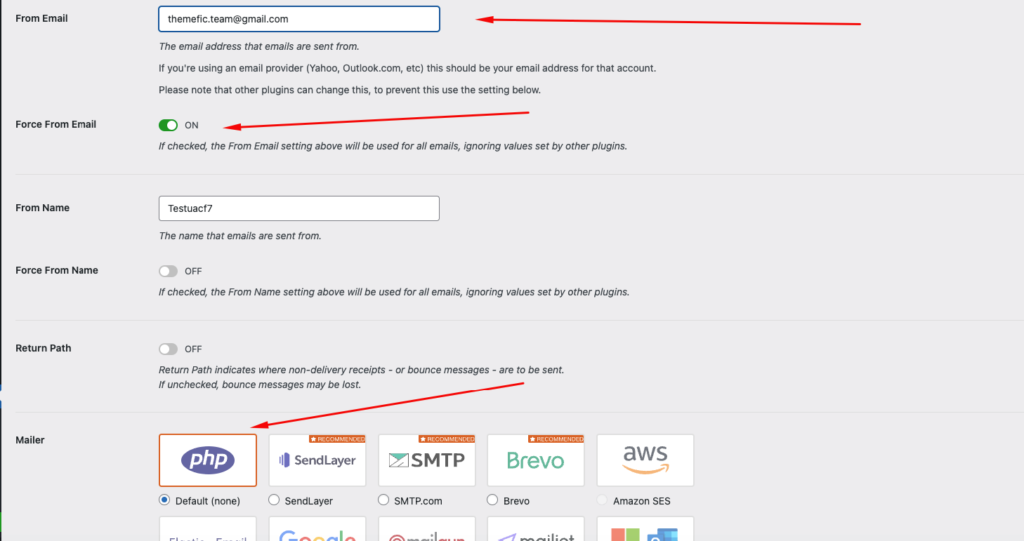
If your “From Email” is not set up correctly or is using wordpress@yourwebsite.com, email piping will not work, and you won’t receive replies.
Fix This Issue: #
- Install & activate WP Mail SMTP.
- Go to WP Mail SMTP Settings.
- Set “From Email” to a valid domain email (e.g.,
noreply@yourwebsite.com). - Enable “Force From Email”.
- Under Mailer, select Default (PHP Mailer) or choose an SMTP provider for better deliverability.
This ensures emails are sent and received correctly.
Still Not Clear? Please contact us. If you are a free User, you can open a ticket from here. If you are a pro user, you can open a ticket from here.