Sometimes, we need to use a form associated with booking functionality to create scheduled bookings. In Ultimate Addons for Contact Form 7, we offer a dedicated Booking Addon that allows you to integrate booking capabilities directly into your Contact Form 7 forms.
With this addon, you can collect booking details, schedule appointments, and manage reservations effortlessly—all within Contact Form 7. Now, let’s dive into how you can set up and configure this Booking Addon to enhance your form’s functionality.
Today in this article, we will go through the process of creating booking functionality in you contact form.
Let’s dive into it.
Important Announcement #
We officially deprecated the Booking/Appointment Addon as of January 2025 and have discontinued updates and support for this addon. While you can still use it to create booking forms, no future bug fixes or updates will be provided.
For a more flexible, scalable, and feature-packed booking and appointment solution, we highly recommend switching to Hydra Booking, our modern and advanced booking and appointment plugin.
Hydra Booking offers enhanced features, better UI/UX, and greater customization options, ensuring a seamless booking experience.
👉 Check out the Hydra Booking Documentation for more details on setting up your booking system with Hydra Booking.
Video Guide #
Watch the video for more info.
What is a booking form? #
A booking form is an online form that allows users to schedule appointments, reserve services, or book events directly through a website. It simplifies the booking process by collecting essential details such as name, contact information, preferred date and time, number of guests, and additional requests, ensuring a smooth and organized scheduling experience.
Booking forms are commonly used for appointment scheduling, hotel and travel reservations, restaurant table bookings, event registrations, and service-based businesses like salons, legal consultations, and personal training.
A well-structured booking form typically includes features like a date and time picker, payment integration, automated email/SMS confirmations, and calendar sync options, allowing businesses to streamline bookings, reduce manual work, and improve customer experience.
Advanced features such as conditional fields, multi-step form support, and cancellation/rescheduling options further enhance user convenience. By using a booking form, businesses can increase conversions, minimize no-shows with automated reminders, and offer a hassle-free self-service option for their customers.
Whether integrated with WooCommerce, Google Calendar, or CRM tools, an efficient booking form helps businesses save time, boost efficiency, and provide a seamless reservation experience.
What’s Needed #
- Ensure that both Contact Form 7 and Ultimate Addons for Contact Form 7 are installed on your WordPress site.
- Download and install Ultimate Addons for Contact Form 7 Pro from our client portal.
- Activate your license key.
- Go to Ultimate Addons > All Addons menu in your WordPress dashboard and enable Booking/Appointment Addon Checkbox.

How to use Booking/Appointment Addon with Contact Form 7? #
Step 1: Create your desired contact form #
Before taking about the settings and the booking/appointment feature, the first step is to create a Contact Form 7 form according to your requirements.
For simplicity, I will use a basic contact form in this demonstration. However, you can customize the form to fit your specific needs, whether it’s for invoices, order confirmations, application forms, or registration submissions.
When you create a form, you will notice that two new tags: Booking Form Date and Booking Form Time—appear at the top of the editing panel. These tags are essential for adding date and time selection fields to your booking form.
- Booking Form Date: Allows users to select a booking date.
- Booking Form Time: Lets users choose a specific time for their booking.
By using these tags, you can easily integrate a fully functional booking system within your Contact Form 7, making it simple for users to schedule their appointments or reservations.

Step 2: Configuring Booking Settings #
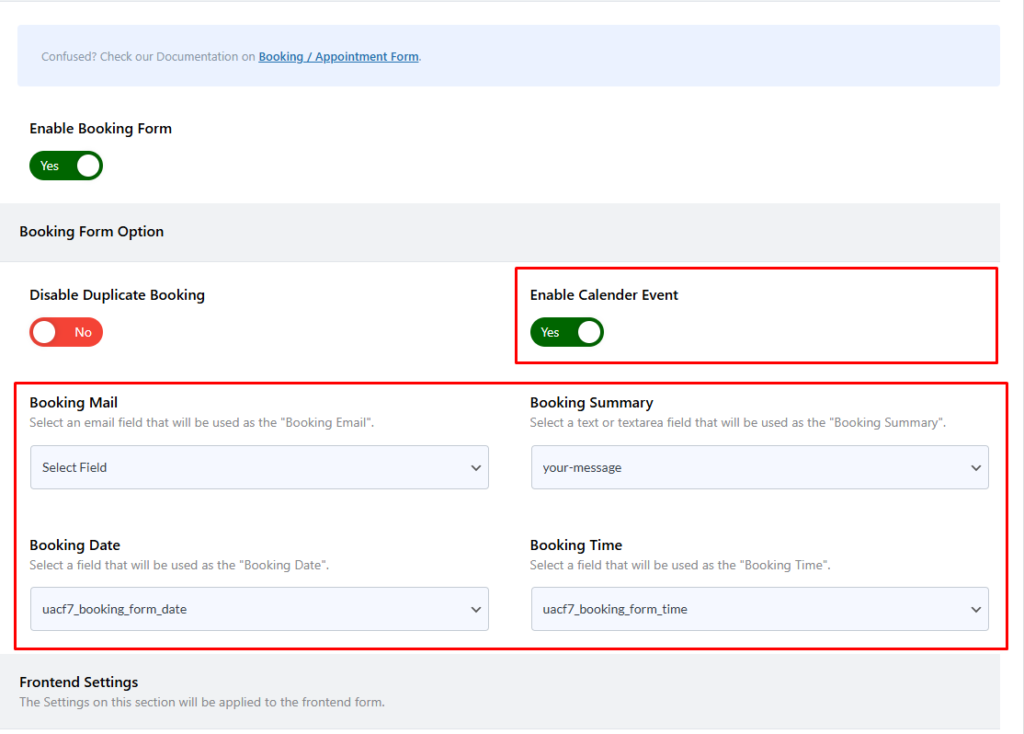
After creating the form, navigate to Ultimate Addons for CF7 Options > Booking Form and turn on the Enable Booking Form toggle button.
Important Note: Without enabling this option, your booking form will not function properly. Make sure to activate it so that users can successfully select their booking date and time when filling out the form.
After enabling the Booking Form, you will see several options available to configure. Let’s go through them one by one:
Disable Duplicate Booking #
If you don’t want to user can able to book your form at the same time, you can able to do so. Just Disable the Duplicate Booking form by clicking the checkbox. For the feature Database feature is required check the screenshot below

Enable Calendar Event #
This feature is for adding your booking form to the Google Calendar using the Google Calendar API.
Watch this video here for, how to create and add a Google Calendar API key for using this feature:
You have to select a specific field for adding an event to your google calendar.
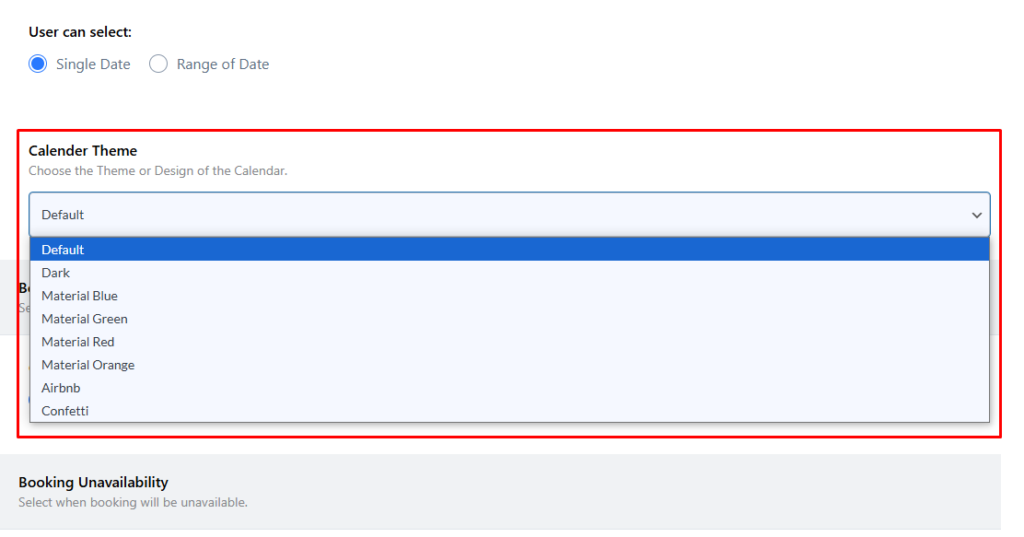
User can select #
You can able to choose how a user can select a date for booking a form. Here are two options available: 1st is a single date, and 2nd is a range of dates.
Calendar Theme #
You can choose from several calendar themes for you booking form here.
Choose your Booking Dates #
Using this setting, you can specify the availability of the booking form. There are three options to choose from:
- Always Available
If you want to accept bookings at any time without restrictions, select this option. This means users can book appointments without any date limitations. - Date Range
If you want to accept bookings only within a specific time frame, choose this option. You can set a start date and an end date, ensuring that bookings are only available during that period. - Specific Date
If you want to allow bookings only on a particular date, this option is ideal. Users will only be able to select the specific date you define.
These options provide flexibility, allowing you to control when users can schedule their appointments based on your availability.

Disable Day(s) #
Using this option, you can disable specific days from your booking form, preventing users from booking appointments on those days. This is particularly useful if you have non-working days, holidays, or specific dates when bookings are not available.
For example, if your business is closed on Sundays, you can disable Sundays in the booking calendar, ensuring that users cannot select those dates. You can also disable multiple days if needed.
Disable Date(s) #
Using this option, you can disable a range of dates in your booking form. For example, if you’re planning a 15-day vacation and want to pause bookings during that period, you can set a start and end date to block those days from being selected. This feature ensures that no bookings can be made within the specified range, allowing you to manage availability effortlessly.
Disable Booking on a Specific Date #
Using this option, you can disable specific dates in your booking form. If there are certain days when you don’t want to accept bookings, you can manually add those dates to prevent users from selecting them. This feature is useful for holidays, maintenance days, or any other unavailable periods.

Time Format for Frontend #
Using this option, you can specify the time format for the frontend booking form. You can set any format supported by PHP and WordPress to display time according to your preference. If you need more format options, you can refer to the official WordPress and PHP documentation for available time formats.
Select Start & End Time #
Using this option, you can set the start and end time for your booking appointments. This ensures that users can only select available time slots within the specified timeframe, preventing bookings outside of your preferred schedule.
Disable Time Range #
Using this option, you can disable a specific range of time within your booking schedule. This is useful if you have breaks, unavailable hours, or specific time slots that should not be booked.
Time Duration (in minutes) #
Using this option, you can specify a time duration for each booking session/slot. This determines how long each appointment or booking will last, ensuring that time slots are properly allocated and managed.
Time Break #
Using this option, you can specify a time break between each booking. This ensures that there is a gap between consecutive appointments, allowing for preparation, cleanup, or any other necessary tasks before the next booking begins.

Enable WooCommerce Integration #
With this option, you can integrate WooCommerce products with your booking system, ensuring a seamless payment process. When a user books a meeting, they will be redirected to WooCommerce for payment.
In this setting, you have two options: Existing Product or Custom Product.
- If you select Existing Product, you can enter the Product ID in the provided text box. This links the booking to a specific WooCommerce product already created in your store.
- If you select Custom Product, you can manually define the Booking Name and Booking Price, allowing you to take payments directly for the booking without needing a pre-existing WooCommerce product.
This feature provides flexibility in handling payments, whether you prefer to link existing products or create custom booking-based products.

These are the booking settings you can configure. Feel free to configure the options according to your needs.
Step 3: Testing the Booking Settings #
After configuring all the settings, it’s time to test the form to ensure everything is working as expected. Fill out the form step by step, check if the fields are displaying correctly, and verify that the form flow is smooth.
Live Example of CF7 Booking Addon #
If you want to see how the Booking/Appointment add-on works in real-time, you can check out our live demo form at the following link. This interactive demo allows you to experience how booking add-ons work.
Still Not Clear? Please contact us. If you are a free User, you can open a ticket from here. If you are a pro user, you can open a ticket from here.