Tracking form submissions is crucial for any website owner, especially when managing leads or customer inquiries. By assigning a unique ID for Contact Form 7 on each submission, you can streamline your data collection process and ensure that every entry is easily identifiable. In this article, we’ll guide you through the simple steps to add a unique ID field to your Contact Form 7 submissions, enabling better organization and tracking of your user interactions.
Watch Complete Video #
If you are still confused, we suggest you watch this video. In this video, we tried to describe the whole step of setting up unique submission id for Contact Form 7:
What’s needed #
- Ensure that both Contact Form 7 and Ultra Addons for Contact Form 7 are installed on your WordPress site.
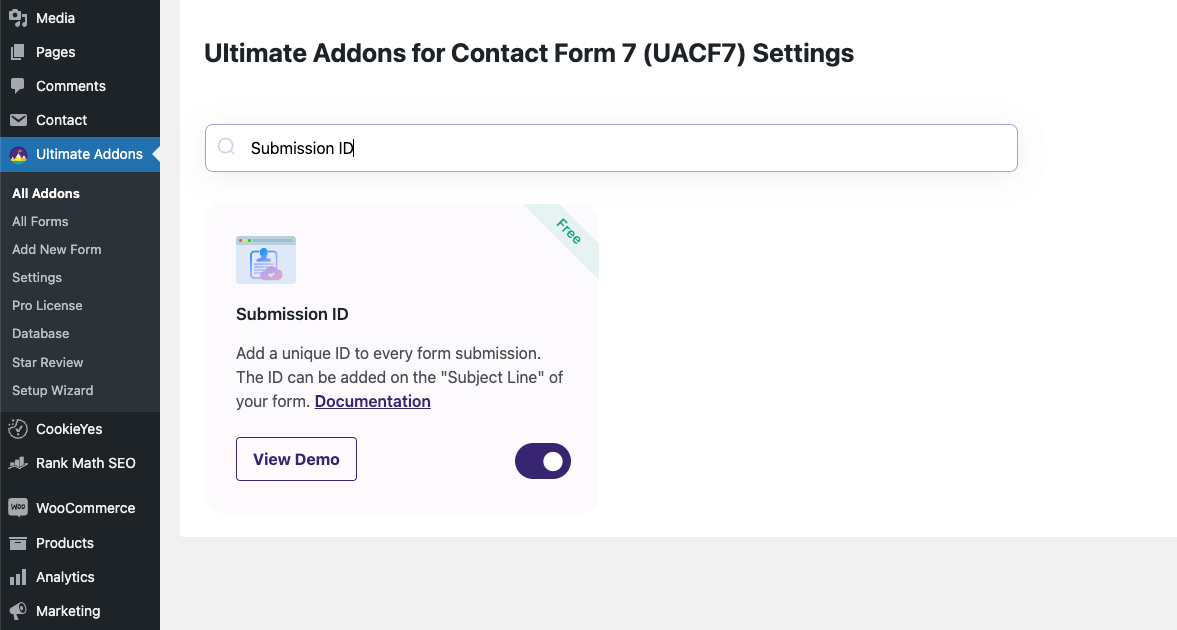
- Navigate to the Ultra Addons menu in your WordPress Dashboard, enable the “Submission ID” checkbox/toggle.
What is UniqueID for Contact Form 7? #
The UniqueID for Contact Form 7 is a feature that allows you to assign a unique identifier to each form submission. This identifier helps track and manage submissions more effectively, particularly when handling leads or customer inquiries. By using a UniqueID, you can differentiate between submissions, making it easier to reference or process individual entries.
Live Example: Contact Form 7 Unique Submission ID #
In this tutorial, we will show you how to add a Unique ID for Contact Form 7 on every Submission for Better Tracking. Here is an example how the ID would look like on your email.

Visit our main demo to see all the supported fields for Contact form 7 Mailchimp addon.
How to Add a Contact Form 7 Unique ID #
Go to Contact -> Add New in your WordPress Dashboard to create a new form. Add all the necessary field. Then, save the form.
Generate Contact Form 7 Submission ID #
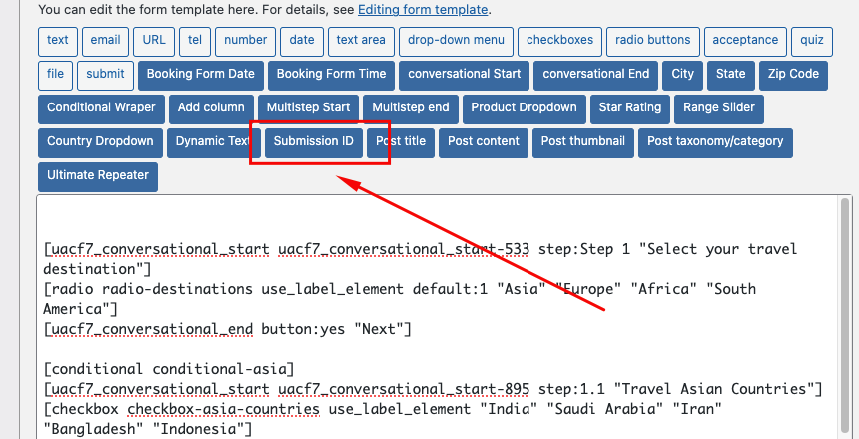
Navigate to the Contact Form 7 editing section. Above the template editing text field, you’ll notice a new button labeled Submission ID.
Inserting the Submission ID Tag #
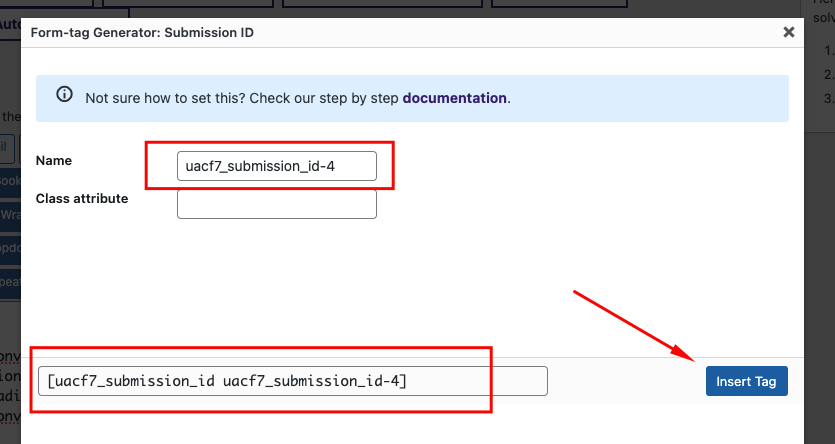
- Click the Submission ID Button: This action will open a pop-up where you can assign a unique name and class attribute to each form.
- Assign a Name: Once you have given it a name, you will see a newly created tag/shortcode at the bottom of the pop-up.
- Insert the Tag: Click Insert Tag to embed the Submission ID tag into your form immediately.
Don’t forget to hit Save to apply the changes.
Configuring Submission ID Settings #
Now, scroll down to the Ultra Addons for CF7 Options section and click the Submission ID tab. Here, you can modify the attributes for the IDs.
- Ensure that the Enable Submission ID Fields box is checked.
- Submission ID Starts From: Specify the starting value for the form ID. For example, if you’ve already received 408 submissions and want the next ID to be 409, enter 409.
- Submission ID Step Increment: This defines how much the ID will increment with each submission. For instance, if set to 2, the submission IDs will follow the pattern 2, 4, 6, and so on, which can be useful for specific scenarios.
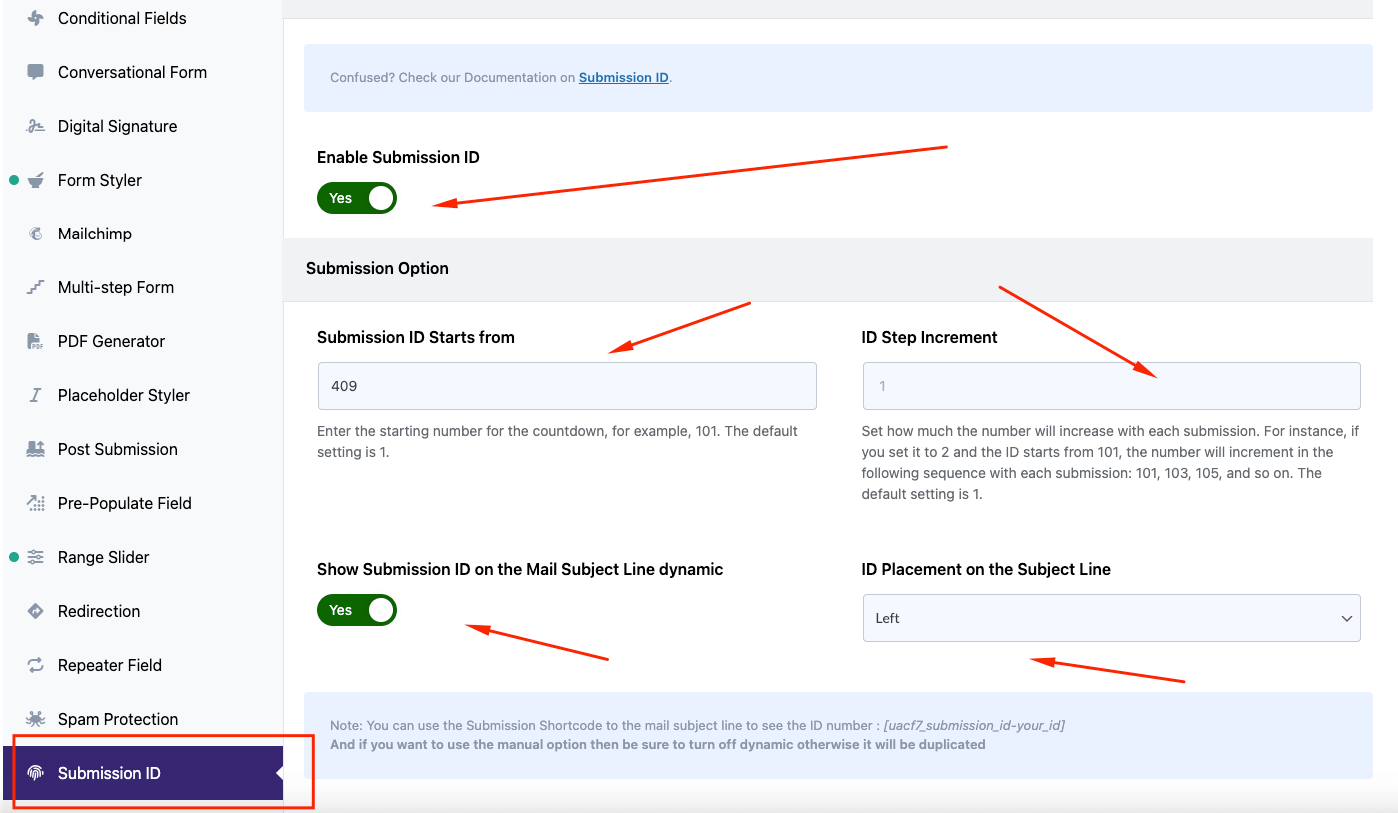
- Show Submission ID in the Mail Subject Line: If you enable this option, the ID will be automatically inserted into the “Subject Line” of the form. You can choose to place the ID on the left or right of the subject line, or you can configure it to show only the ID without any subject text. However, if you want to create a customized subject line that includes the ID, we recommend turning this feature off and manually inserting your ID in the subject line, as explained in the next section.
Adding the ID to the Subject Line Manually #
If you have disabled the dynamic ID insertion in the subject line, follow these steps:
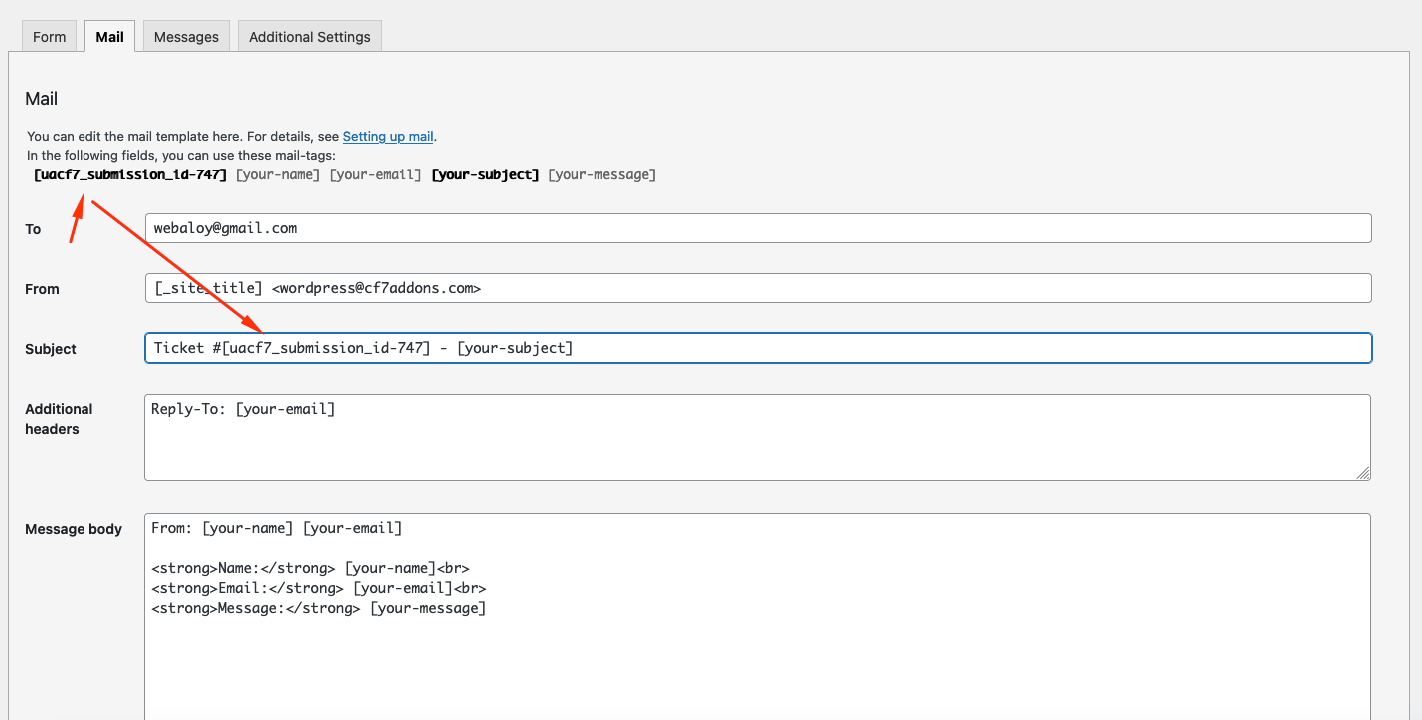
- Go to the Mail Tab: Add the submission ID tag in the “Subject” section. The tag should look something like
[uacf7_submission_id-747](use the tag suggested by your form). - Subject Dropdown Menu: On our example, we have included a dropdown menu named “[your-subject]” in the subject line so that when a form is submitted, we can identify the topic or category of the form.
- Copy to User’s Email: You can do the same in the Mail (2) section if you want your users to receive a copy of their email with the ticket number.
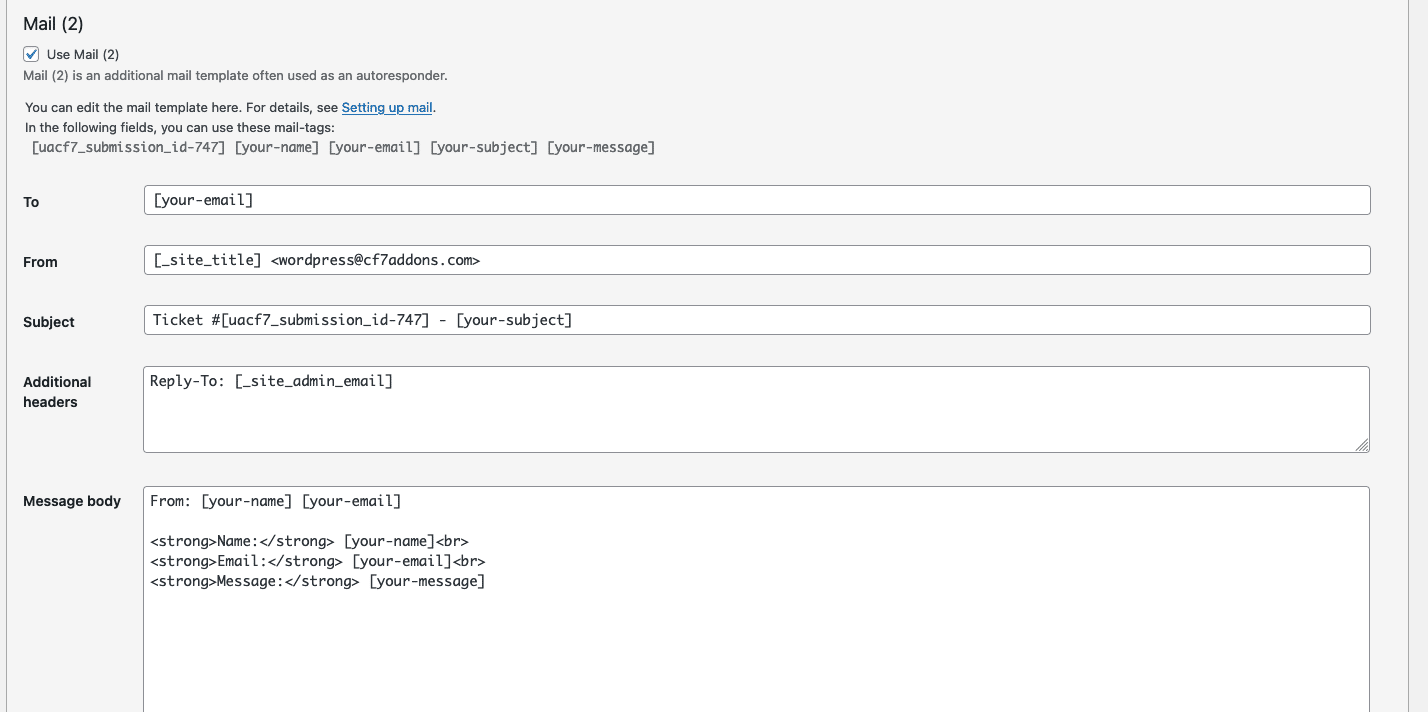
Now go ahead and hit save. That’s it.
Copy the Shortcode #
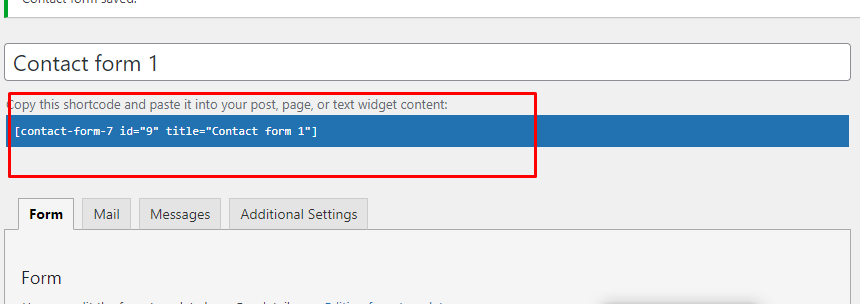
Once the form is set up, click “Save” and copy the Contact Form shortcode.
Time to Publish #
Paste the shortcode wherever you want to display the form (Pages, Posts, Custom Post Types, or Sidebars).
Accessing the Submissions #
You can view form submissions along with their IDs in two ways:
Database Addon #
You can access submissions through the Database Addon in the Ultra Addons section of your WordPress dashboard. Here’s how:
-
Select Your Form: Choose the form whose submissions you want to access and click Submit.
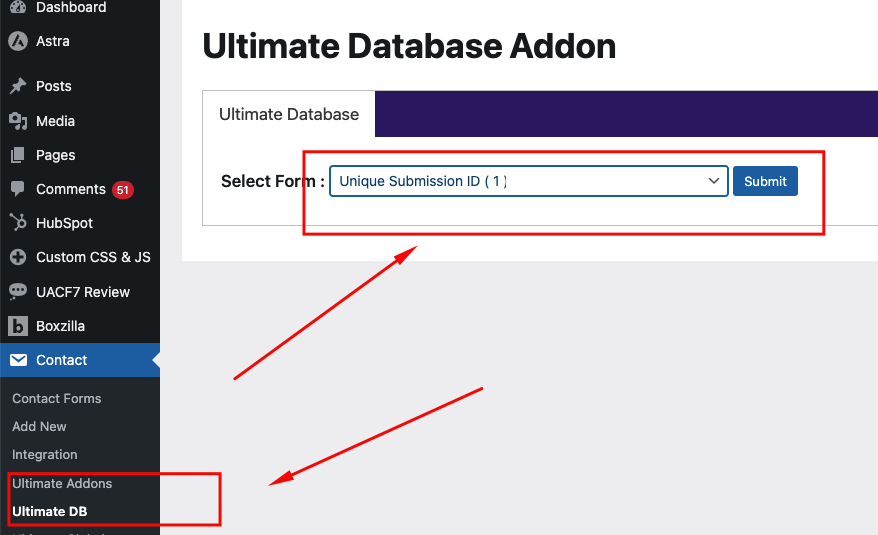
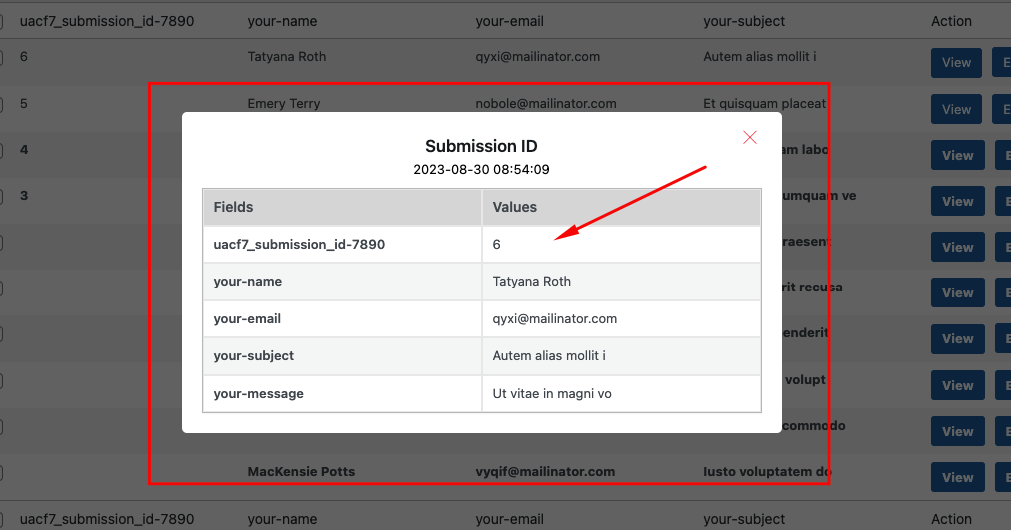
- View Submissions: You’ll see a list of all submissions received by that particular form, including the unique Submission ID, along with other attributes like name and email.
- Detailed View: Clicking on View will show you the details of a specific submission. You can also export submissions in various formats, such as CSV or PDF.
Through Email #
If you check your email, you should see submitted data formatted as follows:
Dynamic Subject Line: If you chose to add the subject line dynamically to the RIGHT, it will look something like this:
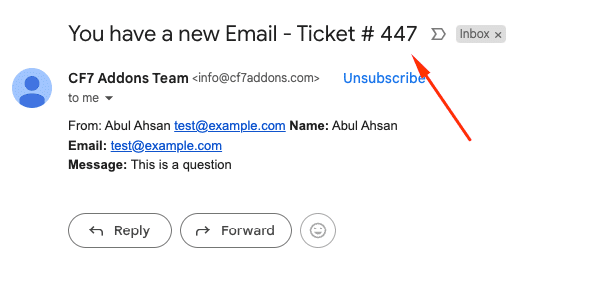
Manual Subject Line: If you opted to add the subject line manually, it will appear as shown below:If you chose to add the subject line manually, it will look something like this:

Full Form Code #
Here is the full code of the above example form:
[uacf7_submission_id uacf7_submission_id-510]

[uacf7-row][uacf7-col col:6]
<label> Your name
    [text* your-name autocomplete:name] </label>
[/uacf7-col][uacf7-col col:6]
<label> Your email
    [email* your-email autocomplete:email] </label>
[/uacf7-col][/uacf7-row]

[uacf7-row][uacf7-col col:12]
<label> How can we help you? <span>*</span>
    [select* your-subject include_blank "I am having issues with your plugin" "I am having issues with my account on Themefic" "I would like to request a new feature" "I have a Presale question" "I need a Refund" "Other Issue"] </label>
[/uacf7-col][/uacf7-row]

[uacf7-row][uacf7-col col:12]
<label> Your message
    [textarea your-message] </label>
[/uacf7-col][/uacf7-row]

[uacf7-row][uacf7-col col:12]
[submit "Submit"]
[/uacf7-col][/uacf7-row]
Still Not Clear? Please contact us. If you are a free User, you can open a ticket from here. If you are a pro user, you can open a ticket from here.

