Sometimes, you may need to pre-fill certain fields in your form using data from another form. This ensures a seamless user experience by automatically populating specific fields based on previously submitted information. This feature is particularly useful for multi-step forms, user registrations, or when carrying over data between different forms without requiring users to re-enter the same details.
In Contact Form 7, you can achieve this feature using the Pre-Populated Fields addon. Let’s discuss more about this.
Video Guide #
What is a Pre-Populated Field for Contact Form 7? #
A pre-populated field in Contact Form 7 is a form field that is automatically filled with dynamic data when the form loads. This feature helps streamline form submissions by reducing manual input and ensuring accuracy. You can auto-fill fields with user details, post data, query parameters, or custom values, making form interactions faster and more efficient.
- Saves Time for Users – Reduces manual typing and speeds up form submissions.
- Improves Data Accuracy – Ensures correct details are automatically inserted.
- Enhances User Experience – Creates a seamless, personalized form-filling experience.
- Essential for eCommerce and booking forms – Auto-fill product details, customer information, or shipping addresses.
- Works with Conditional Fields & Multi-Step Forms – Display pre-filled fields dynamically based on user selections.
What’s needed #
- Ensure that both Contact Form 7 and Ultra Addons for Contact Form 7 are installed on your WordPress site.
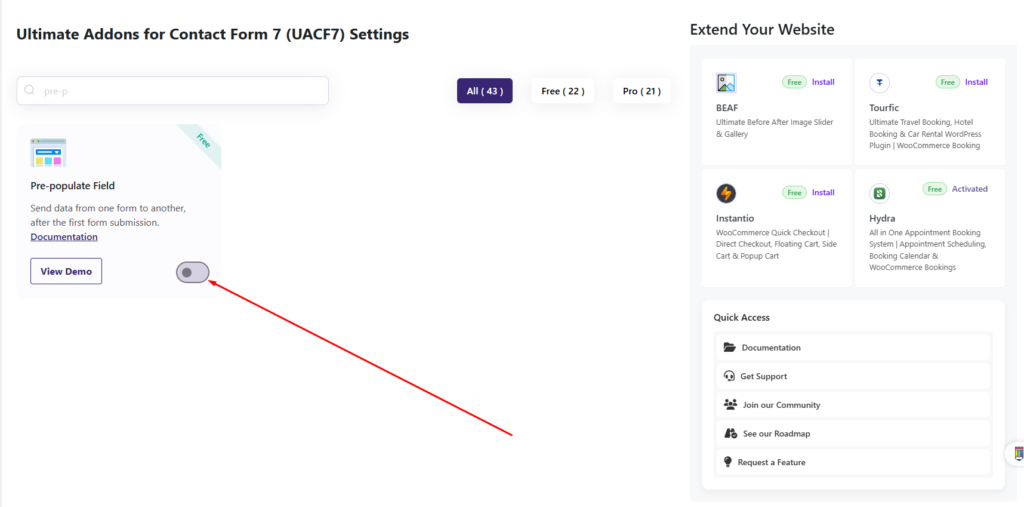
- Navigate to Ultra Addons > All Addons in your WordPress dashboard and enable the “Pre Populated Fields” checkbox/toggle.
How to use the pre-populated addon for Contact Form 7? #
Step 1: Create your desired contact form #
Before setting up the Pre-Populated Addon, the first step is to create two Contact Form 7 forms based on your requirements.
- The first form will act as the data collector, where users input their information.
- The second form will automatically fill in data from the first form, pre-populating specific fields based on previously submitted entries.
Once both forms are created, we can proceed with configuring the pre-population settings to ensure that data is seamlessly transferred between them.
For simplicity in this tutorial, I will use basic forms to demonstrate how the Pre-Populated Addon works. This will help you understand the setup process without unnecessary complexity.
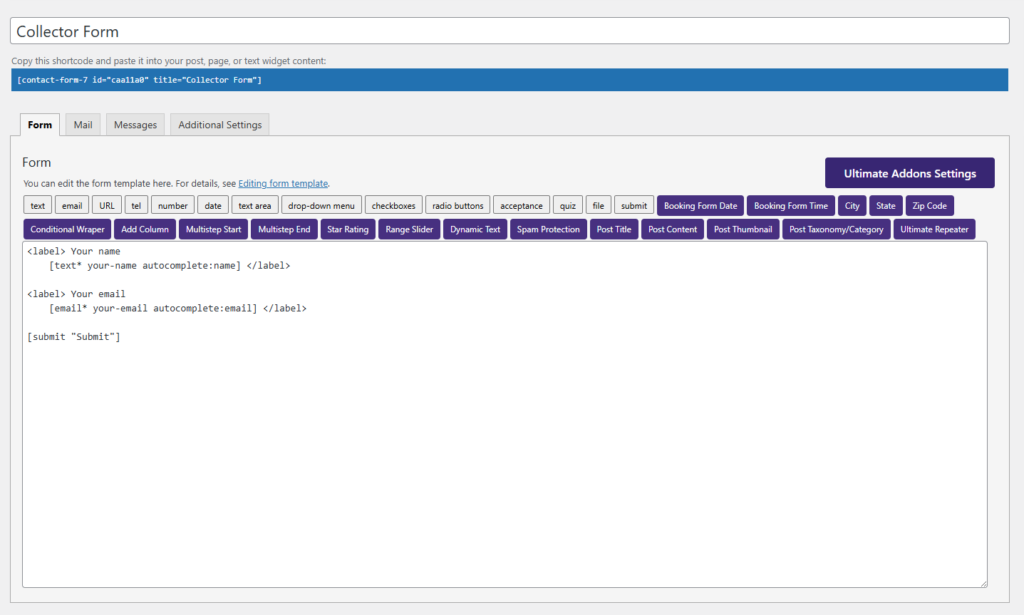
Here is my first form, which is designed to collect user data, specifically name and email. I have named this form “Collector Form” to indicate its role in gathering information. This form will serve as the data source, and the submitted details will be used to pre-fill fields in the second form.
The second form is the main form, where the collected data will be pre-populated automatically. This form will retrieve the name and email from the Collector Form and display it in the corresponding fields. This setup ensures a seamless user experience by reducing the need for manual data entry, making the form-filling process more efficient.

After creating both forms, it’s time to set up the pre-populated form to automatically retrieve data from the Collector Form. This process ensures that when a user submits the first form, their details are pre-filled in the second form, saving time and improving the user experience.
Let’s go step by step to configure the pre-populated add-on and make the data transfer seamless between forms.
Step 2: Configure the Pre-populate Field Settings #
After creating both forms, navigate to the collector form’s editing page. Then go to UACF7 Settings > Pre-Populate Fields to configure the settings. After navigating the settings, you will find several options here. Let’s talk about the settings one by one.
Enable Pre-populate Field #
Enabling this option allows you to use pre-populated fields in your form. Once activated, the form will store submitted data, making it available for use in the next form. Please note that if this option is disabled, the pre-populated fields will not function, and the data will not carry over to other forms.
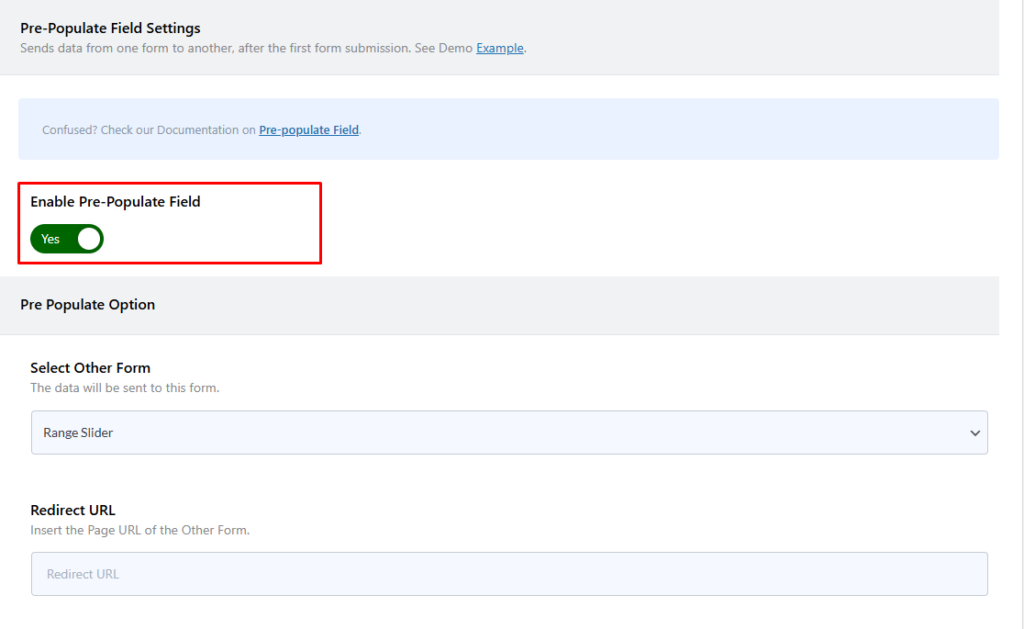
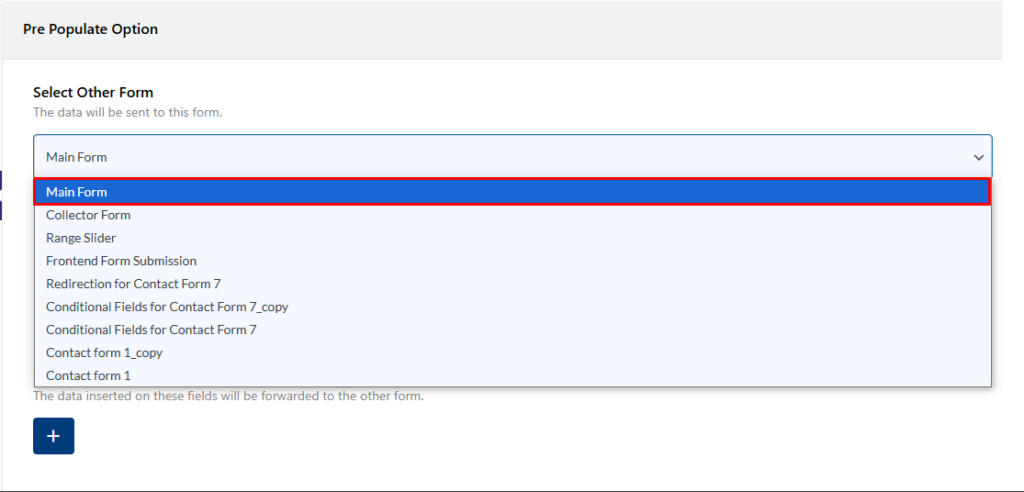
Select Other Form #
This option allows you to select the form where the collected data will be sent. In the dropdown list, you will see the names of all the forms available on your website. Here, I am selecting “Main Form” because I want the data from the Collector Form to be pre-filled into the Main Form. This ensures that when a user submits information in the first form, it will automatically appear in the second form.
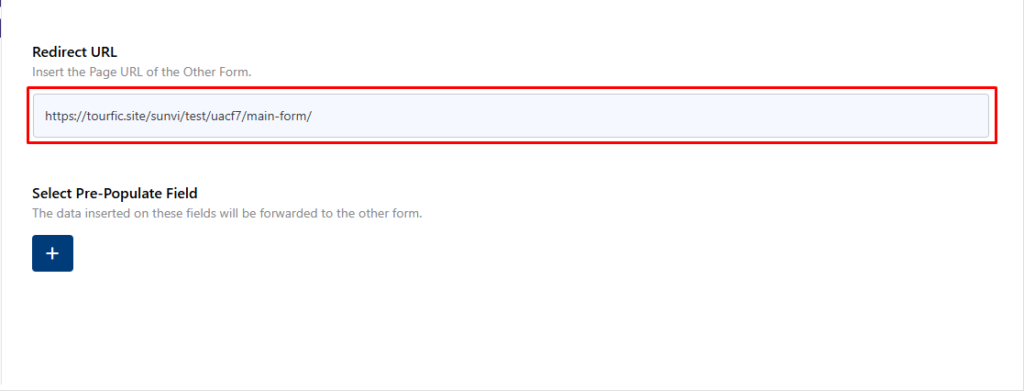
Redirect URL #
In this option field, you need to enter the URL of the page where the main form (or the form receiving the pre-populated data) is located. This ensures that when a user submits the Collector Form, they are redirected to the correct page where their data will be automatically filled into the designated fields of the Main Form.
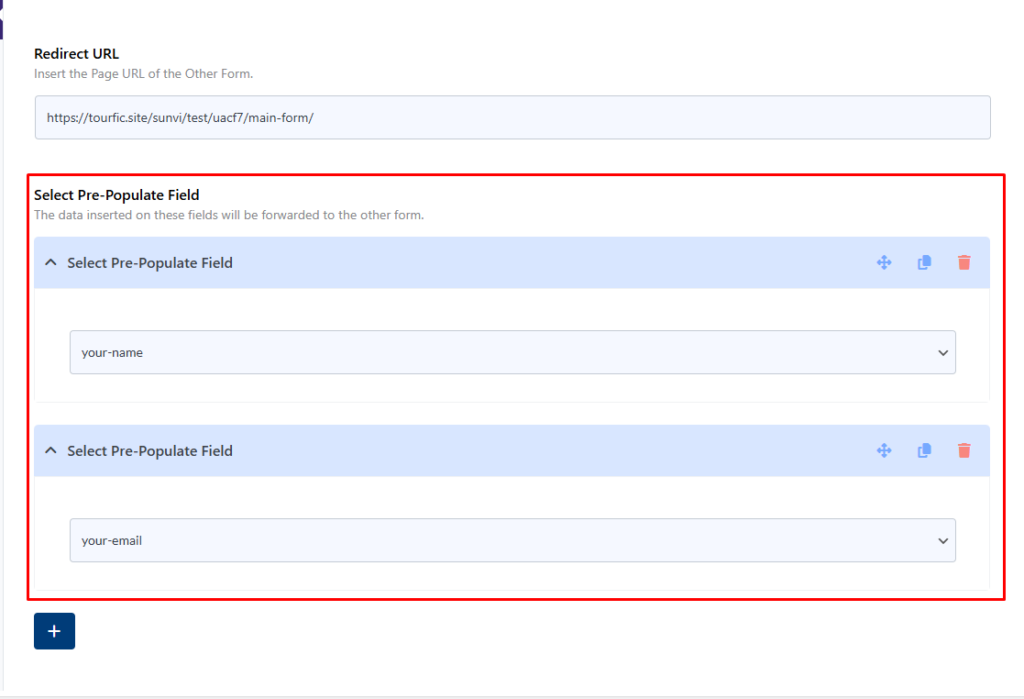
Select Pre-populate Field #
In this setting, you can map the fields from the Collector Form to the corresponding fields in the Main Form. This ensures that the collected data is correctly transferred to the right fields in the next form. For example, you can specify that the Name field in the Collector Form should populate the Name field in the Main Form, and the Email field should do the same. This mapping allows for seamless data transfer between forms. It is a related field, so you can add as much field you want.
These are all the available settings for pre-populated fields. Now, you can configure them according to your requirements. Simply map the necessary fields, set the target form URL, and ensure the settings are enabled. Once configured, your forms will seamlessly transfer data, improving user experience and efficiency.
Step 3: Test your form to check everything #
After configuring all the settings, it’s time to test the form to ensure everything is working as expected. Submit the Collector Form with sample data and check whether the pre-populated fields appear correctly in the Main Form. Verify that the mapped fields are transferring data accurately and that users are redirected to the correct page. If any issues arise, revisit the settings and adjust them accordingly to achieve the desired functionality.
Live Example of CF7 Pre-populated Field #
If you want to see how the Pre-populated Field works in real-time, you can check out our live demo form at the following link. This interactive demo allows you to experience how frontend post submission works.
Click here to test the Pre-populated Field Addon in action!
Still Not Clear? Please contact us. If you are a free User, you can open a ticket from here. If you are a pro user, you can open a ticket from here.