Sometimes, we need to create large forms with numerous fields. Filling out such lengthy forms at once can be quite annoying and overwhelming for users. To address this issue, we’ve introduced the Multi-Step Form, which divides your form into smaller sections. This allows users to complete the form in manageable steps, making the form-filling process simpler and more user-friendly.
Video Tutorial #
What is Multi Step form for Contact Form 7? #
A Multi-Step Form for Contact Form 7 allows you to split a long form into multiple sections, guiding users through a step-by-step submission process instead of displaying all fields at once. This improves user experience, reduces form abandonment, and makes complex forms more manageable.
- Step-by-Step Navigation – Users can move forward and backward between steps.
- Progress Bar or Step Indicator – Visual feedback on form completion status.
- Improved User Experience – Reduces form fatigue and increases submission rates.
- Works with Conditional Fields – Show or hide steps based on user selections.
- File Upload Support – Users can upload files in different steps.
- WooCommerce & Custom Orders – Use multi-step forms for product inquiries and order processing.
- Spam Protection & Validation – Ensures users complete required fields before proceeding.
- Supports Email Notifications – Send customized confirmation emails after form submission.
- Mobile-Friendly & Responsive – Works seamlessly across all devices.
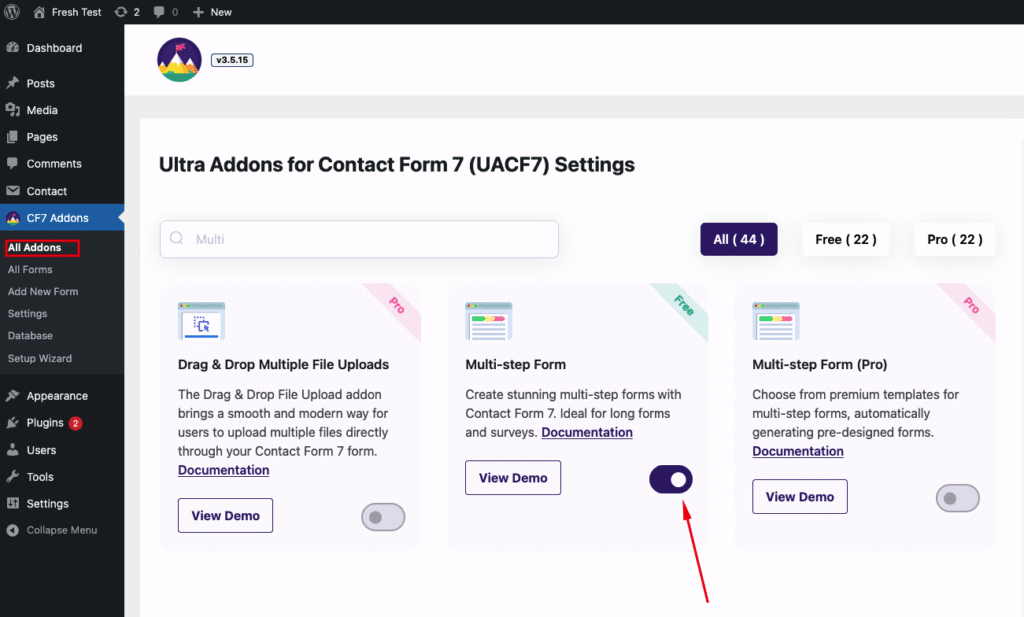
What’s Needed #
- Ensure that both Contact Form 7 and Ultra Addons for Contact Form 7 are installed on your WordPress site.
- Navigate to the Ultra Addons > All Addons section in your WordPress Dashboard, and enable the “Multi Step Form” checkbox/toggle.
How to Use Multistep Addon with Contact Form 7? #
Step 1: Create your desired contact form #
Before taking about the settings and the Multi-Step feature, the first step is to create a Contact Form 7 form according to your requirements.
For simplicity, I will use a basic contact form in this demonstration. However, you can customize the form to fit your specific needs, whether it’s for invoices, order confirmations, application forms, or registration submissions.

Once your form is set up, we can proceed to the next step.
Step 2: Setting up the multistep tags #
After creating the form, you will notice two new tags above the editing panel: Multistep Start and Multistep End. These two tags are crucial for setting up a multi-step form. Let’s discuss their functions in detail.
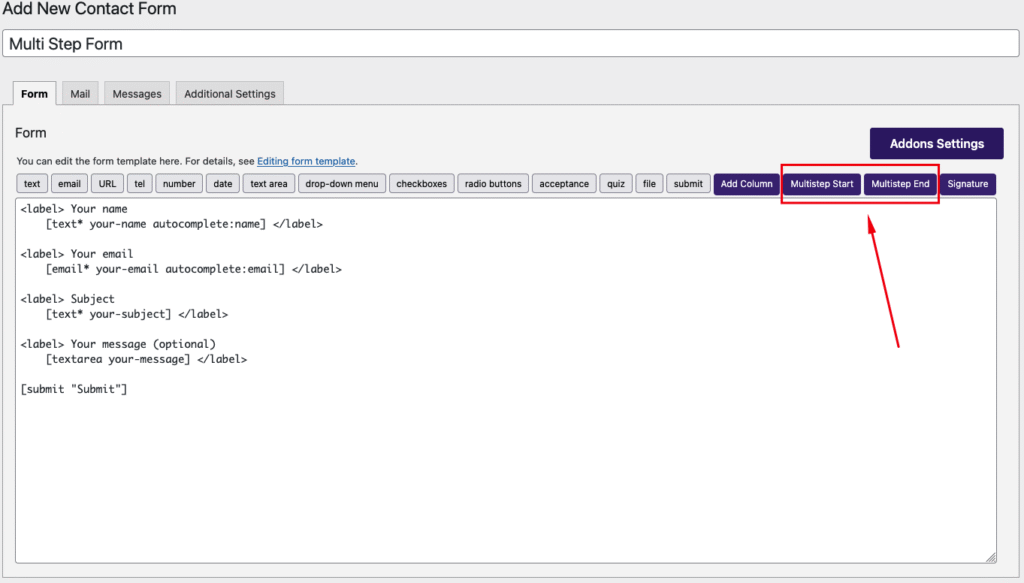
Multistep Start #
The Multistep Start tag allows you to create a new step in your Multistep Form, while the Multistep End tag closes the form (think of them as opening and closing tags).
When you click on the Multistep Start button, a form generator pop-up will appear, presenting several customization options. These options help you define how each step of the form will look and function.
Label: You can specify the step name using this field. This helps users understand which section of the form they are currently filling out.
Field Name: This allows you to assign a unique name to the step, making it easier to manage and identify within the form structure.
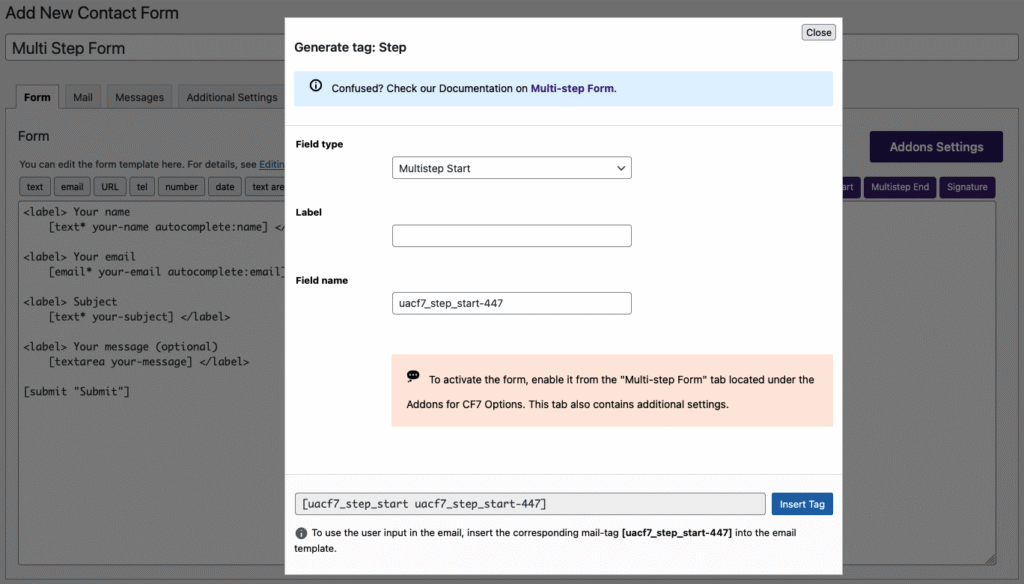
After filling out the required information, click on the “Insert Tag” button to add the Multistep Start tag to your form. This will define the beginning of your multi-step form structure.
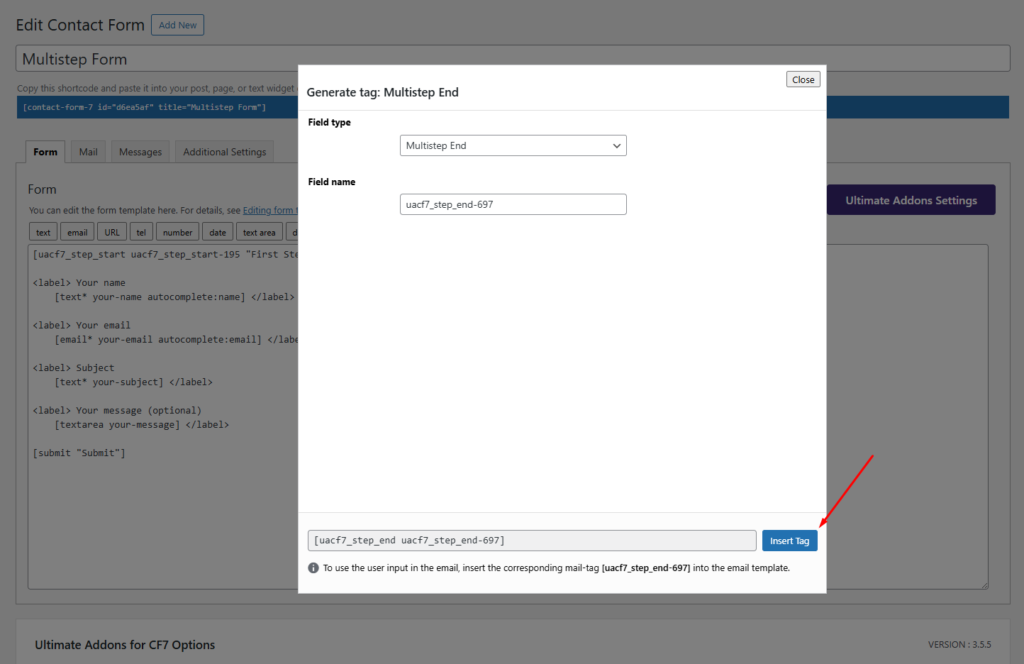
Multistep End #
The Multistep End tag is used to close a step in your multistep form. Simply click on the Multistep End tag, provide a suitable Field Name, and then click on Insert Tag to add it to your form. This ensures that the step is properly closed before moving on to the next section.
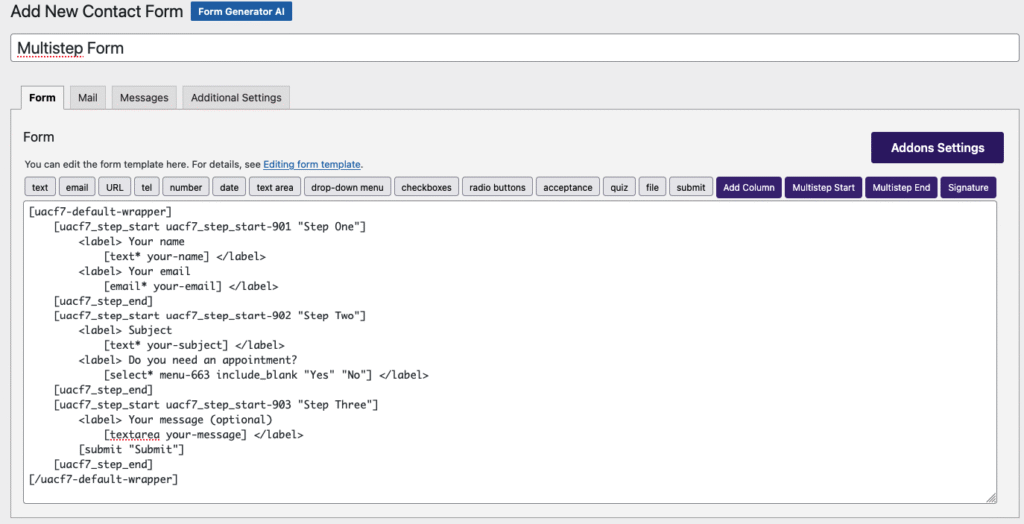
Now, all you need to do is add other form fields, such as text, number, date, email, dropdowns, or any other input fields, between the Multistep Start and Multistep End tags. If you need additional steps, simply create more start and end tags accordingly. These fields will appear as individual steps within your multi-step form, providing users with a smooth, step-by-step experience. You can customize the form structure based on your requirements to create a more engaging and user-friendly interaction.
Here is my form after creating the steps.
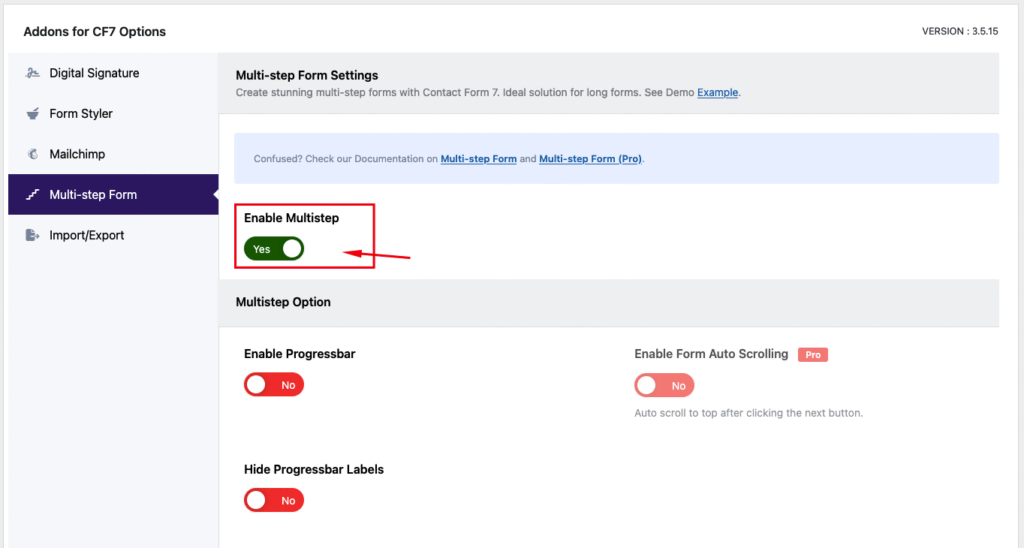
Step 3: Configuring the Multistep Settings #
After creating the steps in your form, navigate to Ultra Addons for CF7 Options > Multi-Step Form. Here, you’ll find several settings that need to be configured to optimize the multi-step form functionality. Let’s go through these settings to ensure a smooth user experience.
Enable Multistep #
This option is essential for enabling the Multi-Step Form functionality. If you do not turn it on, your form will not be converted into a multi-step form, and all fields will appear on a single page instead. Make sure to enable this setting to activate the step-by-step structure.
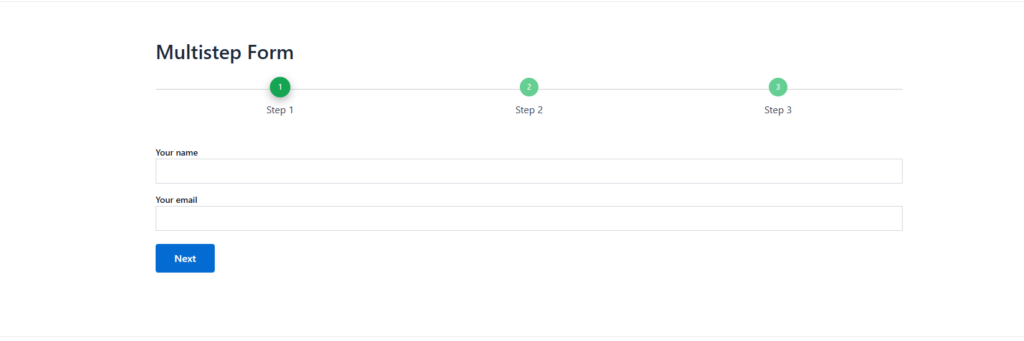
Enable Progressbar #
Enabling this option allows you to display a progress bar for the multi-step form. This helps users track their progress as they move through each step, improving the overall user experience.
Here is the form enabling the progress bar.
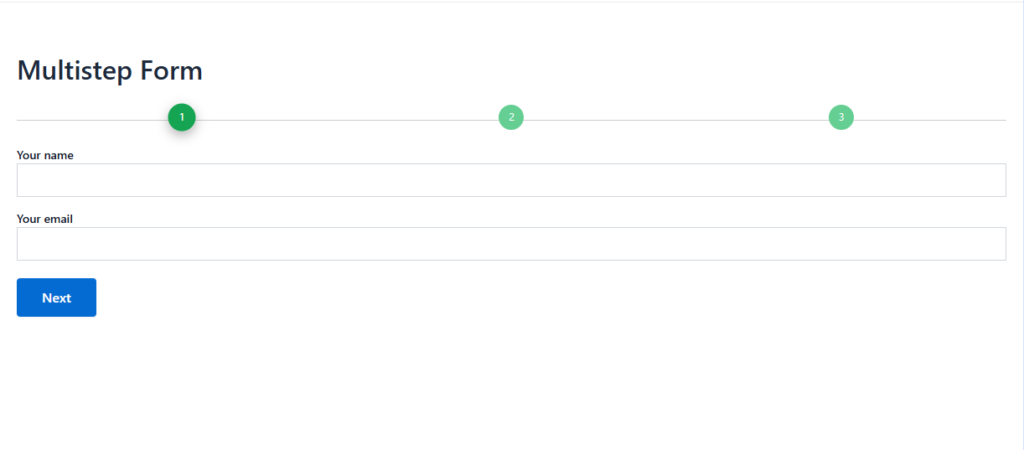
Hide Progressbar Labels #
Enabling this option allows you to hide the step labels on the progress bar. This can be useful if you prefer a cleaner, minimalistic look without displaying step names.
Here is the form after enabling Hide Progress Bar Labels.
Choose Form Layout / Style #
Using this option, you can select a layout or style from a set of pre-designed templates, allowing you to customize the appearance of your multi-step form to match your website’s design. We offer two free layouts, while the remaining five layouts are available in the pro version for more advanced customization.
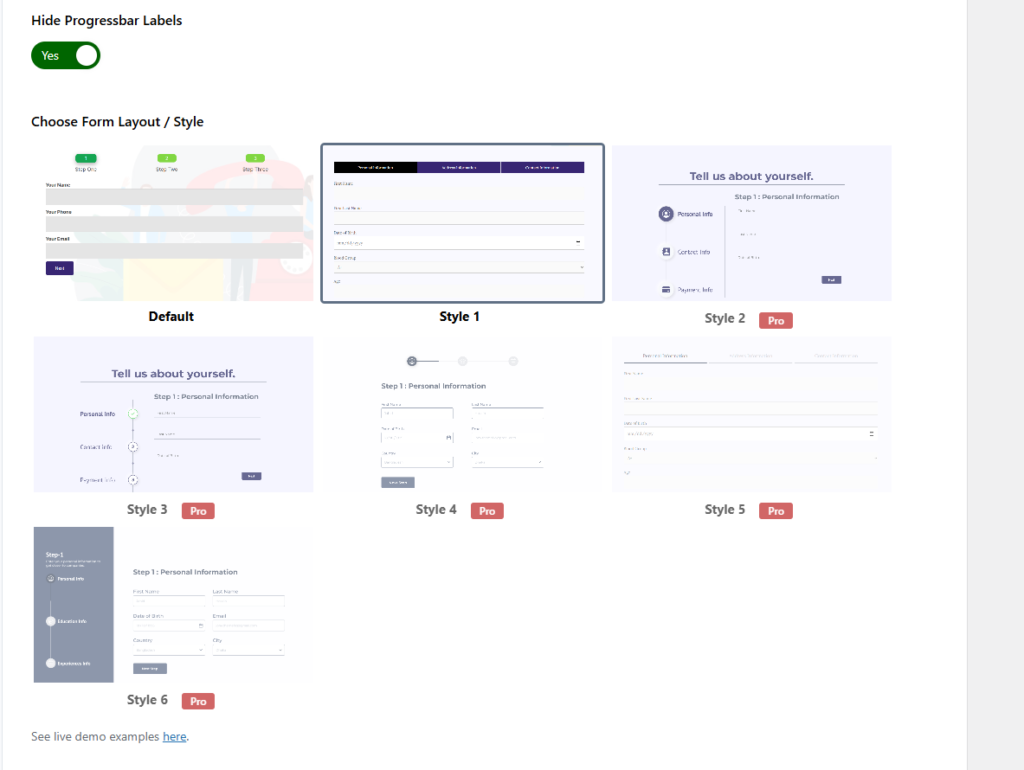
You can check the live examples of the form style here.
Step 4: Testing the Form Settings #
After configuring all the settings, it’s time to test the form to ensure everything is working as expected. Fill out the form step by step, check if the fields are displaying correctly, and verify that the form flow is smooth.
Live Example of CF7 Multistep Form #
If you want to see how the Multistep Form works in real-time, you can check out our live demo form at the following link. This interactive demo allows you to experience how frontend post submission works.
Click here to test the CF7 Multistep Form addon in action!
Still Not Clear? Please contact us. If you are a free User, you can open a ticket from here. If you are a pro user, you can open a ticket from here.
It is not working with barba js powered pages
Hello, thank you for getting in touch with us. As this is a technical issue, our tech team would be able to assist you better. Please kindly open a ticket from our client portal. -> https://portal.themefic.com/support
Hello, thank you for getting in touch with us. As this is a technical issue, our tech team would be able to assist you better. Please kindly open a ticket from our client portal. -> https://portal.themefic.com/support
The spacing between the circles looks weird.
Hello disk, thank you for getting in touch with us. I have reviewed the multi-steps, and the UI looks proper at our end. If you need assistance on this, our tech team would be able to assist you better. Please kindly open a ticket from our client portal. -> https://portal.themefic.com/support
Is there any hooks to get after each step ?
I would to scroll to the top of the screen after each “next/previous” clicking
Hello,
Thank you for your question.
At the moment, the hooks are not available. The feature to scroll to the top of the screen after each “next/previous” click is available.
If you have any other questions, please let us know.