In this article, we will try to explain how to connect Contact Form 7 with your Mailchimp list with the help of our Free Addon “Contact Form 7 Mailchimp”.
Watch Complete Video #
If you need further assistance, check out our video tutorial, which walks through the entire process of creating a Mailchimp and Contact Form 7 form step by step:
What’s needed #
- Ensure that both Contact Form 7 and Ultra Addons for Contact Form 7 are installed on your WordPress site.
- Navigate to the Ultra Addons menu in your WordPress Dashboard, enable the “Mailchimp” checkbox/toggle.

What is Mailchimp? #
Mailchimp is a popular email marketing platform that helps businesses and individuals create, send, and manage email campaigns. It offers a range of tools for designing professional email templates, automating marketing emails, managing subscriber lists, tracking email performance, and much more.
What is Contact Form 7 Mailchimp Addon? #
Live Example: Contact Form 7 and Mailchimp Integration #
In this tutorial, we will show you how to create a form with Contact Form 7 and Mailchimp, similar to the example below. Follow these steps to create your own form.
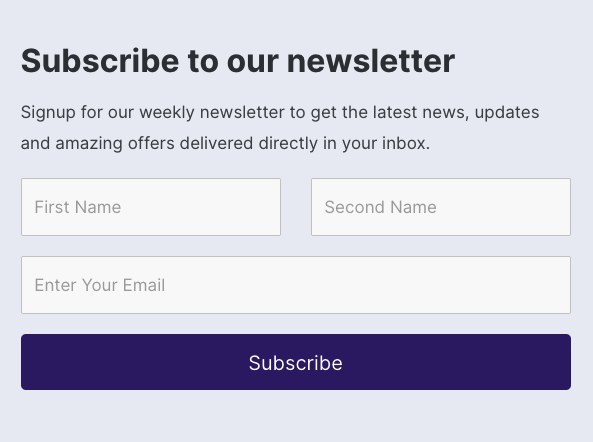
Visit our main demo to see all the supported fields for Contact form 7 Mailchimp addon.
Contact Form 7 Mailchimp Form Creation #
Before creating the form, you need to connect Mailchimp by adding the API key:
Add Mailchimp API #
Go to Ultra Addons -> Settings -> API Integration -> Mailchimp API. Just add your Mailchimp Audience API key. Add your Mailchimp Audience API key. If you’re unsure how to get your API key, refer to Mailchimp’s official documentation by clicking here.

After adding the API key, you’ll be able to connect Mailchimp with Contact Form 7.
Create a form #
Go to Contact -> Add New in your WordPress Dashboard to create a new form. You can add as many fields to your form as you want, but for a basic setup, make sure you include the name fields (First Name & Last Name) and the email field. Then, save the form.

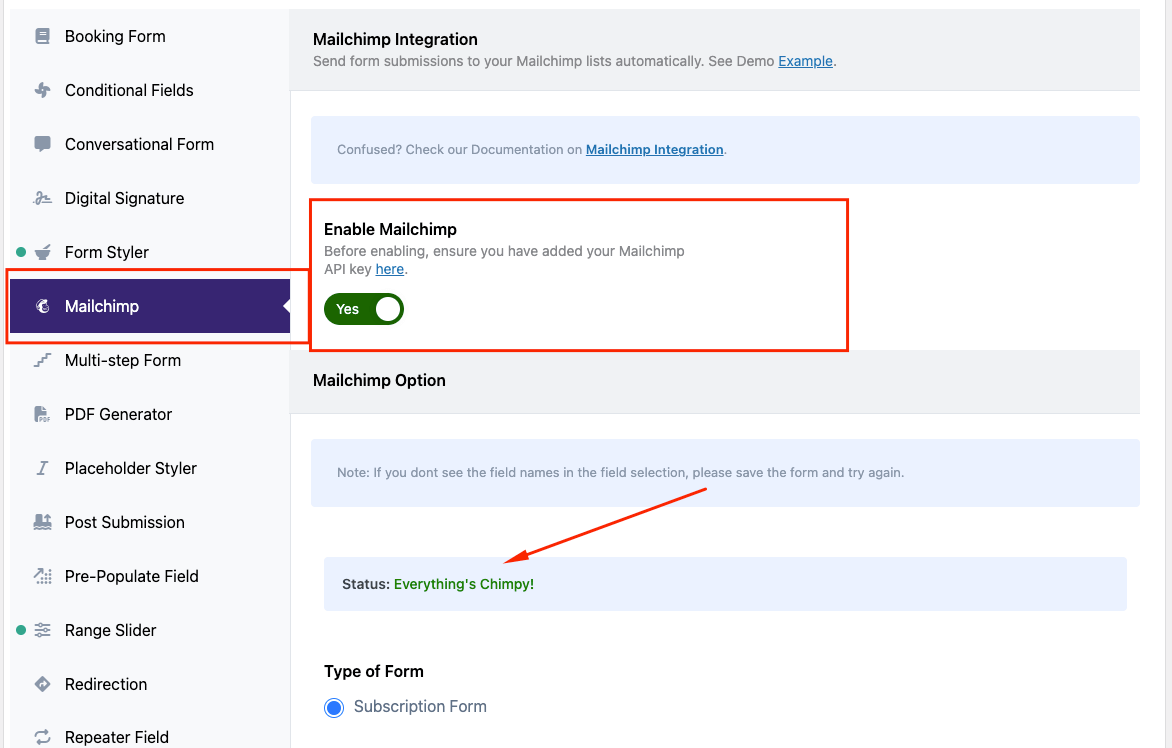
Mailchimp Settings #
After creating the form, scroll down to the Ultra Addons for CF7 Options section and click the Mailchimp tab. Follow these steps:
-
- Enable the Mailchimp Form checkbox.
-
- Select your Mailchimp audience list. If the API key was entered successfully, you’ll see a confirmation message “Everything’s Chimpy”and all your mailchimp audience list will be visible here. Select your desired list.
Here are couple of screenshots for your reference:

That’s it.
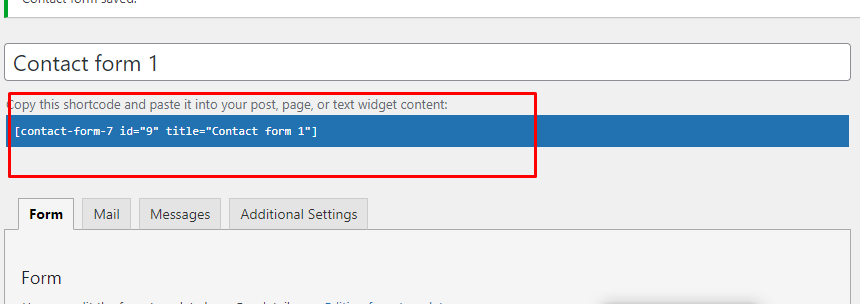
Copy the Shortcode #
Once the form is set up, click “Save” and copy the Contact Form shortcode.
Time to Publish #
Paste the shortcode wherever you want to display the form (Pages, Posts, Custom Post Types, or Sidebars). The form will function like the example shown above.
Want more features? #
In our Mailchimp Pro addon, you have the ability to add an acceptance checkbox so users can opt-in to your Mailchimp list. Until they opt in, no data will be passed to Mailchimp. You can learn more about this from here.
Full Form Code #
Here is the full code of the above example form:
[uacf7-row][uacf7-col col:6]
[text* first-name placeholder "First Name"]
[/uacf7-col][uacf7-col col:6]
[text* second-name placeholder "Second Name"]
[/uacf7-col][/uacf7-row]

[uacf7-row]
[uacf7-col col:12]
[email* email-subscribe placeholder "Enter Your Email"]
[/uacf7-col]
[uacf7-col col:12]
[submit "subscribe"]
[/uacf7-col]
[/uacf7-row]
Still Not Clear? Please contact us. If you are a free User, you can open a ticket from here. If you are a pro user, you can open a ticket from here.