In this article, we will try to explain how to set up Contact Form 7 Country Dropdown with Flag Easily with the help of our Free Addon “Country Dropdown Field”.
Watch Complete Video #
If you need further guidance, watch our video tutorial. It walks you through the entire process of creating a Contact Form 7 country list form step-by-step:

What’s needed #
- Ensure that both Contact Form 7 and Ultra Addons for Contact Form 7 are installed on your WordPress site.
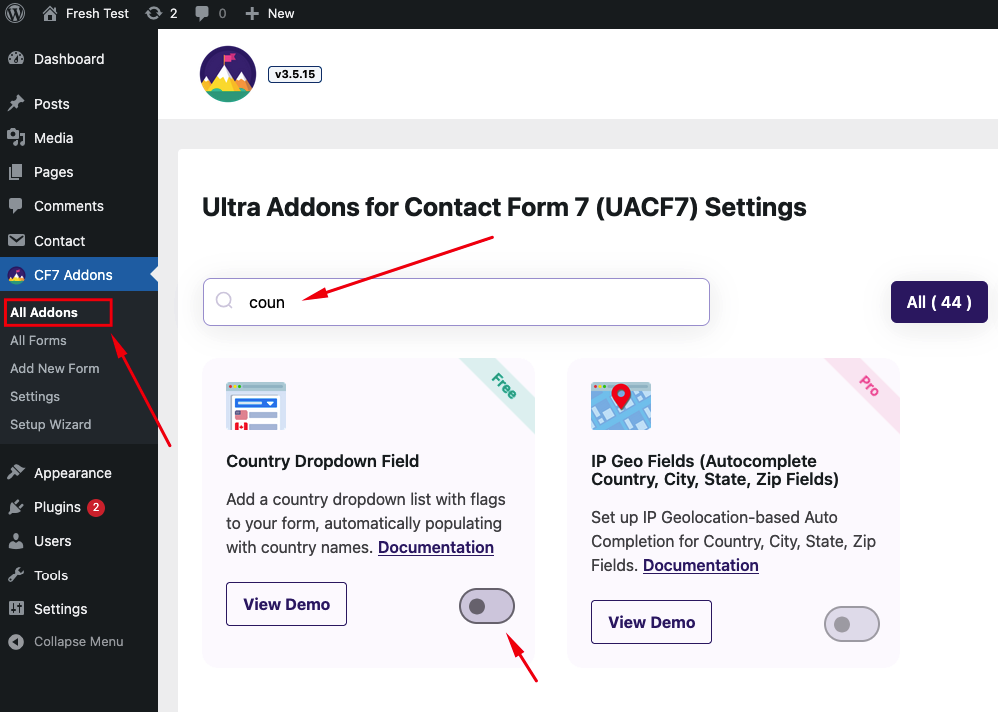
- Navigate to the Ultra Addons section in your WordPress Dashboard, and enable the “Country Dropdown Field” checkbox/toggle.
What is Contact Form 7 Country Dropdown field? #
The Contact Form 7 Country Dropdown Field is a feature that allows you to easily add a dropdown list of countries to your contact forms. This dropdown can be used to let users select their country from a predefined list, enhancing the user experience by providing a convenient way to enter location information.
Live Example of a Country List Form #
In this tutorial, we’ll create a Contact Form 7 with a country dropdown, similar to the example below. Follow these steps to create your own form.
Visit our main demo to see all the supported fields for the Contact Form 7 Country Dropdown field.
Creating a Contact Form 7 Country Dropdown with Flags #
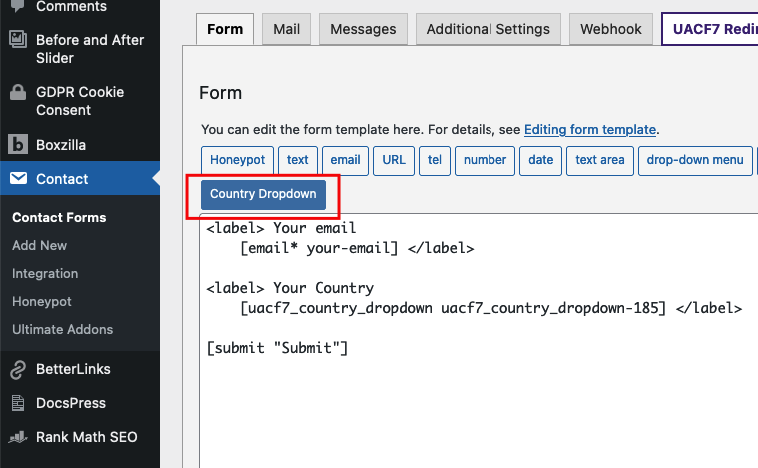
Go to Contact -> Add New in your WordPress Dashboard to create a new form. You will see a contact form editor with a “Country Dropdown” button.
Choose your Country List #
Click on the “Country Dropdown” button. This will give you options to add a list of countries to your contact form.
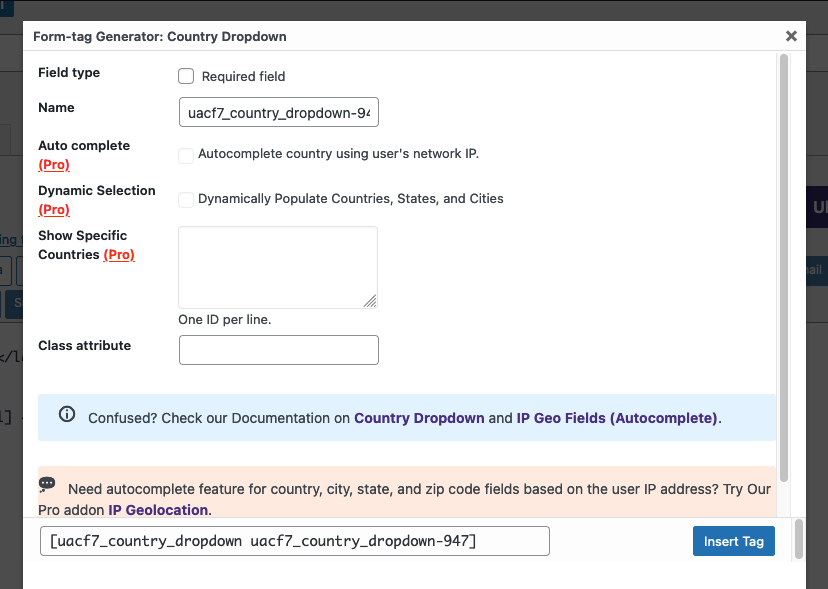
On the popup settings panel, you’ll find the following options:
- Field Type: Decide if this dropdown should be a required field. Check the box if you want to make it required.
- Name: This field is auto-generated, but you can rename it to suit your needs.
- Auto Complete, Only Countries, Default Country: These are Pro features. If you upgrade, the system can automatically detect the user’s location via IP and fill in the country name.
- Class Attribute: Add a custom class if needed.
Insert Tag #
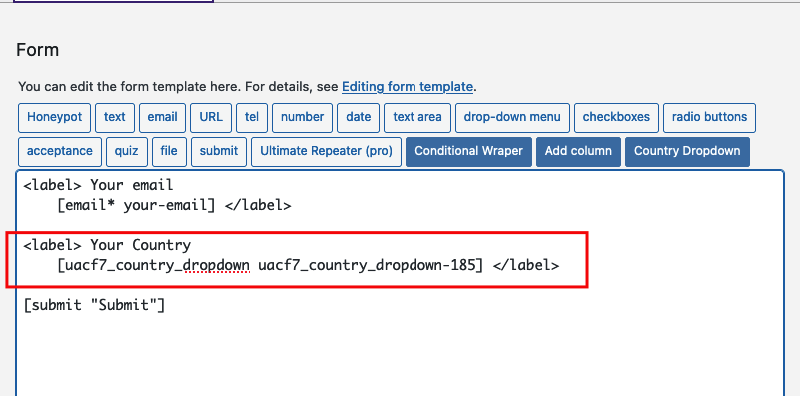
Click the “Insert Tag” button, and the tag will be added to your editing panel.
Add other fields (if needed) #
We are almost done. You can add additional fields like name, email, or URL as needed.
Mail Setup #
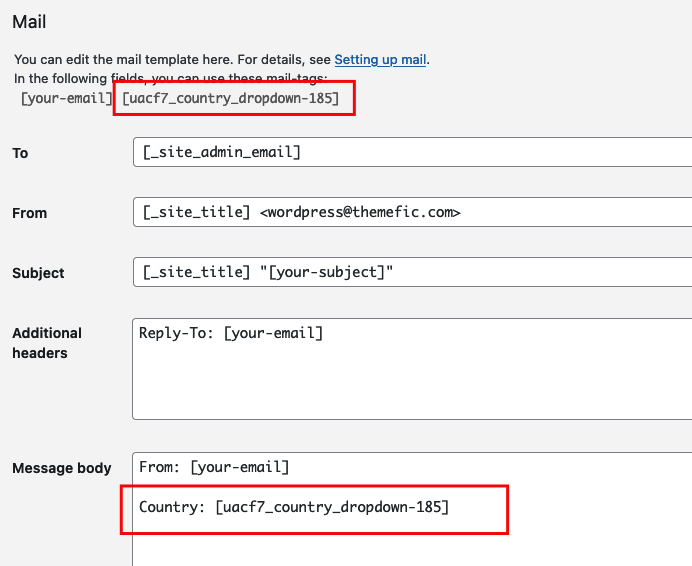
After adding all the necessary fields, ensure you properly set up the mail tags to receive the country information via email:
- Click the Mail tab in the form editor.
- Enter the email address where you want to receive submissions in the “To” box.
- Copy the Country Dropdown Tag from the suggested mail tags and place it inside the message body.
- Make sure to include tags for all other fields as well.
Copy the Shortcode #
Your form is now ready. Click “Save” and copy the Contact Form shortcode.

Time to Publish #
Paste the shortcode into your desired Pages, Posts, Custom Post Types, or Sidebars. The result should look like the example form above.
Looking for Autocomplete Country, City, State, Zip Fields? #
UACF7 Pro version’s Autocomplete Addon allows you to set IP Geolocation-based Country, City, State, and Zip fields on Contact Form 7. These fields will automatically complete based on the user’s IP address. You can also select specific countries and set a default country in the dropdown. Check out our live demo to see this feature in action.
Full Form Code #
Here is a sample code of our above form:
<label> Your email
[email* your-email] </label>

<label> Your Country
[uacf7_country_dropdown* uacf7_country_dropdown-70] </label>

<label> Your message (optional)
[textarea your-message] </label>

[submit "Submit"]
Still Not Clear? Please contact us. If you are a free User, you can open a ticket from here. If you are a pro user, you can open a ticket from here.

Hi, could you add the option to edit/translate the “Select a Country” text showing up frontend with the dropdown ?
Hello Jul, Thank you for bringing this to our attention. I have taken note of this and forwarded this to the dev team for resolution.
Hi, thank a lot. We tried translating the string with our polylang plugin but it’s not found. Any idea if you can fix this easily with next release ?
Hello Jul, this solution will be released on the next update.