Framer gives you total design freedom. Shopify gives you the most trusted checkout in eCommerce. The problem has always been getting the two to work together without hiring a developer or wrestling with the Shopify API.
This guide shows you exactly how to integrate Shopify with Framer, sync your products into Framer CMS, and keep Shopify’s secure checkout intact. There is no custom code to write, no manual product copying, and no weeks of setup. Whether you are a seasoned Framer designer or someone launching your first online store, you will be able to follow along. By the end, you will have a fully working headless Shopify storefront running on a Framer site.
Why Integrate Shopify with Framer?
Shopify is one of the most powerful eCommerce backends available, but its default themes limit how far you can push your design. Framer is one of the fastest no-code website builders for creating custom, high-converting layouts, but it was never built to manage inventory, orders, or payments.
Connecting the two gives you the best of both platforms:
- Full design control. Build any product page, hero section, or storefront layout you can imagine in Framer, with no theme restrictions.
- A trusted eCommerce backend. Keep managing products, inventory, orders, and checkout inside Shopify, the platform you already know.
- Better performance and SEO. A clean Framer frontend gives you faster load times and full control over on-page SEO, which search engines reward.
- A headless setup without the cost. You get the benefits of headless commerce (a separate frontend and backend) without the usual API complexity or developer fees.
In plain terms: you design in Framer and sell through Shopify. Your customers get a beautiful storefront and a secure, familiar checkout, and you get a store that finally looks the way you want.
What Is a Headless Shopify Store? (For Non-Technical Readers)
You will see the word “headless” a lot in this space, so here is a simple explanation.
A normal Shopify store uses one system for everything: the design, the product data, and the checkout all live inside Shopify. A headless store splits that into two parts. Shopify still handles the “body” of your store (products, inventory, payments, orders), while a separate tool handles the “head,” which is the part your customers actually see and interact with.
In this setup, Framer becomes the head. It controls how your store looks and feels. Shopify stays as the engine running quietly in the background. The integration tool is simply the bridge that keeps the two talking to each other. That bridge is what this guide is about.
The Old Way vs. The Easy Way
Before dedicated tools existed, integrating Shopify with Framer meant one of three painful routes:
- Custom Storefront API code. Powerful and flexible, but you need a developer to build it and someone to maintain it over time.
- Iframe embeds. Quick to drop in, but they break your design, load slowly, and hurt your SEO.
- Manual product entry. Copying every product by hand into Framer, then re-copying it every single time a price or detail changes.
None of these are ideal, especially if you are a designer or store owner rather than a backend engineer. The modern approach is a purpose-built Framer plugin that handles the connection for you. That is exactly what Connectfic does.
Here is how the three approaches compare:
| Approach | Coding required | Keeps Shopify checkout | Auto product sync | SEO friendly | Setup time |
|---|---|---|---|---|---|
| Custom Storefront API | Yes, developer needed | Depends on build | Only if custom-built | Depends on build | Days to weeks |
| Iframe embed | Minimal | Yes | No | Poor | Minutes, but low quality |
| Manual entry | No | Yes | No | Good | Hours, and ongoing |
| Connectfic plugin | No | Yes | Yes | Yes | Under an hour |
Meet Connectfic: The No-Code Bridge Between Shopify and Framer
Connectfic is a Framer plugin built by Framefic that connects your Framer website directly to your Shopify store. It lets you use Framer for design and Shopify for eCommerce management, all from one simple setup inside Framer.
Here is what it handles for you:
- Framer to Shopify integration so your Framer site and Shopify store work together as one connected system.
- Product syncing that pulls your Shopify products into Framer and keeps them updated over time.
- Advanced field mapping so you control exactly how each piece of Shopify data lands in your Framer CMS.
- SEO metadata support that carries over your meta titles, meta descriptions, and other SEO settings during the sync.
- Inventory syncing to keep stock levels accurate across both platforms.
- Shopify checkout support so customers pay through Shopify’s reliable, secure checkout.
- Real-time component updates that refresh your storefront automatically whenever products change.
- A storefront component library with ready-to-use product grids, galleries, add-to-cart panels, and more.
Now let’s walk through the actual integration, one clear step at a time.
Before You Start: What You Need
Gather these three things before you begin. Having them ready makes the whole process smooth.
- A Shopify store. Any Shopify plan works, including the Basic plan. If you are just testing, a Shopify trial store is fine to start with, though you will need a paid plan to sell for real.
- A Framer project. This can be a brand new site or an existing one you want to add a shop to.
- Around 30 to 60 minutes. That is all it takes for a first setup, even if you have never done this before.
You do not need any coding knowledge, a developer, or a design background. If you can drag a box and click a button in Framer, you can complete this.
How to Integrate Shopify with Framer: Step by Step
Follow these steps to connect your Shopify store to Framer and go live.
Step 1: Add the Connectfic Plugin to Framer
Open your Framer project and go to the plugins area, usually found in the top toolbar or the insert menu. Search for Connectfic in the Framer Marketplace and install it. Once it is installed, click to launch the plugin from inside your project. A panel will open where all the connection steps happen.
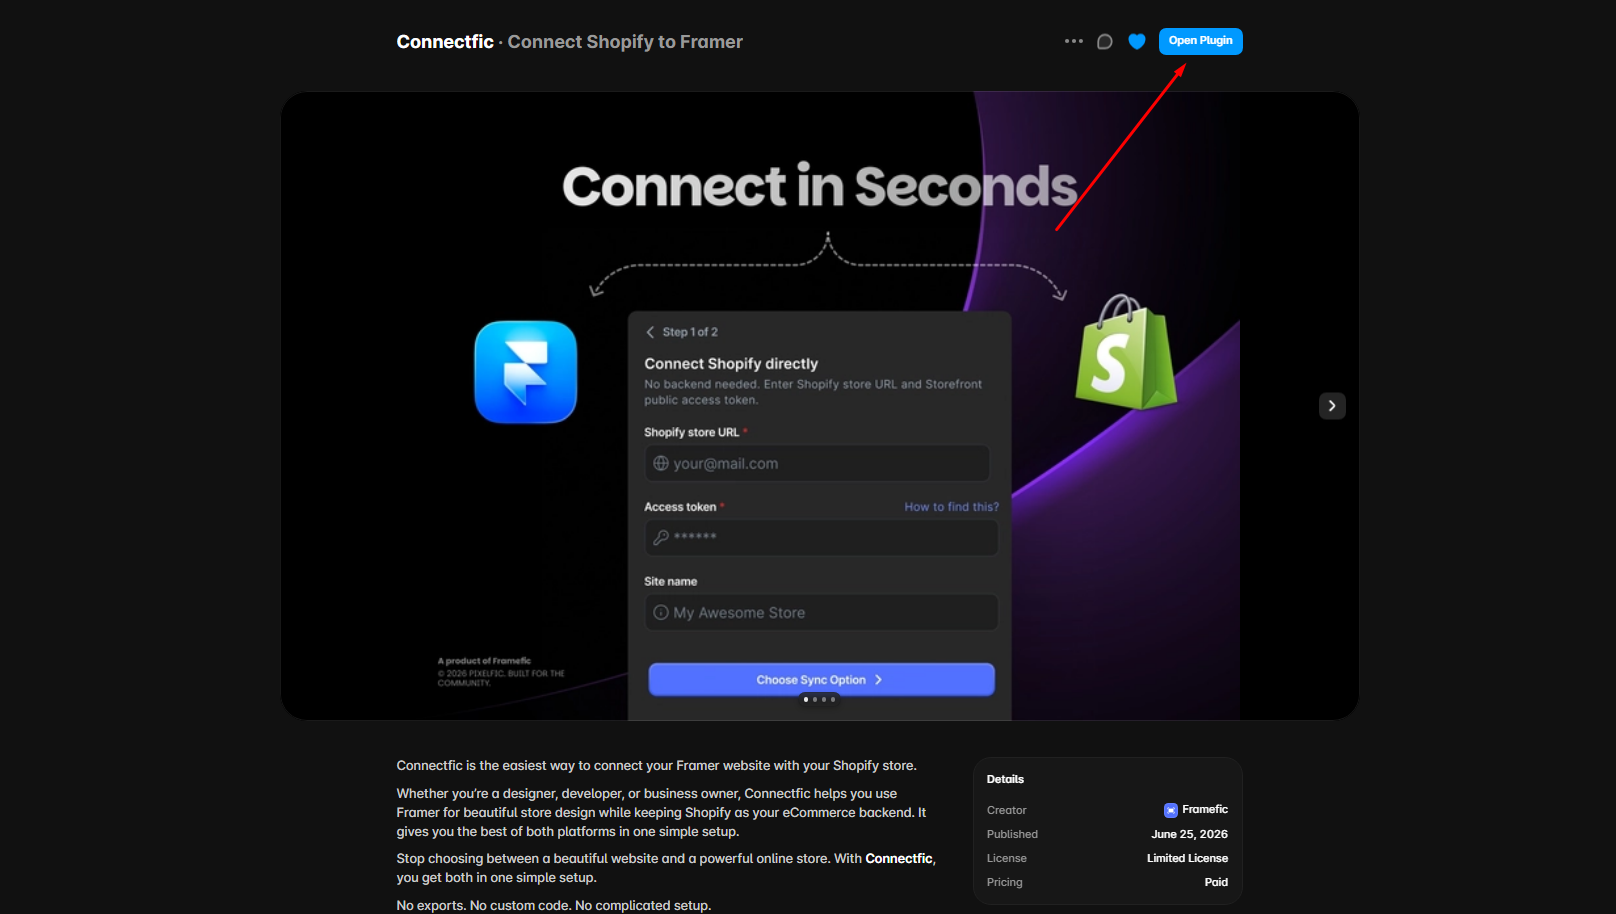
Step 2: Connect Your Shopify Store
Inside the Connectfic panel, choose the option to connect a store, then follow the on-screen prompts to link your Shopify account. Connectfic uses this connection to safely read your product catalog, inventory levels, and checkout details from Shopify.
You only need to connect a store once. If you run more than one Shopify store, Connectfic lets you connect multiple stores to the same Framer site, which is especially useful for agencies managing several clients.
What this means for non-technical users: this step is like giving Framer permission to view your Shopify products, similar to how one app asks to connect to another. Your login and payment data stay safe inside Shopify. Framer never takes over your store, it simply reads from it.
Step 3: Choose Where Your Products Will Live in Framer
Framer organizes content in something called a CMS collection. A CMS collection is just a smart, structured list, in this case a list that will hold all your products. Every product becomes one entry, and each entry has fields like name, price, and image.
In the plugin, select the CMS collection you want to use for your Shopify products. You can pick an existing collection or create a fresh one dedicated to your store. If you are new to Framer, creating a new collection called something like “Products” or “Shop” keeps things tidy.
What this means for non-technical users: imagine a spreadsheet where each row is a product and each column is a detail like price or image. That is what a CMS collection is. You are just telling Connectfic which spreadsheet to fill.
Step 4: Map Your Shopify Fields to Framer Fields
This is the step that gives you real control, so it is worth a moment of attention. Every product in Shopify has pieces of information: a title, a price, images, variants (like size or color), a description, and SEO details. Framer has matching fields waiting to receive them.
Field mapping simply means connecting each Shopify piece to the correct Framer field, so the price goes into the price field, the image goes into the image field, and so on. Connectfic’s advanced mapping lets you line these up exactly the way you want, including your SEO metadata so your search rankings carry over.
What this means for non-technical users: picture two lists side by side. On the left is your Shopify data, on the right is your Framer store. You are drawing lines between them so everything ends up in the right spot. Connectfic guides you through it, and most fields match up automatically.
Step 5: Import Your Products
Once your fields are mapped, run the import. Connectfic pulls your Shopify products into your Framer CMS collection instantly. Your entire catalog populates in one go, ready to be displayed. There is no copying, no exporting spreadsheets, and no re-typing product details.
What this means for non-technical users: press the button and watch your products appear inside Framer automatically. What used to take hours of manual work now happens in seconds.
Step 6: Turn On Auto-Sync
Products change. Prices go up, items sell out, new arrivals get added. Instead of updating everything twice, turn on Auto-Sync in Connectfic. From now on, any change you make in Shopify flows through to your Framer site on its own. New products appear, price updates reflect, and inventory stays accurate, all without you lifting a finger.
What this means for non-technical users: this is the “set it and forget it” step. You keep working in Shopify the way you always have, and your Framer store keeps itself up to date in the background.
Step 7: Build Your Storefront with Ready-Made Components
Now the fun part. Connectfic includes a library of pre-built storefront blocks so you do not have to design everything from scratch. Drag them onto your page and they automatically connect to your synced products. The library includes:
- Product hero sections
- Dynamic product grids
- Product cards and grid items
- Product galleries
- Add-to-cart panels
- Product details sections
- Price and stock badges
Style each one to match your brand: change the fonts, colors, spacing, and layout until it looks exactly right. Because these components pull from your live Shopify data, they always show the correct, current information.
What this means for non-technical users: these are like furniture pieces for your store. You drop them in, arrange them how you like, and they come pre-wired to show your real products. No assembly instructions required.
Step 8: Connect Checkout and Publish Your Store
Finally, link your add-to-cart and buy buttons to Shopify’s checkout. This is the moment where a browsing visitor becomes a paying customer. Because payment runs through Shopify, your customers get the secure, familiar checkout they already trust, and you get reliable order handling on the Shopify side.
Before you announce your store, test the full journey yourself: browse a product, add it to the cart, and complete a real checkout. When everything works, hit publish in Framer and your store is live.
What this means for non-technical users: the checkout is handled by Shopify, the experts in payments, so you never have to worry about the security or reliability of taking money. You just design the storefront around it.
That’s it. You now have a headless Shopify storefront running on Framer, syncing automatically and taking real orders.
Troubleshooting Common Issues
A few quick fixes for the most common first-time hiccups:
- Products are not showing up. Double-check that your import finished and that your Framer CMS collection is the same one your product components point to.
- A field looks empty or wrong. Revisit your field mapping in Step 4. An empty price or image usually means that field was not mapped correctly.
- Changes in Shopify are not appearing. Confirm that Auto-Sync is turned on. If it is, give it a moment, since syncs can take a short time to process.
- Checkout is not opening. Make sure your add-to-cart or buy button is connected to the Shopify checkout action, not just linked as a normal button.
Who Should Use This Integration?
Connecting Shopify to Framer with Connectfic is a strong fit for:
- Framer designers who want to build custom Shopify storefronts without touching code.
- Shopify store owners who feel boxed in by standard themes and want a more flexible, on-brand frontend.
- Agencies building headless eCommerce sites for multiple clients at scale.
- First-time store builders who want a professional storefront without learning to code.
SEO Tips for Your Framer Shopify Store
A headless Framer storefront can outperform a standard Shopify theme on SEO if you set it up right:
- Sync your SEO metadata. Connectfic carries over meta titles and meta descriptions, so map those fields carefully in Step 4.
- Write unique product descriptions. Avoid duplicate manufacturer copy and give each product page original content.
- Optimize your images. Compress product photos and add descriptive alt text in Framer so they load fast and rank in image search.
- Use clean URLs. Keep product and collection slugs short and keyword-relevant.
- Add structured data. Include product schema so search engines can show rich results like price and availability.
- Keep pages fast. Framer is quick by default, so keep your components lean to hold that speed advantage.
Frequently Asked Questions
Can you connect Shopify to Framer without code? Yes. With a plugin like Connectfic, you can integrate Shopify with Framer entirely without writing code. The plugin handles product syncing, field mapping, and checkout for you.
Do I need a developer to set this up? No. The whole process is designed for non-technical users. If you can use Framer’s drag-and-drop editor, you can complete the integration on your own.
Does the integration keep Shopify checkout? Yes. Connectfic uses Shopify’s own checkout, so customers complete purchases through Shopify’s secure and trusted payment flow while browsing your Framer-designed storefront.
Will my products stay in sync automatically? Yes. With Auto-Sync enabled, changes to products, prices, and inventory in Shopify update on your Framer site automatically, and Connectfic’s components refresh in real time.
Can I connect more than one Shopify store? Yes. Connectfic supports connecting multiple Shopify stores to a single Framer site, which is ideal for agencies and multi-brand businesses.
Which Shopify plan do I need? Any Shopify plan works, including the Basic plan. You can start building on a trial store, then move to a paid plan when you are ready to sell.
Final Thoughts
Integrating Shopify with Framer used to mean choosing between a beautiful website and a powerful store. That trade-off is gone. With Connectfic, you design freely in Framer, manage everything in Shopify, and keep both perfectly in sync, whether you are a developer or someone building a store for the very first time.
If you have been waiting for a clean, no-code way to build a headless Shopify store on Framer, this is it. Add Connectfic to your Framer project, connect your store, and launch a storefront that looks exactly how you want while selling through the checkout your customers already trust.
Get Connectfic on the Framer Marketplace
Help us grow by sharing this Post!